


Recipe courtesy of Amanda Rettke
Recipe courtesy of Amanda Rettke
Watch how to make this recipe.
Candy Corn Hi-Hat Cupcakes
Getting reviews...
- Level: Intermediate
- Total: 2 hr 45 min (includes setting and cooling times)
- Active: 55 min
- Yield: 24 cupcakes
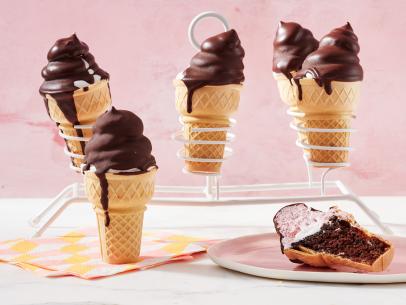
Hi-hat cupcakes are one of the most beautiful and decadent ways to enjoy a cupcake; while they can seem intimidating, they are actually very easy to make. I am a big fan of surprise-inside treats and my cupcakes are no exception. These hat cupcakes hide a sweet fall-inspired surprise that replicates the colors of candy corn.
- Level: Intermediate
- Total: 2 hr 45 min (includes setting and cooling times)
- Active: 55 min
- Yield: 24 cupcakes
Ingredients
Directions
Special equipment:
3 disposable pastry bags or resealable plastic bags- Prepare and bake the cupcakes according to the recipe directions. Allow to cool.
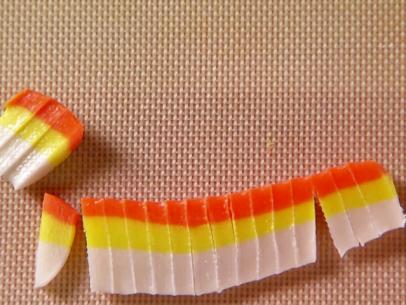
- Prepare the buttercream and equally divide into two bowls. Add the yellow food coloring to one bowl and mix until fully combined; set aside. Take the other bowl and equally divide again (into two bowls of frosting). One bowl should be tinted orange; the other should remain white.
- When ready to assemble, place the frostings into plastic disposable pastry bags (or resealable plastic bags). Starting with the yellow frosting, cut about 2 inches from the tip of the bag and pipe out a circle on top of a cupcake. Fill in any holes so that the frosting is even and level. Do this to all of the cupcakes.
- Next, grab your orange frosting and cut off approximately 2 inches from the tip of the bag. Pipe out a smaller circle on top of the yellow frosting. Repeat on all cupcakes. You should now have the yellow and orange layers done.
- Finally, grab your white frosting and cut off approximately 2 inches from the tip of the bag. Pipe a dollop of frosting and then pull your hand up quickly and release pressure. This should create a nice pointed tip at the top of your cupcake. Repeat this on the remaining cupcakes. Put the cupcakes in the fridge for about an hour, or until they have had a chance to set.
- After the cupcakes have chilled, prepare your chocolate coating: Place the chocolate and shortening in a microwave-safe bowl and set in the microwave for one minute, then remove and stir. If the chocolate is not completely melted, place back in the microwave for 15 seconds. Remove and stir until melted and smooth. Pour the chocolate into a drinking glass, one with a mouth wide enough for you to invert the cupcakes into. Let cool about 15 minutes.
- Remove the cupcakes from the fridge. Pick up one cupcake and dip it frosting-side down into the chocolate, going all the way to the top of the cupcake liner. Lift up and let the excess drip off, then set the cupcake on a cookie sheet. Repeat this with the remaining cupcakes. Allow the chocolate to harden, which only takes a few minutes. Serve and enjoy the excited faces of the lucky recipients.
Looking for Something Else?


Related Pages
- No-Bake Frozen S'mores Cheesecake Recipe
- Naked Chocolate Cake Recipe
- Apple Cinnamon Layer Cake with Gooey Caramel...
- Blueberry-Coconut Breakfast Cookies Recipe
- Pumpkin Caramel Skillet Cake with Maple Glaze...
- Naked Pumpkin Cake with Cinnamon Buttercream...
- Raspberry and Chocolate Hi-Hat Cupcakes Recipe
- Confetti Monkey Bread Recipe
- Olympic-Ring Pancakes Recipe