Recipe courtesy of Jacques Torres
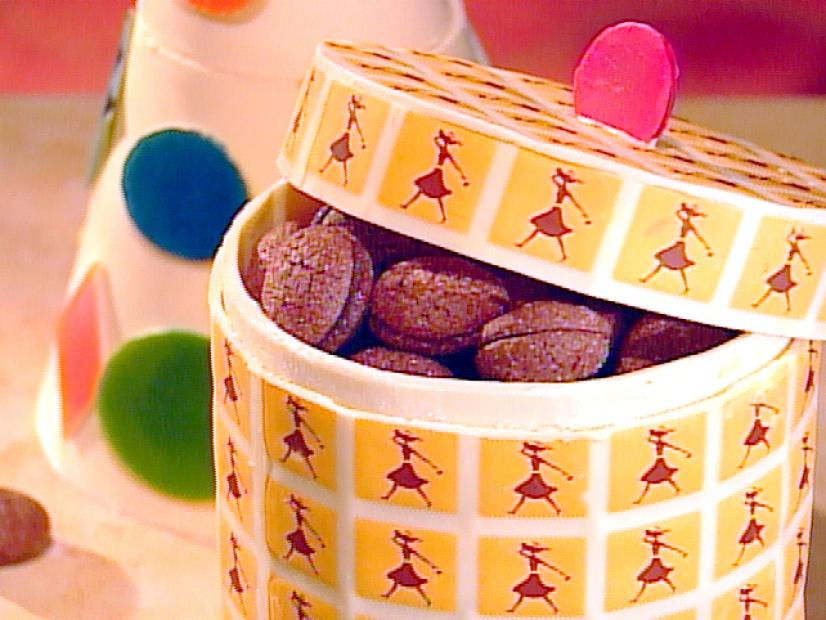
Chocolate Cookie Jars
Getting reviews...
- Level: Advanced
- Total: 2 hr
- Prep: 2 hr
- Yield: 2 cookie jars
- Level: Advanced
- Total: 2 hr
- Prep: 2 hr
- Yield: 2 cookie jars
Ingredients
Directions
- To make the round cookie jar: I used a tall round container that was about 7 inches in diameter as a guide for this shape. Cover the container with parchment paper and tape it closed but do not tape the parchment to the container. Cut a transfer sheet that is 9 1/2 inches wide and 21 inches long. Use an offset spatula to spread a 1/8-inch thick layer of white chocolate onto the transfer sheet. Let the chocolate set until firm yet pliable but not hard. Turn the acetate so the long side is facing you. Lay the container vertically on top of the chocolate and roll the transfer sheet around the container until the ends meet. Use tape to keep it closed. Place it in the refrigerator and allow the chocolate to set completely. When set, remove from the refrigerator. Lift the container from the center of the cookie jar. Remove the parchment paper and the transfer sheet. Rewrap the container in parchment for the next step. Make the lid: Use an offset spatula to spread 1/8-inch thick layer of white chocolate onto the transfer sheet. Use a sharp paring knife to trace around a cardboard cake round to make a 7-inch diameter circle. Let the chocolate set until firm. When the chocolate has set, peel off the transfer sheet. Use a hot knife to trim the top inch off the top of the cookie jar. Use a hot serrated chef's knife to cut through the chocolate. Heat the knife under very hot water and wipe it dry. Hold the knife blade against the side of the chocolate where you want to make the cut. Do not press on the knife or the chocolate will break. Allow the heat of the knife to "cut" through the chocolate by melting it. Use a gentle sawing motion to encourage the knife through the chocolate. Invert the lid so the pattern side is down. Use tempered chocolate to adhere the trim to the circle by resting the trim on top of the circle. Let the chocolate set.
- Make the base and the handle: Use an offset spatula to spread 1/8-inch thick layer of white chocolate onto a piece of acetate. Rest the cookie jar on top of the wet chocolate. Use a sharp paring knife to trace around the cookie jar. Use a 1-inch round cutter to cut a round handle in the chocolate. When the chocolate is set, remove the excess chocolate. Set the handle aside. Use the knife to trim around the base of the cookie jar, if necessary. Let the chocolate set completely and the base will be automatically secured to the bottom of the jar. Paint the handle and adhere it to the jar: If you want to paint the handle, mix together a few tablespoons of the cocoa butter with a small amount of powdered food color. It will be easier if you use a yogurt machine to store and warm your paints. Place the paint in the airbrush, simply place a few drops of color in the receptacle of the airbrush and paint the handle, as you are inspired. If you do not have an airbrush, you can use a paintbrush to paint the decorations, applying color where you are inspired to do so. Use a hot knife to cut the bottom third of the circle to create a straight edge. Dip this edge in tempered chocolate and adhere to the cookie jar lid. Allow the chocolate to set. Make the reinforcement for the top of the jar: Use an offset spatula to spread a 1/8-inch-thick layer of tempered chocolate over a sheet of acetate (this does not have to be a transfer sheet). Use a sharp paring knife to cut a piece that is 3 inches wide and 20 inches long. Position this piece with the wet chocolate side touching the inside of the cookie jar so it is just inside and protruding about 1/4-inch above the rim of the jar. The finished lid will rest around the piece. When the chocolate has set, peel off the acetate sheet. Fill the cookie jar with cookies. Place the lid on top. Voila! Make the Clown Hat cookie jar: Make a cone out of a sheet of acetate securing it closed with tape. Use a scissor to trim the edge of the cone so the end is straight. The cone I made was about 15-inches tall with an opening diameter of 7 1/2 inches. Use a ladle to fill the cone with white chocolate. When it is full, empty it into the bowl of chocolate. The inside of the cone should be evenly coated with chocolate. You may need to repeat this step 1 more time so the cone is a good 1/4-inch thick. Wipe the bottom of the cone on the edge of the bowl and place it upside down on a wire rack placed over a baking sheet. Once the chocolate starts to harden, about 5 minutes, scrape the edge of the cone clean with a paring knife. You can place the cone in the refrigerator for several minutes to help the chocolate to harden. Set the cones aside.
- Cut the cookie jar: Tip: Choose a support like a tin can that is the height of the cut you want to make. Use the support as a guide to help you make a straight cut. Use a hot serrated chef's knife to cut through the top third of the cone. Tip: Make sure you cut far enough into the cone to create an opening large enough to accommodate your hand! To make the cut, heat a serrated knife under very hot water and wipe it dry. Hold the knife blade against the side of the chocolate where you want to make the cut. Do not press on the knife or the chocolate will break. Allow the heat of the knife to "cut" through the chocolate by melting it. Use a gentle sawing motion to encourage the knife through the chocolate. Make the base: Use an offset spatula to spread 1/8-inch thick layer of white chocolate onto a piece of acetate. Rest the cookie jar on top of the wet chocolate. Use a sharp paring knife to trace around the cookie jar. When the chocolate is set, remove the excess chocolate and use the knife to trim, if necessary. Let the chocolate set completely and the base will be automatically secured to the bottom of the jar. Make the decorations: Use an offset spatula to spread a 1/8-inch thick layer of white chocolate onto a sheet of acetate. Let the chocolate set until firm yet pliable but not hard. Use cookie cutters, round cutters or a paring knife to cut shapes like triangles and circles into the chocolate. When the chocolate sets, remove the acetate and set aside the shapes. Make the round ball: Use a plastic dome mold that is about 1 1/4-inch deep and 3-inches in diameter. Use a ladle to fill a mold with chocolate. When it is full, empty it into the bowl of chocolate. The inside of the mold should be evenly coated with chocolate. Wipe the edge of the mold clean on the side of the bowl and place it upside down on a wire rack placed over a baking sheet. Once the chocolate starts to harden, about 5 minutes, scrape the edge clean with a paring knife. When the chocolate sets, it shrinks or retracts from the sides of the mold. A clean edge will keep it from sticking and cracking as it shrinks. You can place the mold in the refrigerator for several minutes to help the chocolate to harden. Use tempered chocolate to glue the dome halves together to form a ball. Use a hot cutter to create a hole in the ball so the ball will sit at the tip of the cone. Paint the decorations: If you want to paint the chocolate, mix together a few tablespoons of the cocoa butter with a small amount of powdered food color. It will be easier if you use a yogurt machine to store and warm your paints. Place the paint in the airbrush, simply place a few drops of color in the receptacle of the airbrush and decorate, as you are inspired. If you do not have an airbrush, you can use a paintbrush to paint the decorations, applying color where you are inspired to do so. Use tempered chocolate to adhere the painted decorations to the outside of the cookie jar. SOURCE: Chocolate Melter: Demarle New Jersey, Demarle.com Chocolate Cold Spray: PCB Creations in France 011 33 0388 587333 Transfer sheets: PCB Creations, Beryls Dome mold