


Recipe courtesy of Jacques Torres
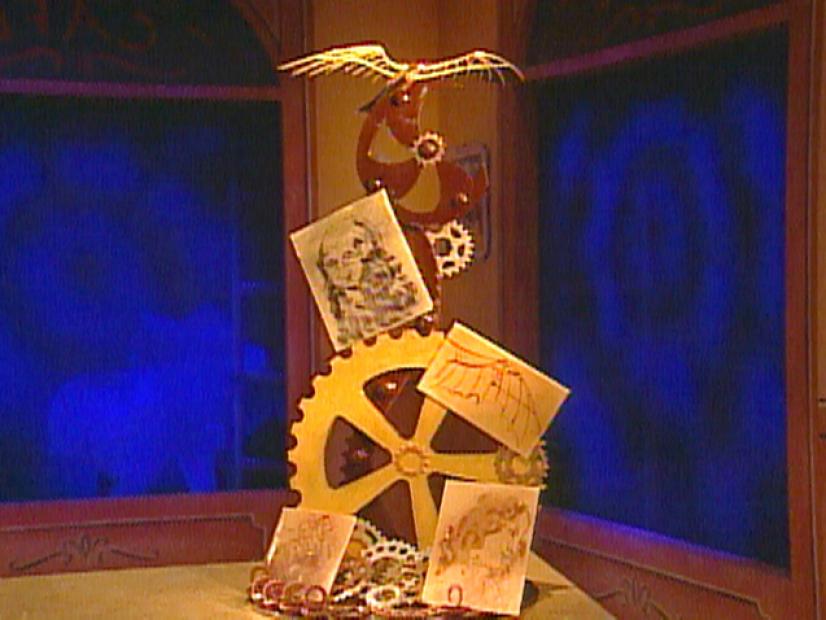
Divinely Divinci
Getting reviews...
- Level: Intermediate
- Total: 4 hr
- Prep: 4 hr
- Yield: 1 centerpiece
- Level: Intermediate
- Total: 4 hr
- Prep: 4 hr
- Yield: 1 centerpiece
Ingredients
Directions
- This centerpiece is about inspiration and this recipe is about techniques you can use to make the molds and templates for the centerpiece that you design. This recipe will give approximate measures and ideas but this is not an exact recipe for the exact centerpiece I made. You can make molds or templates. If you make molds, use the Elastack material to create a mold for virtually any shape of an item made from virtually any relatively heat-proof material. For templates, draw the design onto poster board or foam board and use an X-acto knife to cut the design from the board. Make the molds: Place the Elastack molding material in a saucepan over medium heat until melted. Use metal rulers to outline the mold that you would like to make. For my centerpiece, I used some bicycle gears with sprockets I bought at a bicycle repair store. The pieces ranged in diameter from 2 to 17 inches and I chose them for their unique shapes. Place the rulers on a parchment paper lined sheet pan, and place the item(s) to be molded in the center of that space. Pour the melted Elastack over the item to be molded until it is completely covered. Let this set for about 30 minutes until the Elastack hardens. When set, remove the original piece. Now the mold is ready to use.
- I made templates for a 30-inch tall, gear inspired support piece, a 16-inch gear with sprocket, the flying machine wings, back reinforcement and spine, and other gears. If using templates, use an offset spatula to spread a 1/4-inch-thick layer of tempered dark chocolate over a sheet of parchment paper. If the piece you will cut out is very tall, make a thicker layer so the chocolate will support the height. Remember, dark chocolate is stronger than white chocolate. It is also easier to work with a thicker layer if you use rulers to outline the overall perimeter of the space. Let the chocolate set slightly. Place the template on top of the chocolate and use a paring knife to trace around it. I used a pastry tip to cut half-circles from the edge of the chocolate support piece to make the sprockets (the notched part) of the gear. Use a larger round cutter on the larger gear piece to cut sprockets around the outside perimeter. Make these cuts before the chocolate sets. When the chocolate is set, peel off the parchment and save the excess chocolate for a future use. Use a paper cornet filled with white chocolate to fill the small gears in the Elastack mold. Use the same technique to fill the other gears using dark or white chocolate, as you are inspired. Unmold the gears when the chocolate has set.
- Make the rivet heads: Place tempered dark chocolate in a pastry bag and pipe chocolate into a flexible mini-dome mold pan. Fill the domes half full. When the chocolate sets, unmold. If you want to add the additional detail of the head of a screw, use the back of a hot knife to score the center of the dome. Make a base: Use flexible aluminum strips or very large cake ring to form a base. The base I made was 16 inches in diameter. Place it on a parchment paper lined surface. Pour tempered dark chocolate inside the ring to form a 1/2-inch-thick layer. When the chocolate has set, remove the ring and peel off the parchment paper. I painted the gears with luster dust and cocoa butter. If you use an airbrush, simply place a few drops of color in the receptacle of the airbrush and decorate, as you are inspired. Remember, luster dust comes in a large array of colors and metals so have fun with this! Make a transfer sheet: If you would like to recreate a painting or image from a book, tape the original image to the work surface. Place a piece of acetate over the image. Mix together a few tablespoons of the cocoa butter with a small amount of powdered food color and trace the image with a paintbrush. It will be easier if you use a yogurt machine to store and warm your paints. Use an airbrush to "antique" the painting. If you use an airbrush, simply place a few drops of color in the receptacle of the airbrush and paint, as you are inspired. When the paint had dried, use an offset spatula to spread a 1/4-inch-thick layer of tempered white chocolate over the acetate design. When the chocolate begins to set, use a sharp paring knife to trim the outside edge of the painting. When the chocolate sets, peel away the acetate and the image will be on the chocolate. You can use this technique to recreate any image. The results will be as good as your painting skills!
- Modeling chocolate is a great medium to use to create any number of things. I used it to make the support of Leonardo's flying machine. I rolled a piece that was about 3/8-inch in diameter and about 3 inches long. Using tempered chocolate as glue, I positioned the wings on either side of the spine and glued them together. The reinforcement support was glued to 1 side. I inverted this whole piece and glued the modeling chocolate spine to the center. To make white chocolate decorations: Fill a paper cornet with tempered white chocolate. Use a scissor to trim the tip to a fine point. Use the chocolate to draw any design on the wings of the flying machine. Assemble: Use a sharp knife to scar the base of the chocolate where the support will be attached. Using tempered dark chocolate as glue, attach the center support. Glue the gears onto the tall support as you are inspired to do so. Continue with the rivets and more gears. Position the paintings and attach, if necessary. Add the flying machine. Use a pastry brush to gloss with vegetable oil, if desired. Place the Chocolate Gear Tarts around the base of the centerpiece.