


Chocolate Gingerbread House
- Level: Advanced
- Total: 9 hr 10 min (includes chilling and setting time)
- Active: 3 hr 5 min
- Yield: one 6-by-7-inch house
- Level: Advanced
- Total: 9 hr 10 min (includes chilling and setting time)
- Active: 3 hr 5 min
- Yield: one 6-by-7-inch house
Ingredients
Gingerbread:
Royal Icing:
Decorations:
Directions
Special equipment:
3 sheets of stiff paper or 2 manila folders (split at the seam), scissors, a ruler and a pencil; a base for the house (you can find these at crafts stores or make one with stiff pieces of cardboard wrapped in aluminum foil); 3 small cans (for propping up the walls); 2 piping bags, one fitted with a small plain tip and the other fitted with a large plain tip- For the gingerbread: Sift together the flour, ginger, cinnamon, baking soda, nutmeg, salt and cloves into a large bowl. Set aside.
- Combine the butter, shortening, brown sugar and granulated sugar in the bowl of a stand mixer fitted with the paddle attachment. Beat on medium speed until light and fluffy, about 1 minute. Add the molasses, vanilla and egg and beat on medium until smooth, about 1 minute. Add the sifted flour mixture and mix on low speed until combined into a smooth dough, about 1 minute. Form the dough into a flat square, wrap in plastic wrap and refrigerate until just firm, at least 2 hours and up to overnight.
- Meanwhile, make templates for the gingerbread house. Gather 3 sheets of stiff paper or 2 manila folders (split at the seam), scissors, a ruler and a pencil. For the side panels, draw and cut out a rectangle that measures 4 by 7 inches. For the front and back panels of a house with a peaked roof, draw and cut out a template that is 6 inches wide at the base, 4 inches to the roofline and 4 1/2 inches slanted to a peak. The template for the roof panels should measure 4 1/2 by 8 inches.
- Preheat the oven to 300 degrees F. Line 3 baking sheets with parchment paper.
- Unwrap the dough and cut into 3 equal pieces (a pizza wheel is handy for this). Working with 1 piece of dough at a time and keeping the other pieces refrigerated, roll the dough into a rectangle 1/8 to 1/4 inch thick. Using the template, cut out the side panels and remove the scraps around the cutouts. Repeat with the remaining 2 pieces of dough, cutting out the front and back panels and 2 roof panels. If the dough gets too soft while rolling, return it to the refrigerator for 15 minutes before proceeding. (Discard the dough scraps or reroll to make cookies.) Chill the dough pieces on the prepared baking sheets for 15 minutes.
- Bake the dough pieces until crisp almost all the way through (the very center will still be a little soft), 30 to 35 minutes. Cool in the pans 10 minutes on a rack, then remove the house pieces to the rack to cool completely.
- For the royal icing: Combine the confectioners' sugar and meringue powder in a large bowl. Add the vanilla and 5 tablespoons water and beat on medium-high speed with an electric mixer, scraping down the sides of the bowl as necessary, until the icing forms thick and glossy peaks, about 2 minutes, adding up to 1 tablespoon more water if needed. Divide the icing between the 2 prepared piping bags (one fitted with a small plain tip and the other fitted with a large plain tip).
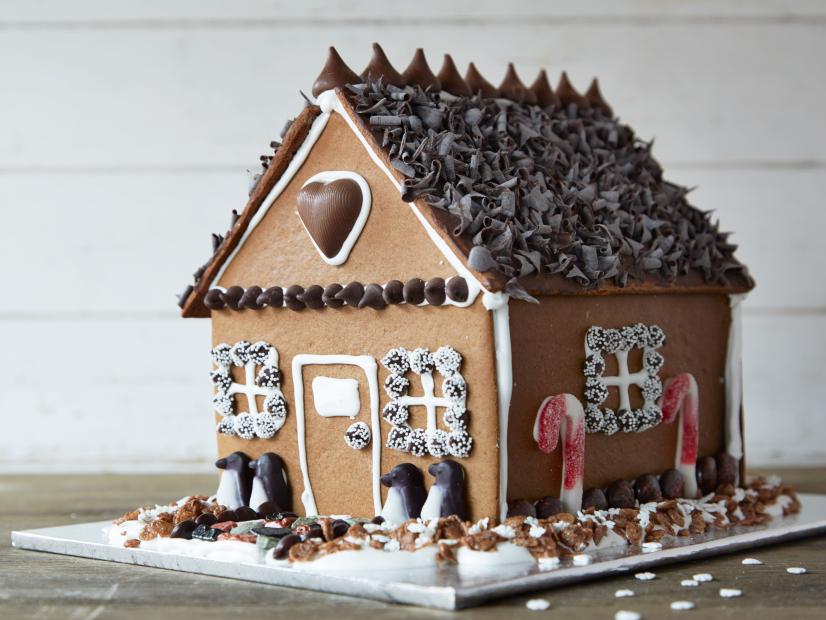
- Decorate the side panels: Using the piping bag fitted with a small tip, pipe icing to draw a window on 1 of the side panels; press nonpareils around the edges to line the window frame. Pipe icing onto the backs of 2 of the gummy candy canes and attach them on either side of the window. Attach a row of 8 of the chocolate-covered mints along the bottom by piping pea-size dots of icing onto the backs and pressing them on. Repeat with the second side panel. Let the panels rest until set, 30 minutes to 1 hour.
- Decorate the front panel: Using the piping bag fitted with a small tip, pipe a double line of icing across the front panel where the roof starts to incline; press on 13 of the chocolate chips. Pipe a large dot of icing onto the back of 1 of the chocolate hearts and attach it to the panel just above the line of chocolate chips; outline the heart with icing. Pipe icing to draw a door; attach a nonpareil with a dot of icing to make a doorknob. Pipe icing to draw 2 windows; line the windows with nonpareils. Pipe icing onto the backs of the gummy penguins and attach 2 on either side of the door. Let the panel rest until set, 30 minutes to 1 hour.
- Decorate the back panel: Using the piping bag fitted with a small tip, pipe a double line of icing across the back panel where the roof starts to incline; press on the remaining 13 chocolate chips. Pipe a large dot of icing onto the back of the remaining chocolate heart and attach it to the panel just above the line of chocolate chips; outline the heart with icing. Pipe icing to draw 2 windows; line the frames with nonpareils. Let the panel rest until set, 30 minutes to 1 hour.
- Decorate the roof panels: Pour half of the melted chocolate onto 1 of the roof panels; using an offset spatula, spread it to form a thin, even layer. Sprinkle the chocolate-coated roof panel with the chocolate curls. Repeat with the other roof panel. Refrigerate the panels for 15 minutes to let the chocolate set.
- Assemble the walls: Using the piping bag fitted with a large tip, pipe a 6-inch line of icing on the foil-wrapped base (this will be for the front of the house). Press the front panel into the icing and pipe a line of icing along the inside of the panel at the base to reinforce it. Prop up the front with a can. Pipe a 7-inch line of icing perpendicular to the front panel. Pipe icing up the edge of 1 of the side panels. Press the side panel into the icing on the base and against the edge of the front panel, creating a corner. Pipe a line of icing along the inside of the panel at the base to reinforce it. Prop up the side with a can. Repeat the process with the second side panel and the back panel. Let the house rest until the icing is firmly set, at least 1 hour.
- Attach the roof: Gently test the walls to make sure the icing is set. If they give, let the house rest until firm. (If you add the roof too soon, the house will collapse.) Once the walls are set, remove the cans. Using the piping bag fitted with a large tip, pipe icing along the angled roof edges on 1 side of the house. Pipe icing on the unfrosted side of 1 of the roof panels along the 2 short edges (where the roof will attach to the slanted edges of the house). Press the panel onto the house and hold it in place until the icing sets, about 5 minutes. Repeat with the other side and the remaining roof panel. Let the roof rest until completely dry, 30 minutes to 1 hour.
- Landscape the yard: Using the piping bag fitted with a large tip, pipe a rectangular icing walkway in front of the house; line the edges with the brown candy-coated chocolates and pave the middle with candy rocks. Pipe pea-size dots of icing onto the backs of the chocolate-covered raisins and press them in a row along the bottom of the back panel. Use the piping bag fitted with a large tip to pipe icing snowdrifts around the walkway and the base of the house. While the snowdrifts are still wet, sprinkle them with chocolate puffed cereal and snowflake sprinkles, pressing gently to help them adhere.
- Using the piping bag fitted with a large tip, pipe icing along the top seam of the house where the roof panels connect; line with a row of the chocolate kisses. Let the house rest until dry.
Cook’s Note
When measuring flour, we spoon it into a dry measuring cup and level off the excess. (Scooping directly from the bag compacts the flour, resulting in dry baked goods.)
Looking for Something Else?


Related Pages
- Gingerbread House Recipe
- Haunted Graham Cracker House Recipe
- Gingerbread for a Gingerbread House Recipe
- Witch's House Recipe
- Royal Icing for a Gingerbread House Recipe
- Salted Caramel Gingerbread House Recipe
- Caramel for a Gingerbread House Recipe
- Peppermint Gingerbread House Recipe
- Light-Up Gingerbread House Recipe