


Recipe courtesy of Food Network Kitchen
Recipe courtesy of Food Network Kitchen
Watch how to make this recipe.
Rainbow Bundt Cake
Getting reviews...
- Level: Intermediate
- Total: 3 hr (includes cooling and drying times)
- Active: 1 hr
- Yield: 10 to 12 servings
-
- Nutritional Analysis
- Per Serving
- Serving Size
- 1 of 12 servings
- Calories
- 592
- Total Fat
- 29 g
- Saturated Fat
- 17 g
- Carbohydrates
- 79 g
- Dietary Fiber
- 3 g
- Sugar
- 58 g
- Protein
- 5 g
- Cholesterol
- 103 mg
- Sodium
- 211 mg
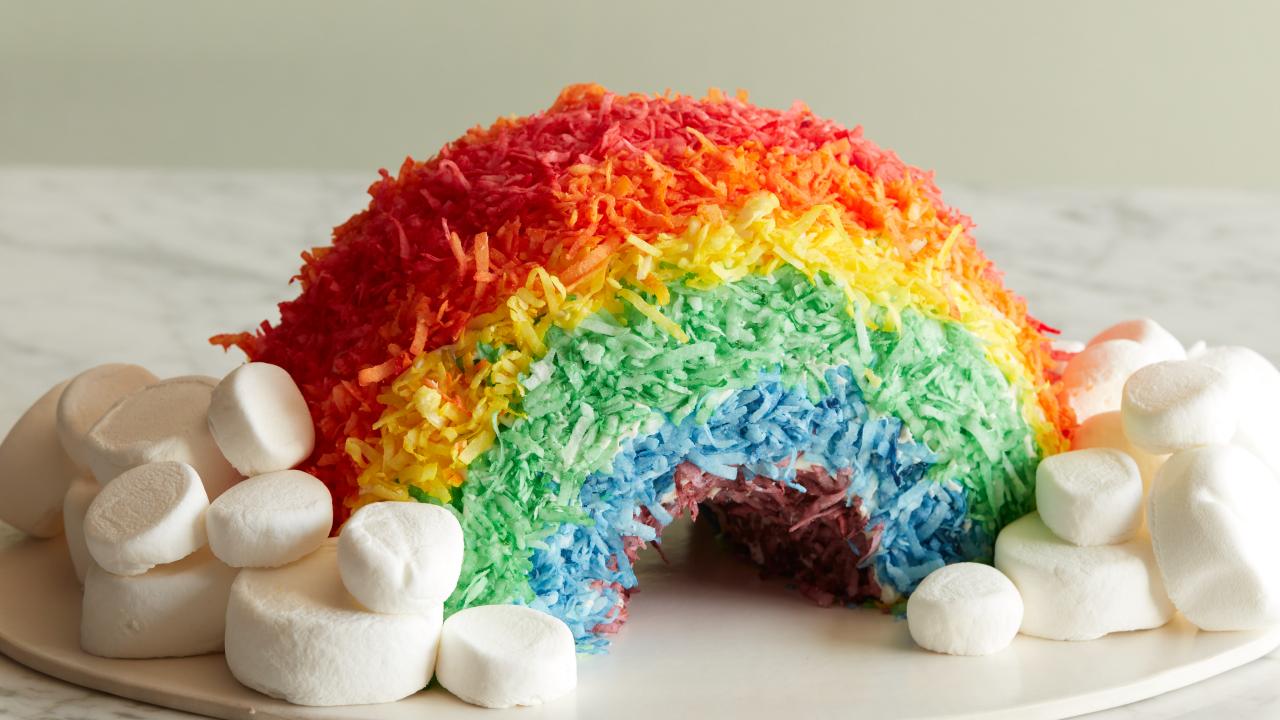
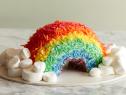
This whimsical rainbow cake doesn't require any special equipment -- just a simple Bundt pan. Dyed shredded coconut achieves those iconic ROYGBIV blocks of color -- so no painstaking decorating necessary.
- Level: Intermediate
- Total: 3 hr (includes cooling and drying times)
- Active: 1 hr
- Yield: 10 to 12 servings
-
- Nutritional Analysis
- Per Serving
- Serving Size
- 1 of 12 servings
- Calories
- 592
- Total Fat
- 29 g
- Saturated Fat
- 17 g
- Carbohydrates
- 79 g
- Dietary Fiber
- 3 g
- Sugar
- 58 g
- Protein
- 5 g
- Cholesterol
- 103 mg
- Sodium
- 211 mg
Ingredients
Directions
Special equipment:
a 12-cup Bundt pan- Position an oven rack in the lower third of the oven and preheat to 350 degrees F. Butter and flour a 12-cup bundt pan.
- Sift the flour and salt into a medium bowl. Whisk together the milk, vanilla, whole eggs and yolk in a second medium bowl until combined. In a stand mixer fitted with a paddle attachment, beat the butter on medium speed until smooth, about 1 minute. With the mixer running, pour in the sugar 1/4 cup at a time; beat until light and fluffy, about 5 minutes. Turn the mixer off and scrape the sides of the bowl to insure the ingredients are incorporated. Turn the mixer to low, add the flour mixture 1/4 cup at a time and beat for about 30 seconds. Add the egg mixture gradually and beat until the batter is combined, about 3 minutes.
- Spoon the batter into the prepared pan and smooth over the top with a spatula. Put the pan in the oven and reduce the temperature to 325 degrees F. Bake until a toothpick inserted into the center comes out clean and the top springs back when lightly pressed, about 1 hour. Cool the cake in the pan on a rack, 10 to 15 minutes. Invert the cake onto a rack to cool completely.
- Meanwhile, open 6 small resealable plastic bags. To the first bag, add 3/4 cup of the coconut and 10 drops red food coloring. To the second bag, add 3/4 cup coconut, 5 drops red food coloring and 5 drops yellow food coloring to make orange. To the third bag, add 3/4 cup coconut and 10 drops yellow food coloring. To the fourth bag, add 1/4 cup coconut and 5 drops green food coloring. To the fifth bag, add 1/4 cup coconut and 5 drops blue food coloring. To the sixth bag, add 1/4 cup coconut, 3 drops red food coloring and 2 drops blue food coloring to make purple. Seal all the bags, pressing out as much air as possible. Press and shake the sealed bags until all the coconut is coated in food coloring. Add more food coloring if you desire a richer color. Empty the bags into stripes on a baking sheet. Let stand, uncovered, for 1 hour to dry out slightly. If not using the coconut immediately, store in an airtight container until ready to use.
- Turn the cake over with the flat side facing up and trim it with a serrated knife to make level. Set the cake trimmed-side down on a work surface. Cut the cake in half from top to bottom so you have 2 semi-circles. Stand up the cake pieces like 2 arches and push them together back-to-back to make 1 arch. Trim as needed so they line up evenly and can stand on their own. Lay the cake pieces back down on their flat sides. Using a butter knife or offset spatula, cover the cake pieces with frosting on all sides except the bottoms.
- Press a stripe of purple coconut into the frosting on the inside curve of one of the cake semi-circles. Add a 1-inch stripe of blue coconut next to the purple stripe. Continue with the green, yellow and orange coconut, leaving an empty space on the outer edge of the semi-circle where the red coconut will go. Repeat with the other cake piece and colored coconut. Carefully stand up both cake pieces again. Spread the flat, cut side of one of the cake pieces with frosting and carefully push it together with the cut side of the second cake piece. Spread the remaining frosting over the seam where the pieces come together. Press a stripe of red coconut over the frosted seam, completing the rainbow. Using a metal spatula and your hands, carefully transfer the cake to a serving platter.
- Using scissors or kitchen shears, cut each marshmallow in half along the equator. Adhere the sticky cut sides to the platter and other marshmallows to build clouds on the sides of the cake.
- When ready to serve, separate the halves again and slice each half into wedges.
Cook’s Note
When measuring flour, we spoon it into a dry measuring cup and level off the excess. (Scooping directly from the bag compacts the flour, resulting in dry baked goods.)
Looking for Something Else?


Related Pages
- Red Velvet Cream Cheese Bundt Cake Recipe
- Flourless Carrot Bundt Cake Recipe
- Jelly Doughnut Bundt Cake Recipe
- Fireworks Bundt Cake Recipe
- Blueberry Buttermilk Bundt Cake Recipe
- Almond Olive Oil Bundt Cake Recipe
- Peanut Butter and Jelly Bundt Cake Recipe
- Jingle Bell Bundt Cake Recipe
- Apple-Honey Bundt Cake Recipe