Recipe courtesy of Cooking Channel
Recipe courtesy of Cooking Channel
Watch how to make this recipe.
Mak Kimchi
Getting reviews...
- Level: Intermediate
- Total: 1 hr 5 min
- Prep: 1 hr
- Cook: 5 min
- Yield: 2 quarts
-
- Nutritional Analysis
- Per Serving
- Serving Size
- 1 of 30 servings
- Calories
- 28
- Total Fat
- 1 g
- Saturated Fat
- 0 g
- Carbohydrates
- 5 g
- Dietary Fiber
- 2 g
- Sugar
- 2 g
- Protein
- 1 g
- Cholesterol
- 2 mg
- Sodium
- 227 mg
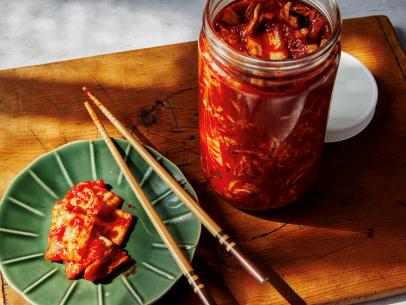
What is 'mak'? Just a Korean term signifying the simple or the everyday. And mak kimchi is just that: an easy, fast-fermenting kimchi made from bite-size pieces of cabbage. The term as used here is best understood in relation to the more traditional, and labor-intensive, baechu kimchi: a slower fermenting, longer-lasting (many Koreans would say superior) version made from whole heads of cabbage that are salted, stuffed (one leaf at a time!), and fermented intact. Mak it's not. Please note: the sweet rice flour paste in this recipe is traditional but entirely optional. You'll get equally delicious results with or without it. Your call.
- Level: Intermediate
- Total: 1 hr 5 min
- Prep: 1 hr
- Cook: 5 min
- Yield: 2 quarts
-
- Nutritional Analysis
- Per Serving
- Serving Size
- 1 of 30 servings
- Calories
- 28
- Total Fat
- 1 g
- Saturated Fat
- 0 g
- Carbohydrates
- 5 g
- Dietary Fiber
- 2 g
- Sugar
- 2 g
- Protein
- 1 g
- Cholesterol
- 2 mg
- Sodium
- 227 mg
Ingredients
The Brine:
The Paste (optional):
The Sauce:
Directions
- Brining: Slice the cabbage lengthwise into quarters. Cut out and discard the core. Cut each quarter crosswise into 2-inch pieces.
- Combine the water and salt in a large bowl and stir to dissolve. Add the cabbage and toss well to coat with brine. Leave for 4 hours, tossing every hour.
- Drain the cabbage well, then spread the cabbage out on a baking sheet and gently pat dry with paper towels.
- Pasting (optional): While the cabbage is brining, make the sweet rice flour paste. In a small saucepan, combine the rice flour with a cup of cold water and whisk vigorously to fully dissolve the flour. Gently heat to a simmer over medium-low heat, stirring frequently. (Be sure to scrape the bottom of the saucepan, as the rice flour has a tendency to settle there.) Simmer until the mixture thickens and becomes glossy and gelatinous, 2 to 3 minutes.
- Saucing: Pulse the garlic and ginger in a blender. Add the apple, onion, fish sauce, salted shrimp and sugar and puree until everything is well broken down--no need to overdo it.
- Empty the contents of the blender into a large bowl. (If you're using the rice paste, add it now and stir well, to fully incorporate.) Add the gochugaru to the bowl and mix well.
- This is the point at which things get messy. Suit up with a pair of clean latex gloves. (Dish gloves-well-washed, of course-will do perfectly well.) Add the scallion and carrot to the bowl and, with your gloved hands, work it all together to coat the vegetables with sauce. Do the same with the cabbage, gently massaging sauce into cabbage.
- Firmly pack the cabbage mixture into clean, quart-size mason jars, pressing as you go to remove any air pockets. Leave 1 inch of headroom in the jars to allow for expansion during fermentation. Press a small sheet of plastic wrap directly onto the surface of the cabbage and seal the jars tightly.
- Fermenting: Refrigerate the jars, set on a plate to catch leaks. In a week, the kimchi will be fresh, very lightly fermented and pretty darn tasty. In two weeks, as the fermentation really kicks into gear, the kimchi will ascend to a whole other plane of awesome. Kimchi keeps for months, getting increasingly pungent over time. Dig in and enjoy it every step of the way.


