


How to Make Sourdough Starter
Our step-by-step guide makes tackling this days-long process way less intimidating.

Matt Armendariz
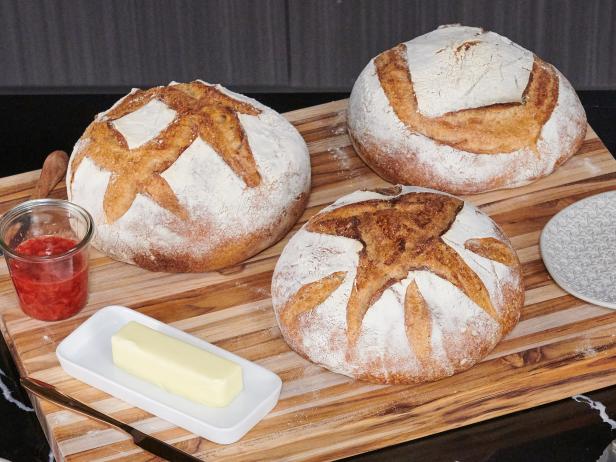
A homemade sourdough starter is a bread baker's pantry staple — though it does take some tending. Here our method for getting one going from scratch; though it'll take a few days longer to get to "bread time" than if you'd stolen some starter from a friend, the result will just be that much more satisfying. Once your starter is mature, it will add a tangy flavor and aroma to all your homemade breads.

Matt Armendariz
Ingredients:
1 cup (4 ounces) whole-wheat or rye flour
Warm water between 65 to 80 degrees F (see notes below)
Unbleached all-purpose or bread flour, for feeding (see notes below)
Supplies:
One 1-quart glass jar, very clean (see notes below)
Rubber spatula
Kitchen scale or dry and liquid measuring cups (see notes below)
Notes:
Water: If you know your tap water to be high in chlorine, fill a vessel and let it sit uncovered overnight to release the chlorine before using to mix a starter. Alternately, you may use filtered water. Aim to keep your starter at 75 degrees F. If your environment is much colder, you might want to start with warmer water.
Flour: After the initial mix, you will feed your starter white flour — both all-purpose and bread flour work — just make sure it is unbleached and look for one that has a protein content between 11 to 12 percent for best results.
Jar: To ensure you don’t bring unwanted mold or bacteria into your starter, sterilize your jar by running it though a hot dishwasher wash cycle, or for canning jars, boil for 10 minutes.
Scale: A kitchen scale is optional but if you plan on keeping up your sourdough starter for a long period of time, it will make the feedings a bit easier, less messy and faster.
Day 1: Initial Mix
Add 1 cup (4 ounces) whole-wheat or rye flour into a very clean 1-quart jar along with 1/2 cup (4 ounces) warm tap or filtered water between 65 to 80 degrees F. Stir well until all the flour is moistened and the dough resembles a thick paste. Cover loosely with the lid or plastic wrap. Set out at warm room temperature (75 to 80 degrees F) for 24 hours.

Matt Armendariz
Day 2: First Feeding
You will not likely notice much of a difference in appearance in the starter after the first 24 hours other than some condensation and a wheat-like aroma. You will need to begin feeding it to encourage growth. Use a rubber spatula to measure out 2/3 cup (5.5 ounces) of the starter and add it to a stainless steel or glass mixing bowl; discard any remaining starter. Add 1 cup (4 ounces) all-purpose or bread flour along with 1/2 cup (4 ounces) warm tap or filtered water between 65 to 80 degrees F to a stainless steel or glass mixing bowl. Stir well to combine all ingredients, making sure all the flour has been incorporated and the starter is well mixed. Return the starter to the jar. Cover again loosely with the lid or plastic wrap. Set out at warm room temperature (75 to 80 degrees F) for 24 hours.

Matt Armendariz
Days 3 to 5: Two Feedings Per Day
On day 3 you should notice some activity in your starter. The mixture should look bubbly and it will probably have risen some. It will have a fresh, slightly tangy aroma. Now you'll feed the starter twice a day. It’s best to arrange the times to conveniently work with your schedule. Keep them as evenly spaced apart as possible — every 12 hours is the goal. To feed the starter, give it a couple of good stirs to release any bubbles. Measure out a heaping 1/2 cup (4 ounces) starter and place it into a stainless steel or glass mixing bowl; discard any remaining starter. Add 1 cup (4 ounces) all-purpose or bread flour along with 1/2 cup (4 ounces) warm tap or filtered water between 65 to 80 degrees F to a stainless steel or glass mixing bowl. Stir well to combine all the ingredients, making sure all the dry flour has been incorporated and the starter is well mixed. Return the starter to the jar. Cover again loosely with the lid or plastic wrap. Set out at warm room temperature (75 to 80 degrees F). Repeat the process 12 hours later and every 12 hours for the next 2 days.

Matt Armendariz
Days 4 and 5: Checking In
You may notice the activity in your starter will vary between feedings over the next 2 days. It should consistently look bubbly and sometimes foamy before each feeding. By day 5 it will have nearly doubled in size before you feed it. The aroma should be pleasantly sour and slightly yeasty.
Day 5 or 6: Ready to Go!
By day 5 or 6 your sourdough starter should be strong enough to use in your first loaf of bread. Check the signs: The starter should be nearly doubling in volume between feedings and look very bubbly and slightly foamy at the surface. It should also have a strong, but pleasant acidic aroma. If you don’t feel your starter is ready, continue feeding it in 12-hour increments for another day or two.
Matt Armendariz
Maintenance and Storage:
For frequent bakers: If you are baking with your starter more than once a week, keep it at cool room temperature (65 to 50 degrees F) and feed it once a day as instructed above.
For occasional bakers: If you are baking once a week or less, you want to slow the starter's growth by storing it in the refrigerator. To prep your starter for cold storage, give it a regular feeding then let it ripen at warm room temperature until you see a good amount of activity, 3 to 4 hours. Then store in the refrigerator. Check the starter at least every other day and feed it weekly as instructed above, making sure to let it ripen at warm room temperature before you refrigerate it again. A refrigerated starter should smell pleasant and sour and you’ll see some bubbles on the surface. You should NOT see watery liquid on the surface or smell alcohol. If you do see liquid, try feeding it more frequently.
With time, you'll get to know your starter and the environments and temperatures in which it will thrive best.
Got your starter ready? Find our Sourdough Bread recipe here.
Josh Grubbs


