


Recipe courtesy of Sandra Lee
Tablescape Center Piece Mini Cakes Three Ways
Getting reviews...
- Level: Intermediate
- Total: 1 hr 45 min
- Prep: 1 hr
- Inactive: 30 min
- Cook: 15 min
- Yield: 38 cakes
-
- Nutritional Analysis
- Per Serving
- Serving Size
- 1 of 38 servings
- Calories
- 138
- Total Fat
- 3 g
- Saturated Fat
- 1 g
- Carbohydrates
- 27 g
- Dietary Fiber
- 0 g
- Sugar
- 14 g
- Protein
- 1 g
- Cholesterol
- 0 mg
- Sodium
- 120 mg
Ingredients
Directions

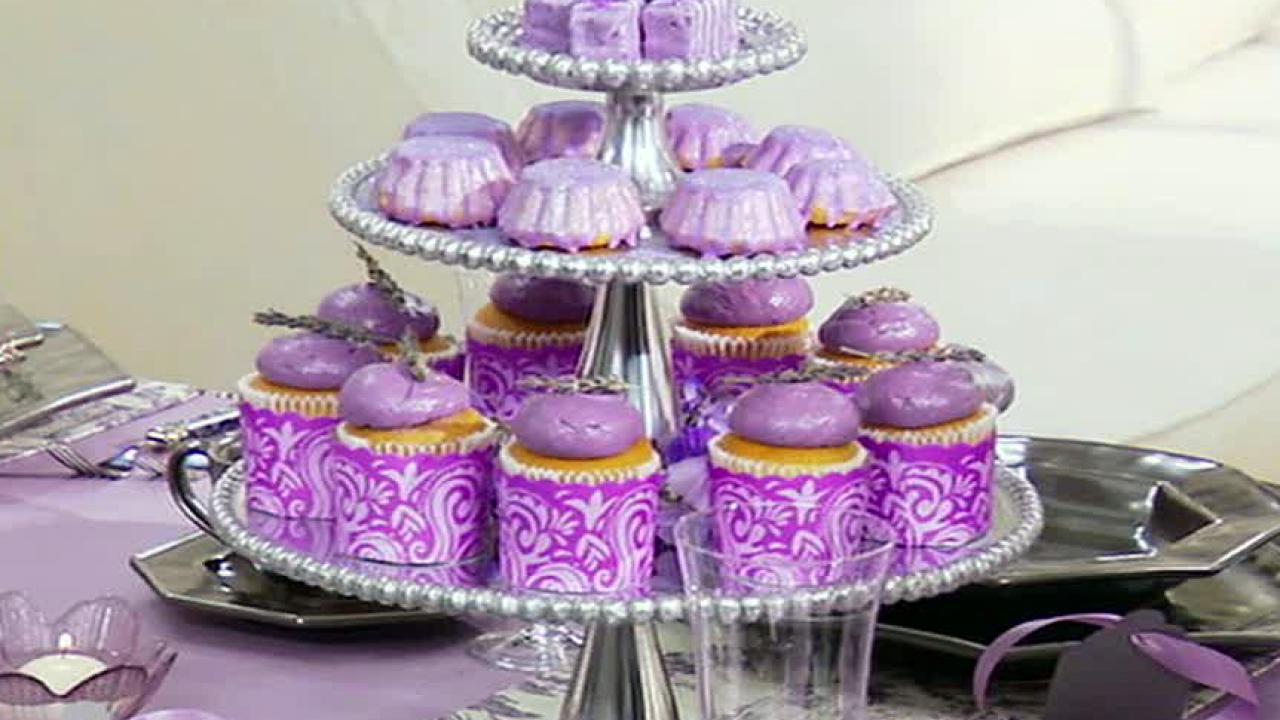
Special equipment:
8 (2-inch) mini brioche tins 8 (3-inch) mini brioche tins 1 (24 count) cupcake tin 24 white cupcake liners Pastry bag, or resealable zip top bags Round pastry tip (number 804 or similar) 4 store bought rectangular petit fours (lavender in color) Purple flowered cupcake paper covers Small 3 tiered silver dessert stand Sprigs lavender, fresh or dried Edible glitter (available at craft and baking supply stores)- Preheat the oven to 450 degrees. Spray the mini brioche tins with nonstick cooking spray. Lightly dust with flour and place on a sheet tray. Line cupcake tin with white paper liners.
- Prepare the cake mix according to package instructions, substituting the buttermilk for the water in recipe. Fill the brioche tins and cupcakes 2/3 of the way to the top. You should get about 18 cupcakes. Bake, rotating pans halfway, until tops are golden and a toothpick inserted in the center comes out clean. Brioche tins will take about 8 to 10 minutes, cupcakes will take 12 to 15 minutes.
- Remove from the oven and cool 5 minutes before unmolding and cooling completely on a wire cooling rack.
- To make the poured icing for mini fluted cakes: Combine 1/2 cup confectioners' sugar with enough lemon juice to form a thin glaze about the consistency of syrup. Dye with equal amounts of red and blue food coloring until the desired lavender color is reached. Place the cakes upside down on a cooling rack fitted inside a sheet tray. Pour the icing over the top of the cakes, allowing it to drip down the sides and completely coat the cake. Allow to set up.
- Meanwhile, mix enough of the confectioner's sugar (1/4 to 1/3 cup) for the icing to thicken; it should be about the consistency of pancake batter. Add an additional drop or 2 of each food coloring to deepen the color. Place the icing in a small zip top bag and snip the corner. Pipe just over the top of the fluted cake, allowing it to drip down the sides.
- To make the frosting for the cupcakes, combine the can of vanilla frosting with enough of the remaining confectioners' sugar to stiffen slightly and allow the frosting hold a shape when piped. Color with equal amounts of red and blue food coloring to the desired lavender color. Place in a pastry bag or a resealable zip top bag fitted with a round pastry tip. Put 12 cupcakes into lavender cupcake covers. Pipe the frosting on top, holding the tip just above surface of the cupcake and raising slightly as you squeeze to form a ball of frosting.
- To assemble: Place the cupcakes evenly spaced on the largest bottom tier and top each with a small sprig of lavender. On the middle tier arrange the fluted cakes evenly. On the top tier place 4 store bought petit fours. Once on the table, sprinkle the whole stand with edible glitter.
Looking for Something Else?


Related Pages
- Mini Angel Food Cakes with Marshmallow Frosting...
- Shower Dome Cakes -Tablescape Centerpiece Recipe
- Tablescape Centerpiece - Candy Castle Cake Recipe
- Sugar Cube House (Tablescape Centerpiece) Recipe
- Mini Date Nut Carrot Muffin Sandwiches with Cream...
- Tablescape Centerpiece
- Tablescape Center Piece - Golden Cake Topper...
- Gingercake Men -Tablescape Centerpiece Recipe
- Meringue Trifle - Decorative Tablescape...