Recipe courtesy of Jacques Torres
Do It Yourself Chocolate Sculpture
Getting reviews...
- Level: Advanced
- Total: 5 hr
- Prep: 5 hr
- Yield: 1 large chocolate sculpture
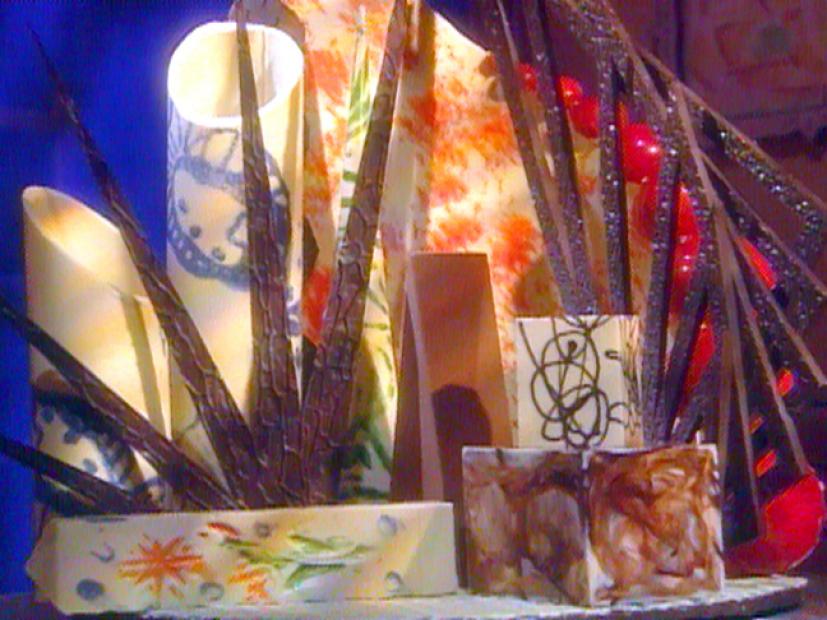
The first thing you must do when making this recipe is to think of it as not just food, but as a work of art that is subject to your own interpretation. By this I mean that you should use your imagination and be creative. More specifically, unless otherwise noted, decide for yourself what size and shape you'd like the objects in your chocolate "sculpture" to be.
- Level: Advanced
- Total: 5 hr
- Prep: 5 hr
- Yield: 1 large chocolate sculpture
Ingredients
Directions
Special equipment:
Multi-size connected dome mold Acetate sheets Various items of your choice to use for molding, for example: bubble wrap, stenciled paint roller, heavy textured plastic, sea sponge, plastic box- For the Base: Using an offset spatula, spread a 1/4-inch-thick layer of white chocolate over a sheet of bubble wrap, making sure to create a big enough base to support the rest of your design. When that has set, repeat the procedure using bittersweet chocolate. Let the chocolate set slightly. If you want to trim the outside edge to a specific shape, use a paring knife to make that cut before the chocolate has set completely. When the chocolate is set, peel off the bubble wrap.
- For the Tube: Cut a piece of acetate the length and width of the tube you would like to make, and set it on your work surface. Make cocoa butter paint by mixing cocoa butter with powdered food coloring to desired consistency, and place it in a shallow dish. Dip the stenciled paint roller in the cocoa butter paint and roll onto the acetate. When the paint has set, use an offset spatula to spread a 1/4-inch-thick layer of white chocolate over the painted acetate paper. Roll the acetate into a tube so the acetate is on the outside and tape it closed. Set aside and allow the chocolate to set. When the chocolate has set, remove the acetate. If you need to trim the tube to fit your presentation, heat a chef's knife and let the heat of the knife cut the chocolate. Do not apply pressure or your tube will break.
- For the Dome: Coat the inside of your dome mold with cocoa butter paint. When the chocolate has set, use a ladle to fill the mold with white chocolate. (It will make an interesting marbled effect if you spread the chocolate around with your fingers.) When the mold is full, empty the chocolate back into the bowl. The inside of the mold should be evenly coated with chocolate. Wipe the lip of the mold clean and place it upside down on a wire rack over a baking sheet. Once the chocolate starts to harden, about 5 minutes, scrape the lip of the mold clean again with a paring knife. This is important because when the chocolate sets, it shrinks or retracts from the sides of the mold. A clean edge will keep it from sticking and cracking as it shrinks. You can place the mold in the refrigerator for several minutes to help the chocolate to harden. When the chocolate has set, unmold it by gently pressing on one side of the chocolate. The chocolate should release easily.
- For the Textured Plastic: Cut shapes from heavy textured plastic. Spread chocolate all the way to the edge of the plastic and let it set. When it has set, carefully peel the plastic away from the chocolate and set aside. You can make textured chocolate triangles by using a sharp paring knife to cut out triangles when the chocolate is partially set. Tile the triangles so they overlap slightly and use chocolate to "glue" them together. If trimming is necessary, use a hot chef's knife to "cut" the chocolate.
- For the Sea Sponge: Using sea sponge dipped in cocoa butter paint, sponge paint onto an acetate sheet. Another method is to spread white chocolate onto an acetate sheet, let it set, then sponge paint on top of the chocolate.
- For the Marbled Chocolate Box: Using a spoon, drizzle white and bittersweet chocolate inside a plastic box. Use your fingers to spread the chocolate and create a marbled effect. Using a ladle, fill the box with white chocolate, and when it's full, empty it back into the bowl of chocolate. The inside of the box should be evenly coated with chocolate. Wipe the lip of the plastic box clean and place the box upside down on a wire rack over a baking sheet. Once the chocolate starts to harden, about 5 minutes, scrape the lip of the box clean again with a paring knife. This is important because when the chocolate sets, it shrinks or retracts from the sides of the mold. A clean edge will keep it from sticking and cracking as it shrinks. You can place the mold in the refrigerator for several minutes to help the chocolate to harden.
- If you are very adventurous, you can give the molded box an interesting finish by using a paint spray gun instead, however the spray gun must be unused. Start by placing the mold in the freezer for 10 minutes. Mix equal parts of cocoa butter and melted chocolate together and strain the mixture. Pour it into the spray gun container, making sure it is very warm. Remove the mold from the freezer and use the spray gun to "paint" the outside of the mold.
- How to Temper Chocolate (From Dessert Circus, Extraordinary Desserts You Can Make At Home by Jacques Torres):
- Chocolate is tempered so that after it has been melted, it retains its gloss and hardens again without becoming chalky and white (that happens when the molecules of fat separate and form on top of the chocolate). There are a variety of ways to temper.
- One of the easiest ways to temper chocolate is to chop it into small pieces and then place it in the microwave for 30 seconds at a time on high power until most of the chocolate is melted. Be very careful not to overheat it. (The temperature of dark chocolate should be between 88 and 90 degrees F, slightly warmer than your bottom lip. It will retain its shape even when mostly melted. White and milk chocolates melt at a temperature approximately 2 degrees F less because of the amount of lactose they contain.) Any remaining lumps will melt in the chocolate's residual heat. Use an immersion blender or whisk to break up the lumps. Usually, chocolate begins to set, or crystallize, along the side of the bowl. As it sets, mix those crystals into the melted chocolate to temper it. A glass bowl retains heat well and keeps the chocolate tempered longer.
- Another way to temper chocolate is called seeding. In this method, add small pieces of unmelted chocolate to melted chocolate. The amount of unmelted chocolate to be added depends on the temperature of the melted chocolate, but is usually 1/4 of the total amount. It is easiest to use an immersion blender for this, or a whisk.
- The classic way to temper chocolate is called tabliering. Two thirds of the melted chocolate is poured onto a marble or another cold work surface. The chocolate is spread out and worked with a spatula until its temperature is approximately 81 degrees F. At this stage, it is thick and begins to set. This tempered chocolate is then added to the remaining non-tempered chocolate and mixed thoroughly until the mass has a completely uniform temperature. If the temperature is still too high, part of the chocolate is worked further on the cold surface until the correct temperature is reached. This is a lot of work, requires a lot of room, and makes a big mess.
- A simple method of checking tempering, is to apply a small quantity of chocolate to a piece of paper or to the point of a knife. If the chocolate has been correctly tempered, it will harden evenly and show a good gloss within a few minutes.
Looking for Something Else?
Related Pages
- Chocolate Covered Strawberries Recipe
- Chocolate Pretzels Recipe
- Beatty's Chocolate Cake Recipe
- Chocolate Frosting Recipe
- Basic Chocolate Cake Recipe
- Chocolate Chocolate Chip Cookies Recipe
- Amazing Cake and Ice Sculpture Creations
- Carrie Underwood Received a Giant Sculpture Made...
- An Artist Flung a McDonald’s Burger Pickle onto...
