


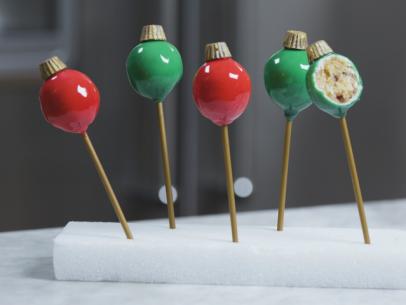
Christmas Ornament Cake Pops with Mirror Glaze
- Level: Intermediate
- Total: 3 hr 40 min
- Active: 1 hr 30 min
- Yield: about 36 cake pops
-
- Nutritional Analysis
- Per Serving
- Serving Size
- 1 of 36 servings
- Calories
- 687
- Total Fat
- 36 g
- Saturated Fat
- 16 g
- Carbohydrates
- 84 g
- Dietary Fiber
- 3 g
- Sugar
- 72 g
- Protein
- 11 g
- Cholesterol
- 14 mg
- Sodium
- 422 mg
Ingredients
Cake Pops:
White Chocolate Shell:
Mirror Glaze:
Decoration:
Directions
Special equipment:
36 white or gold lollipop sticks (each about 6 inches long), two 9.8-by-11.8-inch Styrofoam blocks, a 3/4-ounce scoop and a small art brush- For the cake pops: Prepare and bake the cake according to the package directions for a 9-by-13-inch pan. Let cool completely.
- Meanwhile, put the white chocolate and heavy cream in a small microwave-safe bowl. Microwave on high in 30 second intervals until melted and smooth, stirring halfway through, about 1 minute. (You can also use a double boiler.) Carefully remove from the microwave and add the orange extract; stir to combine.
- When cool, crumble the cake finely into a large bowl and add the dried cranberries and orange-white chocolate ganache. Mix with a rubber spatula or your hands until the mixture is very well combined, completely moistened and holds together when pinched.
- Using a 3/4-ounce scoop, scoop rounded mounds of the mixture and shape into balls and place on a baking sheet. You should have about 36 balls. Refrigerate until firm, about 30 minutes.
- For the white chocolate shell: Put the white chocolate chips and vegetable shortening in a medium microwave-safe bowl. Microwave on high in 30 second intervals until melted and smooth, stirring halfway through, about 1 minute. (You can also use a double boiler.) Carefully remove from the microwave and stir once more to make sure no lumps remain.
- Dip the tip of a lollipop stick into the chocolate shell and stick halfway into a cake ball. Dip the entire cake ball in the chocolate shell, letting any excess drip off, then press the stick into the Styrofoam block to stand upright. Repeat with the remaining balls and sticks. Refrigerate the cake pops until completely chilled and set, about 1 hour.
- For the mirror glaze: Sprinkle the gelatin over 1/4 cup water in a small bowl; stir and set aside 5 minutes. Combine the remaining 3/4 cup water in a small saucepan with the granulated sugar and sweetened condensed milk. Bring to a simmer over medium-high heat until the sugar has dissolved, about 3 minutes. Remove from the heat, then add the gelatin mixture and stir to dissolve.
- Put the white chocolate chips in a large bowl and set a fine-mesh strainer on top. Pour the gelatin mixture through the strainer to catch any small lumps; remove the strainer. Let stand 5 minutes for the chocolate to soften, then stir with a rubber spatula until smooth. Tint with food coloring (divide the glaze in half if you are using more than 1 color), then let sit, stirring occasionally, until thickened and a thermometer registers 90 degrees F. Transfer to a tall, wide glass container (such as a wide-mouth mason jar) for easy dipping.
- Working one at a time, dip the cake pops into the mirror glaze to completely coat letting any excess drip off. Return to the foam board (it may continue to drip for a minute or two). Transfer to the refrigerator to set completely, about 1 hour. (Even after setting, mirror glaze stays sticky, so make sure to space the pops apart).
- Using a small, clean art brush, dust the peanut butter cups with edible gold pearl dust, then place one on top of each cake pop "ornament" (see Cook's Note). Keep chilled until ready to serve.
Cook’s Note
For fuller, more even coverage on the gold-dusted candies, Zac recommends making a "paint" with gold dust and vodka. Mix 2 teaspoons edible gold pearl dust with about 1/4 teaspoon vodka, adjusting the consistency with more dust or vodka to create a thick paste. Paint this mixture onto the mini peanut butter cups (put them on the end of a toothpick to hold if necessary) and let dry for a few minutes.
Looking for Something Else?


Related Pages
- Bananas Foster Pudding Recipe
- Peppermint White Mocha Trifle Recipe
- Upside-Down Blood Orange and Rosemary Olive Oil...
- Maple Bacon Scones Recipe
- Mini Spiced Bundt Cake Wreaths Recipe
- Pumpkin Caramel Baked Alaska Recipe
- Blueberry Oatmeal Cookies Recipe
- Sausage Gravy Stuffed Biscuits Recipe
- Stuffed Carrot Cake Cookies Recipe