


Recipe courtesy of Pascal Rigo
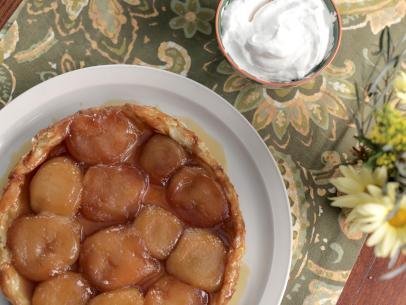
Caramelized Apple Tart: Tarte Tatin
Getting reviews...
- Level: Intermediate
- Total: 2 hr 25 min
- Prep: 20 min
- Inactive: 25 min
- Cook: 1 hr 40 min
- Yield: 1 (10-inch) tart
Some people say this upside-down apple tart was invented by the Tatin sisters, who ran an inn in the Loire Valley. The story goes that they dropped an apple tart on the kitchen table and when it landed upside down, they decided to bake and serve it just like that. That was a happy accident because the inverted baking technique that is now standard practice for this famous tart makes everything turn out perfectly: The apples caramelize in the hot pan, and the pastry, which is exposed during baking, becomes light and flaky. Because the crust doesn't really need to rise very high, this is an excellent way to use up puff pastry trimmings.
- Level: Intermediate
- Total: 2 hr 25 min
- Prep: 20 min
- Inactive: 25 min
- Cook: 1 hr 40 min
- Yield: 1 (10-inch) tart
Ingredients
Caramel:
Apples:
Puff Pastry Dough:
Directions
- To make the caramel: Have ready a 10-inch round cake pan with 3-inch sides. (Do not use a springform pan for this; it will leak!) In a medium saucepan, melt the butter over medium heat. Add the sugar and cook, stirring often with a wooden spoon, until the mixture is dark amber in color ¿ it's okay if there are a few sugar lumps remaining. When the caramel is done, carefully pour it into the cake pan. Don't touch the cake pan with unprotected hands ¿ it will be hot! Set the cake pan aside until caramel is cool. (The caramel-coated pan can be made up to 2 days in advance and left, covered, at room temperature.)
- Preheat the oven to 400 degrees F.
- Core the apples by cutting down, top to bottom, on all 4 sides around the core. You will have 2 apple halves and 2 smaller pieces. Arrange the first layer of apple halves, flat-side down, on top of the set caramel in the pan. (This will later become the top of the tart.) Arrange the remaining apple halves and pieces to form the second layer. Things will be a bit crowded at first, but the apples will shrink down when cooked. Place on a parchment paper-lined, sturdy baking sheet. Bake for about 50 minutes, until the apples are very tender.
- Meanwhile, on a lightly floured work surface, roll out the puff pastry dough into a round 1/4-inch thick. Cut out a 10-inch pastry circle and transfer it to a parchment lined baking sheet. Cover with plastic wrap and refrigerate until needed.
- When the apples are done, carefully remove the baking sheet from the oven and transfer to a flat surface, taking care, as the caramel will be bubbling hot. Remove the pastry circle from the refrigerator and prick with a fork 15 times. Gently place on top of the cooked apples. Return tart to the oven and bake for 35 minutes or until the puff pastry is puffy and golden brown. Cool in the pan on a wire rack for 20 to 25 minutes.
- To serve, you will need a 12- to 14-inch diameter round serving platter and another sturdy baking sheet. Invert both the serving platter and the other baking sheet. Invert both the serving platter and the other baking sheet over the warm tatin pan. Using both hands, firmly grab both baking sheets and quickly flip over the pans ¿ doing this over the kitchen sink will cut down on any sticky mess. Remove the top baking sheet and carefully lift up the cake pan, using dry towels to avoid getting burned by the caramel. If any apples remain stuck to the pan, remove them with a metal spatula and place them back on the tart. This tart is best served warm.
Puff Pastry Dough:
Yield:
3 pounds of dough
- In the bowl of an electric mixer fitted with the paddle attachment, beat the flour, sugar, salt, water, and melted butter on medium speed until well mixed, about 1 minute. Work quickly and do not overwork the dough. Transfer the dough to a large piece of plastic wrap, form it into a rough rectangle, enclose the dough in plastic wrap, and refrigerate for 1 hour. Meanwhile, put the remaining 14 ounces of butter between 2 pieces of plastic wrap and beat it with a rolling pin, turning as necessary, until softened. The butter should be malleable but not too soft. Set aside in a cool place ¿ the butter will later be spread on the dough as you start the folding process.
- Place the refrigerated dough on a well-floured work surface and dust the top of the dough lightly with flour. Using a rolling pin, push down on the dough to start flattening it, and then roll it into a 20 by 30 by 10-inch rectangle, 1/4 inch thick, with the long sides running from left to right. (It might feel that you're rolling sideways, and well, you are.) Carefully brush off any excess flour from the dough. Starting on the right side, and leaving a 1-inch border, slap and spread on the butter, using your fingers, over two-thirds of the rectangle. Fold the dough into thirds; starting with the left side, fold at the butter line as if closing a book, and then fold the right side up and over the top layer. You should end up with a stack of 3 thick layers of dough, each separated from the next by a layer of butter.
- As you prepare to make the first turn of the dough, keep in mind the importance of rolling the butter evenly along the length and width of the rectangle as you roll the dough. Adjust the pressure on the rolling pin as necessary, rolling harder or more evenly, to achieve a smoother, even, dough-enclosed butter sandwich. To begin your first turn, turn the dough 90 degrees on your work surface so the closed fold is at the top and, rolling lengthwise, roll It into a 20 by 10-inch rectangle. Brush off any excess flour and fold into thirds as above, starting with the left side and ending with the right. At this point, you have finished one turn. Rotate the dough 90 degrees so the closed fold is at the top, and repeat the rolling and folding process. The second turn is complete. After the second turn, or any time the dough is too soft to work with, transfer to a parchment paper-lined baking sheet and refrigerate, covered in plastic wrap, for about 30 minutes, or until the dough is chilled and relaxed. Each time the dough is refrigerated, make an indentation in the dough with your fingertip for each turn completed. Repeat this rolling and folding process, rolling out the dough lengthwise every time, for more times for a total of 6 turns. After the sixth turn, let the dough rest a good hour in the refrigerator.
- Store the dough, as is, well wrapped in plastic wrap. The dough can be kept refrigerated up to 3 days, or frozen for up to 10 days. If frozen, thaw the dough, still wrapped in plastic, in the refrigerator before using.