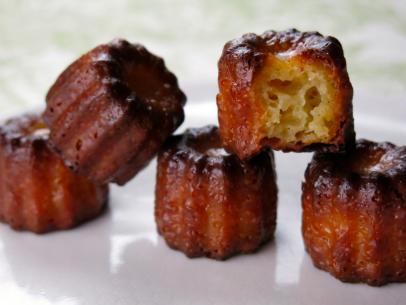


Canelés
- Level: Advanced
- Total: 1 day 4 hr 45 min (includes cooling time)
- Active: 45 min
- Yield: 12 pastries
-
- Nutritional Analysis
- Per Serving
- Serving Size
- 1 of 12 servings
- Calories
- 241
- Total Fat
- 13 g
- Saturated Fat
- 7 g
- Carbohydrates
- 27 g
- Dietary Fiber
- 0 g
- Sugar
- 19 g
- Protein
- 4 g
- Cholesterol
- 91 mg
- Sodium
- 106 mg
Ingredients
Batter:
Coating:
Directions
Special equipment:
12 copper canelé molds (or use fewer molds and bake them in batches)- For the batter: Place the flour in a large bowl. Combine the milk, sugar and butter pieces in a medium saucepan. Scrape in the seeds from the vanilla bean with the tip of a paring knife and add the pod halves as well. Heat the mixture over medium-low heat just until the milk simmers.
- Meanwhile, whisk the egg, yolks and salt in a large metal bowl. Very slowly drizzle in the hot milk mixture, whisking constantly so the eggs don’t scramble but gently so you don’t over-aerate the batter. Once you have whisked in all of the milk, gently whisk in the rum.
- Remove the vanilla bean. Pour half of the milk-and-egg mixture over the flour and whisk to combine. Pour in the remaining mixture and whisk again to combine. Pour through a fine-mesh strainer into a bowl and let cool to room temperature, about 30 minutes. Cover the surface of the batter with plastic wrap and refrigerate for 1 to 2 days. (While these can be baked with only a 2-hour rest/chill time for the batter, we found at least 24 hours was best for the rich, custardy interior associated with canelé.)
- When you’re ready to bake, preheat the oven to 300 degrees F and put your molds on a baking sheet to heat up in the oven. (If your molds are copper and brand new, they will need to be seasoned, see Cook’s Note below.)
- Meanwhile, for the coating: Combine the beeswax and butter in a heatproof measuring cup with a spout and place it in a saucepan of simmering water. Let sit, stirring occasionally, until both the butter and wax are completely melted and combined.
- Remove the molds from the oven. Line a baking sheet with foil and place a cooling rack on top. To coat the molds with the wax mixture, use an oven mitt or kitchen towel to hold a mold in your hand. Pour some of the mixture in to fill it to the brim, then immediately pour the mixture back into the measuring cup. The inside of the mold should be coated with a thin layer of the mixture. Place the mold upside down on the rack to let the excess drip out. Repeat with the remaining molds. Freeze for 15 minutes.
- Position an oven rack to the lowest position in the oven and preheat the oven to 475 degrees F.
- Fill the molds with the batter, filling each to within a scant 1/2 inch from the top. Place the filled molds on a baking sheet on the bottom rack of the oven and bake for 15 minutes. Reduce the oven temperature to 375 degrees F. Start checking for doneness after 1 hour, rotating the pan in the oven every 20 minutes or so. The tops should be very dark brown; take one of the molds out of the oven, hold it in a kitchen towel and give it a shake. If the canelé comes out of the mold and is deep brown all over it’s done. (They might not all be done at the same time – if they don’t drop out easily or if the tops are still pale, bake for another 5 to 10 minutes in the molds and check again.)
- Place the unmolded canelés on a rack to cool completely. They’re best eaten the day they’re made but be sure to let them cool completely before digging into one to allow the beeswax coating to become shatteringly crisp.
Cook’s Note
To season copper canelé molds, wash and dry them, then rub or brush the molds all over (inside and out) with a neutral oil like canola or vegetable oil. Place them on a baking sheet, open side up, and bake in a 350-degree-F oven for 1 hour. Flip the molds and bake for 15 more minutes. Turn off the oven and let the molds cool in the oven. They should now be seasoned and ready to use. After the initial seasoning, don’t wash the molds – just wipe them clean with a towel. (If you must wash a mold because something has stuck to it you should season the mold again.)