


Recipe courtesy of Food Network Kitchen
Recipe courtesy of Food Network Kitchen
Watch how to make this recipe.
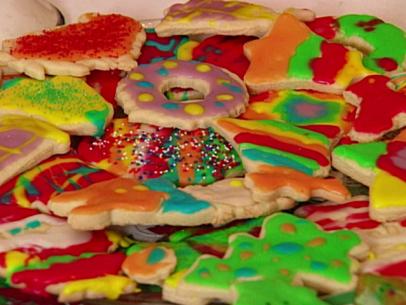
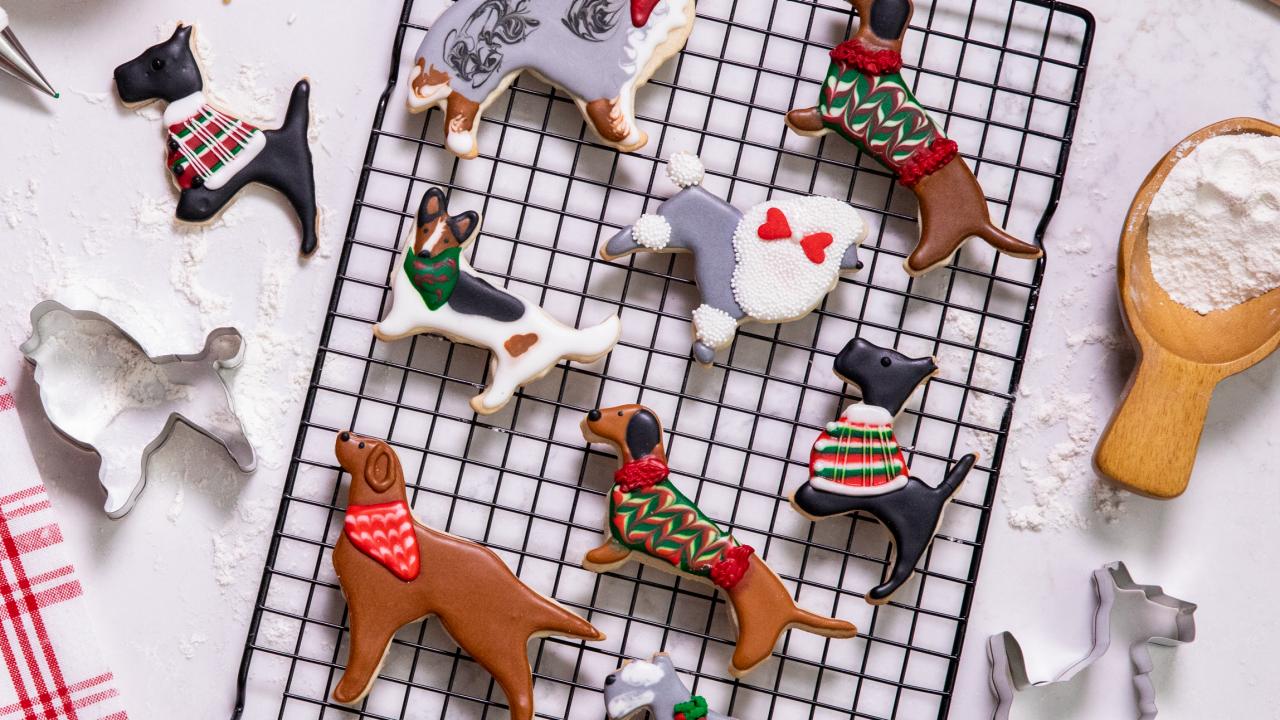
Holiday Dog Cutout Sugar Cookies
Getting reviews...
- Level: Easy
- Total: 2 hr 30 min (includes cooling time)
- Active: 45 min
- Yield: 24 to 36 cookies
-
- Nutritional Analysis
- Per Serving
- Serving Size
- 1 of 30 servings
- Calories
- 180
- Total Fat
- 6 g
- Saturated Fat
- 4 g
- Carbohydrates
- 30 g
- Dietary Fiber
- 0 g
- Sugar
- 21 g
- Protein
- 1 g
- Cholesterol
- 22 mg
- Sodium
- 36 mg
This recipe is sponsored by Milk-Bone®. These classic sugar cookies are rolled and shaped like adorable pups, making them the perfect tribute to your most loyal canine friend. Decorated with royal icing, these treats will definitely be the cutest addition to your cookie jar this season.
- Level: Easy
- Total: 2 hr 30 min (includes cooling time)
- Active: 45 min
- Yield: 24 to 36 cookies
-
- Nutritional Analysis
- Per Serving
- Serving Size
- 1 of 30 servings
- Calories
- 180
- Total Fat
- 6 g
- Saturated Fat
- 4 g
- Carbohydrates
- 30 g
- Dietary Fiber
- 0 g
- Sugar
- 21 g
- Protein
- 1 g
- Cholesterol
- 22 mg
- Sodium
- 36 mg
Ingredients
Basic Royal Icing:
Directions

Special equipment:
assorted 2- to 4-inch dog-shaped cookie cutters, piping bags, a number 1 plain piping tip and a number 2 plain piping tip- Sift the flour, baking powder and salt into a medium bowl; set aside. Beat the butter and sugar in a large bowl with an electric mixer on medium-high speed until light and fluffy, about 5 minutes. Add the egg and vanilla and beat until incorporated. Reduce the mixer speed to low and beat in the flour mixture in 2 batches until just incorporated. Divide the dough between 2 pieces of plastic wrap; shape into disks. Wrap and refrigerate until firm, at least 1 hour. (The dough can be frozen for up to 1 month; thaw overnight in the refrigerator before rolling.)
- Line 2 baking sheets with parchment paper. Working with 1 disk at a time, roll out the dough on a floured surface, dusting with flour as needed, until about 1/8 inch thick. Cut out shapes with 2- to 4-inch dog-shaped cookie cutters and arrange 2 inches apart on the prepared baking sheets. (If the dough becomes too soft as you work, return it to the refrigerator until firm.) Gather the scraps and refrigerate until firm; reroll once to cut out more cookies. Chill the cutouts 30 minutes.
- Position racks in the upper and lower thirds of the oven and preheat to 350 degrees F. Bake the cookies, switching the pans halfway through, until slightly puffed and just golden, 13 to 15 minutes. Let cool 5 minutes on the baking sheets, then transfer to racks to cool completely before icing.
- To decorate the cookies, divide the Basic Royal Icing into bowls and tint as desired with food coloring. The thicker icing will be used to outline your decorations.
- To make the flood icing for filling, remove three-quarters of the desired color icing to a small bowl and stir in a few drops of water until flooding consistency is achieved -- you can run a knife through it and it flows back to where it was in 10 seconds. Transfer the flood icing to a piping bag fitted with a number 2 round tip. Transfer the remaining thick icing to a piping bag fitted with a number 1 round tip. Use additional piping bags and tips for different colors of icing.
- Draw outlines of your decorations with the thicker royal icing, then pipe a generous amount of the same-colored flood icing inside the border of each design.
- Using a toothpick, spread the icing to cover the cookie. If making a design, decorate with more colored icing while the flood icing is still wet, using a toothpick to swirl to colors together as desired. Decorate with sugar pearls if using. Let the cookies set at room temperature, at least 1 hour.
Basic Royal Icing:
Yield:
Makes about 2 1/4 cups.
- Whisk the confectioners' sugar and meringue powder in a large bowl. Add 5 tablespoons water and beat with a mixer on medium-high speed until soft glossy peaks form, adding up to 1 more tablespoon water if necessary, about 5 minutes. Cover the bowl with a damp paper towel and plastic wrap until ready to use to prevent the icing from drying out.
Cook’s Note
When measuring flour, we spoon it into a dry measuring cup and level off the excess. (Scooping directly from the bag compacts the flour, resulting in dry baked goods.)