


Recipe courtesy of
Jacqueline Tris
for
Food Network Kitchen
Recipe courtesy of
Jacqueline Tris
for
Food Network Kitchen
Watch how to make this recipe.
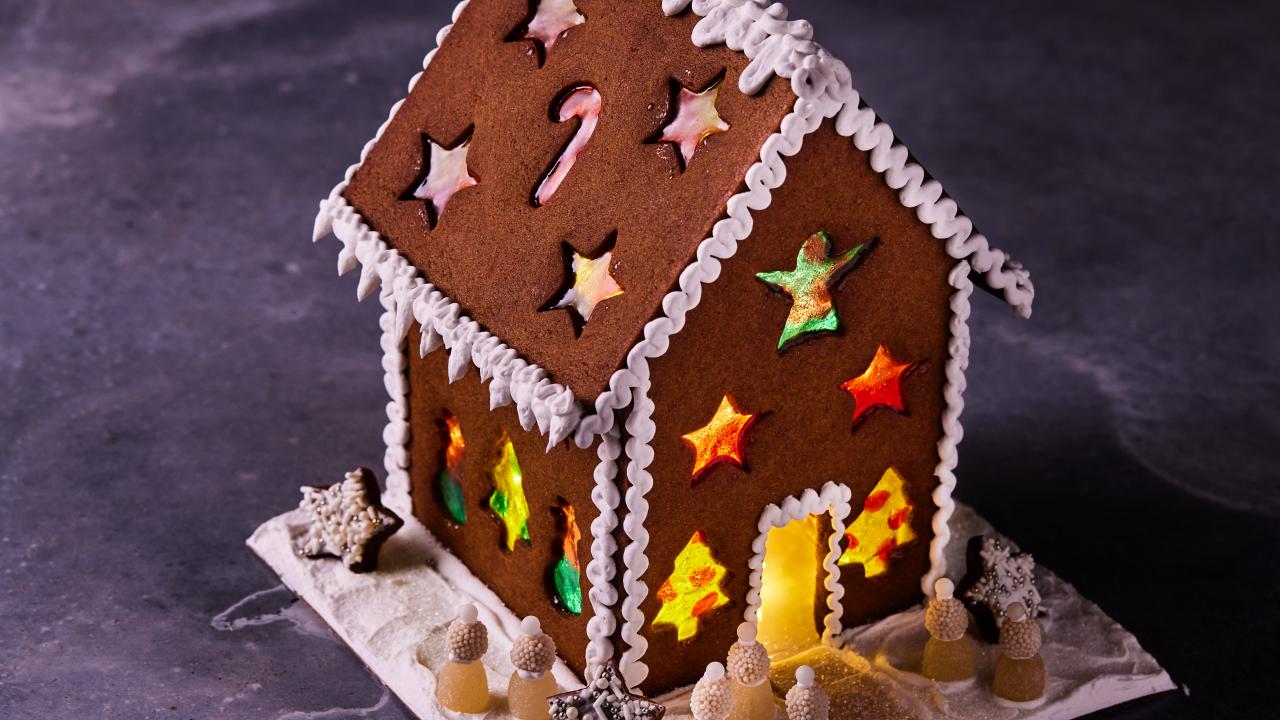
Light-Up Gingerbread House
Getting reviews...
- Level: Intermediate
- Total: 9 hr (includes drying and chilling times)
- Active: 1 hr 30 min
- Yield: 1 house plus up to 2 dozen gingerbread people or extra decorations
Brighten up your holiday table with this showstopping centerpiece dessert. The dough for the gingerbread house is both sturdy and delicious, and the recipe makes enough for the house and additional gingerbread people for decorating. The candy windows create a stunning stained-glass effect and add a pop of color, especially when lit from within by a flameless LED tealight or LED fairy lights (turn off the lights when not in use).
- Level: Intermediate
- Total: 9 hr (includes drying and chilling times)
- Active: 1 hr 30 min
- Yield: 1 house plus up to 2 dozen gingerbread people or extra decorations
Ingredients
Gingerbread:
Royal Icing:
Directions
Special equipment:
a cake board; stiff paper such as a manila folder, optional, a flameless LED tealight or LED fairy lights- For the gingerbread: Heat the butter and shortening in a medium saucepan over medium heat until melted. Let cool.
- Sift the flour, granulated sugar, ginger, cinnamon and salt into the bowl of a stand mixer fitted with the paddle attachment.
- Mix the butter mixture into the flour mixture on low until sandy and just combined, about 1 minute. Add the molasses, corn syrup and vanilla and mix until evenly incorporated but still crumbly in texture, about another minute. Press the dough together by hand, divide into 4 equal portions and press each portion into a disk about 1/2 inch thick. Wrap in plastic and refrigerate until chilled, about 1 hour.
- Roll out each portion of dough between 2 sheets of parchment, lightly dusting with flour if needed, to a thickness of about 1/4 inch. You can measure and cut the house pieces by hand, or make templates first from stiff paper such as a manila folder. You will need two 5-by-6-inch rectangles cut from the first piece of dough for the roof pieces; two 5-inch squares cut from the second piece of dough for the sides of the house; and 2 pieces with a 5-inch square base topped with a 3-by-5-inch triangle cut from the last 2 pieces of dough (1 from each piece). Save the dough scraps and rechill, if needed.
- Use small cookie cutters to cut patterns all around the roof and walls. Cut a 1-by-2-inch rectangle in the front piece to create the front door. Reserve the cut-out pieces and use them to decorate the house. Re-roll any remaining dough to create gingerbread people or other elements to decorate the house.
- Place the dough shapes on parchment-lined baking sheets and refrigerate until well chilled, at least 2 hours and up to overnight. The longer you chill the dough shapes, the less they will spread or puff while baking.
- Position racks in the upper and lower thirds of the oven and preheat to 350 degrees F.
- Bake the dough pieces until a rich golden color, 20 to 25 minutes. Transfer the cut-out cookies to a cooling rack. Fill the cavities of the house pieces with about 1 teaspoon of crushed candy, using 2 colors in each cavity for a marbled effect or 1 color for a monochromatic effect. Return to the oven and bake until the candies are melted, 2 to 3 more minutes. Let cool on the baking sheets, then transfer to a cooling rack to cool completely, 1 to 2 hours.
- For the royal icing: Combine the confectioners' sugar, meringue powder and 3/4 cup water in a stand mixer fitted with the paddle attachment. Mix on medium speed until stiff enough to form peaks, about 4 minutes. The icing should be pure white and thick but not fluffy or bubbly. Add food coloring if desired and mix with a rubber spatula until the color is uniform. (Adding too much color reduces the sheen of the icing and can break down the consistency over a couple of days.) Store the icing, covered, with plastic film on the surface.
- On a cake board, line one side of 1 of the squares and the back house piece with the icing (you can use a piping bag fitted with a plain tip for a neater look; cover the piping bag tip with plastic in between piping so it doesn't dry out). Hold the pieces together for a minute or two so they adhere; repeat with the front house piece and the other square to make the base of the house. Let dry completely, at least 1 hour.
- Use the icing to attach the 2 rectangles to the top of the base to create a roof. Let dry for at least 1 hour and up to overnight.
- Use the remaining icing to decorate the house and cookies. You can also use sprinkles or other candy to decorate the house. Once the house is dry, carefully place a flameless LED tealight or LED fairy lights through the door and watch the house light up. Turn off the lights when not in use.
Cook’s Note
When measuring flour, we spoon it into a dry measuring cup and level off excess. (Scooping directly from the bag compacts the flour, resulting in dry baked goods.) Turn off the lights when not in use.
Looking for Something Else?


Related Pages
- Stained Glass Cookies Recipe
- Gingerbread House Recipe
- Sugar-Cookie Easter Bunny House Recipe
- Gingerbread for a Gingerbread House Recipe
- Chocolate Gingerbread House Recipe
- Royal Icing for a Gingerbread House Recipe
- Salted Caramel Gingerbread House Recipe
- Caramel for a Gingerbread House Recipe
- Peppermint Gingerbread House Recipe