


Recipe courtesy of Carla Hall
Recipe courtesy of Carla Hall
A Bloody Good Tsunami Cake
Getting reviews...
- Level: Intermediate
- Total: 3 hr (includes cooling and chilling times)
- Active: 1 hr
- Yield: 8 to 10 servings
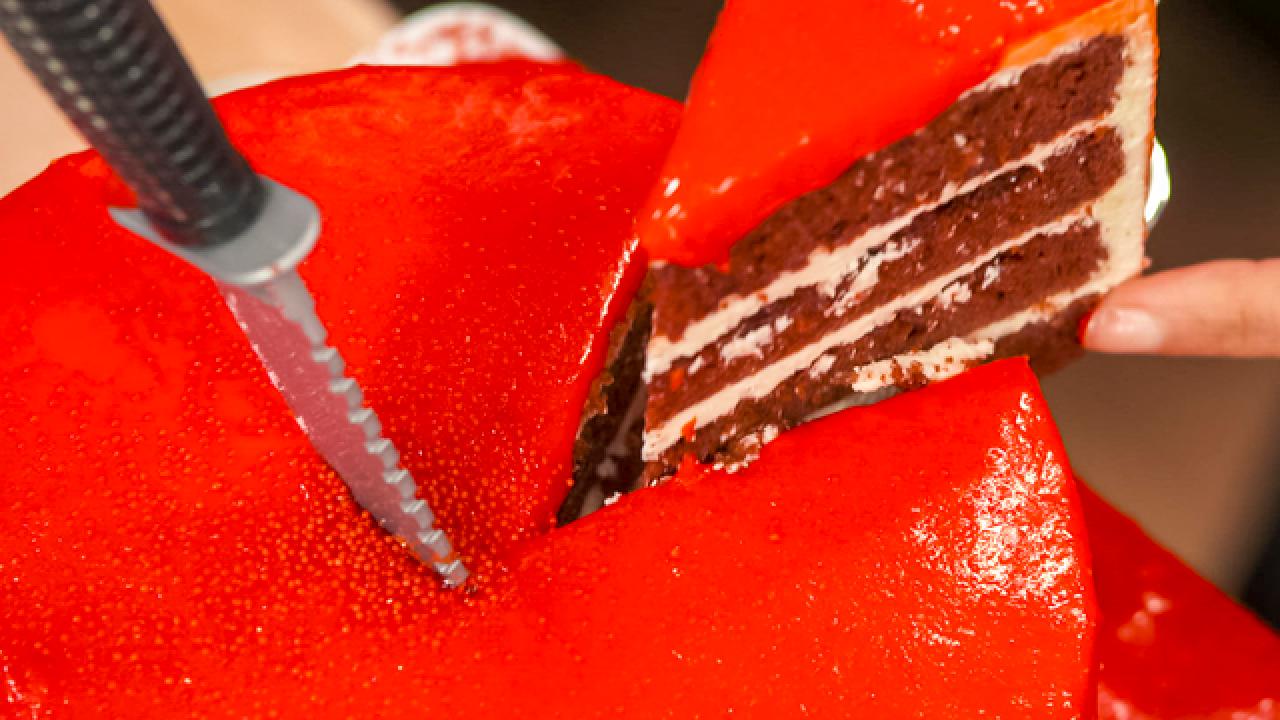
The tsunami--or pull-it-up--cake really works perfectly for a scary Halloween cake. For this one, you simply plunge a plastic toy hatchet, meat cleaver or dagger into the top of a red velvet cake (you can make it from scratch with my recipe below, but there’s no shame in using a store-bought cake!), then wrap the cake in clear acetate, pour a creamy red topping and decorations onto the top inside the acetate shell, then pull up the acetate so that it allows the “bloody” topping to cascade down over the sides of the cake. It’s creepy in the best possible way!
- Level: Intermediate
- Total: 3 hr (includes cooling and chilling times)
- Active: 1 hr
- Yield: 8 to 10 servings
Ingredients
Roasted Beet Purée:
Red Velvet Cake:
Cream Cheese Frosting:
Bloody Good Tsunami Topping:
Directions
Special equipment:
two 8-inch round cake pans; an 8-inch cake round; a rotating cake stand; a plastic toy hatchet, meat cleaver or dagger; a large sheet of clear acetate, at least 2 inches wider and 5 inches taller than the assembled cake- For the roasted beet purée: Preheat the oven to 425 degrees F.
- Place the beets in a piece of foil and season with the salt. Top with the olive oil and a splash of water, close up the foil and roast until a knife or skewer comes out with ease when inserted into the beets, 25 to 30 minutes. Set aside to cool just enough to handle.
- Peel the beets, transfer to a blender with any remaining juices and purée, adding up to 1/4 cup water if needed to get it to puree.
- For the red velvet cake: Reduce the oven temperature to 350 degrees F. Butter and flour two 8-inch round cake pans.
- In the bowl of a stand mixer, combine the flour, granulated sugar, cocoa, baking soda and salt. Mix on low for 30 seconds with the paddle attachment.
- In a separate bowl, whisk to combine 1/2 cup of the roasted beet purée, the buttermilk, oil, food coloring, vinegar, vanilla and eggs. In 2 parts, pour into the mixer. Mix on medium speed until combined. Do not overmix. Pour the batter into the prepared pans.
- Bake on the center rack until a toothpick inserted in the center comes out clean, about 35 minutes. Let cool for 10 minutes, then turn out on a wire rack. Let the cakes cool completely before frosting.
- For the cream cheese frosting: Meanwhile, beat the cream cheese and butter in a large bowl with an electric mixer until combined. Add the chocolate and vanilla extract, then continue to mix until incorporated. Next, slowly add the powdered sugar, beating until the frosting is light and fluffy. Transfer to a piping bag or ziptop bag and snip off the end.
- Pipe a tablespoon of frosting onto a rotating cake stand and place an 8-inch cake round on top, pressing gently to adhere. Place the first cake on the cake round and trim the dome to make flat if needed. Cut the cake in half horizontally to make 2 layers. Frost the top of the first layer, then place the second half on top and frost. Repeat with the remaining cake, cutting in half and stacking between layers of frosting. There should be 4 layers. Finally, frost the sides, finishing with the top.
- For the bloody good tsunami topping: Whisk the milk, heavy cream, cornstarch and salt in a medium saucepan until smooth. Heat over medium heat, whisking constantly, until the mixture just begins to thicken, about 5 minutes. Remove from the heat and immediately whisk in the condensed milk and red food coloring (as many drops to get the color you prefer). Place a layer of plastic wrap over the top of the mixture to prevent a skin from forming, then allow to cool completely before using.
- To assemble the bloody good tsunami cake: Cut a sheet of clear acetate that can wrap completely around the base of the cake, adding an extra 2 inches so that it can be secured with tape on the side and also making sure that the acetate is taller than the top of the cake by at least 5 inches. Wrap the acetate around the cake and tape it to form a long tube--it should not be so tight as to squeeze against the outer layer of the cake, but still have no gaps at the top of the cake so that the topping will not seep over the edges. Gently spoon the bloody good tsunami topping over the top of the cake, then spoon an even layer of red sprinkles and sparkling sugar, about 1/4 inch thick, over the topping. Plunge a plastic toy hatchet, meat cleaver or dagger into the center of the top of the cake--it should be very decorative and realistic-looking for the best effect!
- To reveal the tsunami, grasp the top of the acetate and gently pull up to loosen from the base of the cake, then continue pulling up over the top of the cake in one single motion to allow the topping to cascade over the side of the cake.
Looking for Something Else?


Related Pages
- Sparking Magic Lemonade Punch Recipe
- Chunky Tomato Soup with Blood Sausage Recipe
- Hasselback Holiday Fruit and Vegetables Recipe
- Crispy Beef with Carrots and Snow Peas Recipe
- Hot Fried Chicken with Iceberg-Pickle Slaw Recipe
- Strawberry Cupcakes with Macerated Strawberries...
- Rib-Eye with Smashed Potatoes Recipe
- Orecchiette with Lamb and Mint Pea Pesto Recipe
- Individual Skillet Cornbreads Recipe