


Recipe courtesy of
Kathleen Brennan
for
Food Network Kitchen
Recipe courtesy of
Kathleen Brennan
for
Food Network Kitchen
Watch how to make this recipe.
Shokupan
Getting reviews...
- Level: Intermediate
- Total: 6 hr 10 min (includes rising and cooling times)
- Active: 30 min
- Yield: 4 servings
-
- Nutritional Analysis
- Per Serving
- Serving Size
- 1 of 4 servings
- Calories
- 513
- Total Fat
- 16 g
- Saturated Fat
- 9 g
- Carbohydrates
- 76 g
- Dietary Fiber
- 3 g
- Sugar
- 10 g
- Protein
- 15 g
- Cholesterol
- 83 mg
- Sodium
- 403 mg
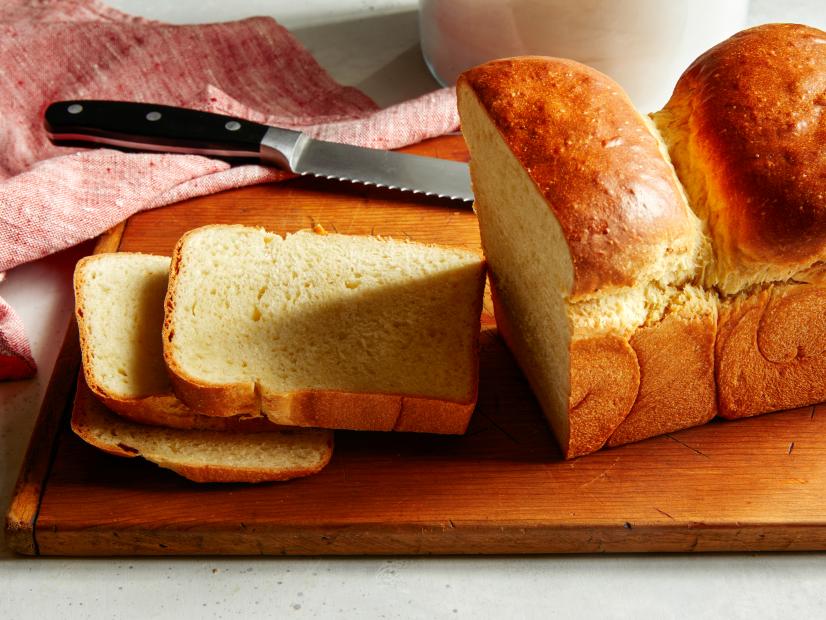
Japanese milk bread is the ultimate white sandwich-style bread: super-soft and fluffy with just a hint of sweetness. This version uses a cooked and cooled roux starter called a yukone to help achieve its pillowy, moist texture. Don’t be put off by the number of steps—the process is pretty straightforward and the result is worth the effort. If you’d like a finished loaf with straight sides, use a pullman loaf pan; otherwise, a regular loaf pan works fine.
- Level: Intermediate
- Total: 6 hr 10 min (includes rising and cooling times)
- Active: 30 min
- Yield: 4 servings
-
- Nutritional Analysis
- Per Serving
- Serving Size
- 1 of 4 servings
- Calories
- 513
- Total Fat
- 16 g
- Saturated Fat
- 9 g
- Carbohydrates
- 76 g
- Dietary Fiber
- 3 g
- Sugar
- 10 g
- Protein
- 15 g
- Cholesterol
- 83 mg
- Sodium
- 403 mg
Ingredients
Starter:
Dough:
Directions
Special equipment:
an instant-read thermometer- For the starter: Whisk together the flour, milk and 1/3 cup (75 milliliters) water in a small heavy-bottomed saucepan until smooth. Turn the heat to medium low and cook, stirring constantly, until thick and pasty, about 3 minutes. Scrape the starter into a small bowl. When cool, cover and refrigerate to allow the starter to rest and firm up slightly, about 2 hours.
- For the dough: After the starter rests for 2 hours, briefly stir together the flour, sugar, yeast and salt in a stand mixer fitter with the dough hook attachment. Add the milk, egg and starter and knead on low speed until completely combined, about 3 minutes. Add the butter 1 tablespoon at a time and knead on medium speed, scraping down the sides of the bowl and the hook once or twice, until the dough is smooth, elastic and a little sticky, about 10 minutes.
- Meanwhile, lightly grease a large bowl. Generously grease a 9-by-4-inch pullman loaf pan or 9-by-5-inch loaf pan.
- Gather the dough from the mixer, form into a ball and place in the greased bowl seam-side down. Cover with a kitchen towel, set in a warm place and let rise until doubled in size, 45 minutes to 1 hour.
- Punch down the dough and roll it out onto a clean work surface. (If needed, lightly flour the surface.) Cut the dough into 2 pieces. Gently form each piece into a ball and set the pieces next to each other seam-side down. Cover with the kitchen towel and let rise for about 15 minutes.
- When the dough is ready, lightly flour a rolling pin and/or the work surface, if needed. Gently roll out 1 ball of dough into a 6-by-9-inch oval. Fold the top edge of the oval over to the center, then repeat with the bottom edge. Tightly roll the right edge of the dough until you form a log. Gently transfer the log to the prepared pan seam-side down, so one of the smooth sides touches one end of the pan. Repeat with the remaining ball of dough, setting it in the pan so one of the smooth sides touches the other end of the pan. Cover with the kitchen towel, set in a warm place and let rise until doubled in size, 30 to 45 minutes.
- Meanwhile position an oven rack in the center of the oven and preheat to 350 degrees F.
- When the dough is ready, brush the top with a little milk and bake until the center measures 190 degrees F on an instant-read thermometer, about 35 minutes. Carefully remove the bread from the pan and set on a wire rack on its side for at least 1 hour before slicing. (If you cut it when the bread is warm, it will compress and lose its fluffy texture.)


