


Recipe courtesy of Sandra Lee
Recipe courtesy of Sandra Lee
Watch how to make this recipe.
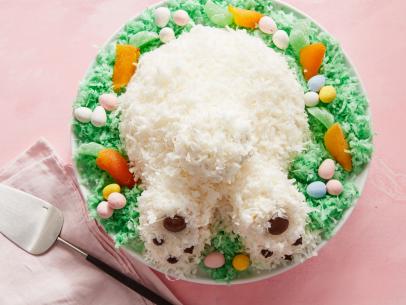
Easter Bunny Cake
Getting reviews...
- Level: Easy
- Total: 2 hr 45 min
- Prep: 30 min
- Inactive: 1 hr 30 min
- Cook: 45 min
- Yield: 8 to 10 servings
- Level: Easy
- Total: 2 hr 45 min
- Prep: 30 min
- Inactive: 1 hr 30 min
- Cook: 45 min
- Yield: 8 to 10 servings
Ingredients
Cake and Frosting:
Decorations:
Special Equipment:
Directions
- Preheat the oven to 350 degrees F.
- Butter and flour the metal bowls. Combine the cake mix, water, oil, and eggs in another clean bowl. Beat for 2 minutes or until well blended. Pour 2 cups of batter into the smaller prepared bowl; pour remaining batter into larger prepared bowl. Bake smaller cake for 40 minutes and larger cake for 45 minutes, or until toothpick inserted into the center of the cake comes out clean. Cool cakes on cooling rack for 30 minutes. Invert cakes onto cooling rack and cool completely.
- Cut larger cake in half, forming 2 half-moon pieces. Spread 1/4 cup of frosting over flat top of each piece. Place pieces cut side down on work surface, adhering frosted sides together. Trim 1-inch from 1 end of the cake; discard trimmings. Repeat with the smaller cake. Place larger cake on a serving platter. Spread 2 tablespoons of frosting over trimmed end of smaller cake. Place trimmed end of smaller cake against trimmed end of larger cake. Spread remaining frosting over cakes to cover completely. Sprinkle with all but 1/2 cup of the coconut, pressing to adhere.
- Brush melted milk chocolate over both sides of the cookie halves to coat completely. Sprinkle with reserved 1/2 cup coconut; set aside to dry. Press 2 semisweet chocolate morsels onto bunny face for eyes. Using toothpicks, secure jellied candy onto bunny face for nose. Using toothpicks, secure licorice pieces onto face for whiskers. Using toothpicks, secure miniature marshmallows onto bunny face for teeth. Make 2-inch deep cuts atop bunny head; insert chocolate cookie halves for ears. Roll large marshmallows together; using toothpick, secure onto bunny for tail.