













Here’s Why Food Network Kitchen Wants You to Cover Your Thanksgiving Turkey in a Blanket of Butter
This unconventional method results in a bird that's beautifully crispy and extra juicy.


Anders Krusberg
If you’re like us, the great turkey debate happens every November right before Thanksgiving. Should you go with the same traditional tukey recipe this year, or try your hand at the fad of the moment (upside-down roasting, wet brining, deep-frying, dry brining)? Well, for Food Network Executive Chef Ginevra Iverson (and for the rest of us) there really is no question: Once you give Butter-Blanketed Turkey a try, you'll have your Turkey Day method locked in for life.
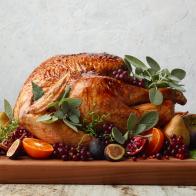
That's because the end result of this recipe is simply perfection. There’s no hint of dryness, the signature criticism turkey-haters always lob every year. (They can eat ham!) The meat is moist, juicy and perfectly seasoned, and the skin is burnished beautifully and is so crispy, you’ll have to hold yourself back from eating it by the handful as you carve your bird. This recipe also yields the most ideal gravy, too! Keep reading to see what makes this method the very best way to cook your turkey this Thanksgiving.
Keep It Clean
First, we have to acknowledge the elephant in the room, or in this case, the big raw bird in your kitchen. To limit the risk of cross-contamination, Ginevra suggests getting all your ingredients and equipment ready before you begin. Measure out your salt and pepper so you’re not reaching into your salt cellar with turkey hands. Wedge up your lemon and onion, and separate out the fresh herbs you’ll be tucking into the turkey cavity, too. Make the paprika butter, which will provide gorgeous color and a subtle roasty flavor. And don't forget to cut the cheesecloth: You’ll need a piece about 30 inches long for this recipe. Fold it in half twice to create 4 layers, then place it in the pot that's holding the melted butter, to transform it into Food Network Kitchen's legendary butter blanket.
Prep Your Bird
Now, it’s time to handle your turkey. Make sure to pull the giblets bag out from the inside of the turkey cavity; if the turkey neck isn't included in the bag, double-check to make sure it isn't in the cavity, and if it is, pull it out, too. (You'll want to save everything in this bag except the turkey liver to make your gravy.) Once that's done, tip the bird cavity side-up and sprinkle salt and pepper all over the inside. This ensures that every part of the turkey is well-seasoned, not just the surface. Add the lemon, onion and herbs next, but don’t overdo it; a too-stuffed cavity will slow down the turkey from evenly coming up to temperature. You want there to still be some airspace in there!
Once your turkey is seasoned, bend the wings behind the back and very gently start to separate the skin from the breast. The skin around the neck side has a lot more give than by the legs, where it could tear. Just ease your fingers under the skin, loosening it from the breast, creating space where you can add your seasoned butter. Then massage chunks of the paprika butter underneath; you can work one hand between the skin and meat and the other on the outside of the skin, sort of mashing it into position. This adds so much flavor and seasoning, not to mention a beautiful color on the meat when you slice it. Finally, season the outside of the bird.

Anders Krusberg
Add Some Aromatics
Aromatics, like onions, carrots and celery thrown directly into your roasting pan will add additional dimension to your gravy. Place the roasting rack right on top of the veggies, sort of snuggling it in there so that it won’t slide around. Pour stock in the base of the pan, then put the turkey on the rack. Truss the legs together with cotton kitchen twine, to ensure even cooking (and keep those herbs in the cavity from unceremoniously falling out).
Make the Butter Blanket
Finally, it’s time for the butter blanket. Gently wring out the cheesecloth that’s been soaking in the butter, and spread it across the turkey, all the way down as if you’re tucking it in at bedtime. The cheesecloth has a crucial function. When you baste a non-blanketed turkey, the basting liquid makes a satisfying sizzle as it hits the skin, but then it just rolls right back off the bird again. Here, the cheesecloth acts like a sponge, absorbing the juices and holding them against the skin while the turkey cooks. That means that the flavor you’re building, and the incredible moisture from the butter, gets locked in.

Anders Krusberg
Don't Forget to Baste
You’ll be basting every 30 minutes as the turkey roasts. Each time you do, make sure that the cheesecloth, which dries out and hardens during the roasting process, gets fully saturated again. This is a great visual cue to see where the turkey needs basting, and it also prevents the cheesecloth from sticking to the skin when it’s time to remove it. (If you find that one side of the turkey is browning more quickly than the other, simply rotate it in the oven.)

Anders Krusberg
Remove the Butter Blanket
Finally, slowly and carefully peel the cheesecloth away from the turkey, basting any stuck-on areas to encourage it to release, then put the turkey back in the oven. This final stretch will make sure it’s cooked through (an instant-read thermometer inserted in the thickest part of both thighs should read 160 degrees F; avoid hitting the bone, which will inaccurately increase the read). Your turkey will be so golden, it'll be ready for its Norman Rockwell moment.
Gravy Time!
Though you could theoretically just make a gravy from a few boxes of store-bought stock, that would be leaving so much flavor on the table. Seasoned cooks know that great gravy is built with layer upon layer of flavor, starting with that little bag found inside the turkey that we mentioned earlier. Use it to make a concentrated broth or to fortify a store-bought stock; you won’t regret it, and it doesn’t really take that much more effort to simmer a small pot full on the back of the stove.
Additionally, you’ll want to collect any pan drippings, which are so rich in turkey flavor. Usually home cooks use a fat separator to solely collect only the drippings, and instead choose to make the gravy roux with fresh butter. But let’s review: Our turkey was cooked in a ton of butter, so that fat on the top of your separator is an even-better butter, one that's infused with rich turkey flavor. Use that to make your roux, then use the drippings to turbo-boost the umami of the gravy.

Anders Krusberg
Carve and Enjoy!
Take your time and use the sharpest knives that you feel most comfortable with to carve your turkey; we love using a boning knife for helping work around and through the joints. Remember to rest the bird at least 30 minutes before carving to let its juices reabsorb; if you cut too soon, all those juices will run out onto your carving board. Remove the turkey's legs first, then separate them from the thighs, and cut the thighs along the bone into two pieces. Remove the wings and divide them into two pieces each; finally, cut the breasts right off, then slice across the grain, giving each slice an edge of that incredible skin. As a finishing touch, add a few fresh herbs to your serving platter — you won’t believe how much drama and beauty just tucking a few sprigs among the meat will bring to your holiday table.
Related Content:


