.jpg.rend.hgtvcom.126.196.suffix/1789013089131.jpeg)














Recipe courtesy of Heather Baird
Recipe courtesy of Heather Baird
Watch how to make this recipe.
Beetlejuice Candy Bark
Getting reviews...
- Level: Intermediate
- Total: 1 hr
- Active: 45 min
- Yield: 12 servings
-
- Nutritional Analysis
- Per Serving
- Serving Size
- 1 of 12 servings
- Calories
- 377
- Total Fat
- 18 g
- Saturated Fat
- 9 g
- Carbohydrates
- 58 g
- Dietary Fiber
- 3 g
- Sugar
- 45 g
- Protein
- 3 g
- Cholesterol
- 2 mg
- Sodium
- 83 mg
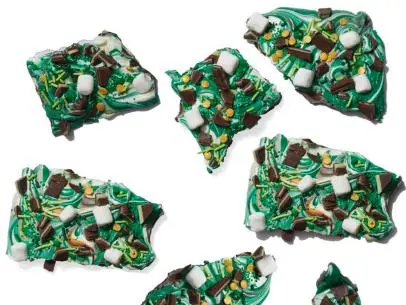
Celebrate “Beetlejuice Beetlejuice” with a treat that's as wacky and wonderful as this movie sequel itself. Our colorful bark features the iconic faces of Beetlejuice and Lydia Deetz along with creepy-crawly sprinkles on a swirled candy base. Get ready for a sugar rush that’s out of this world! You can put a plate of the bark out for snacking, or package pieces in cellophane bags and tie with black ribbon for a spooky-sweet party favor or Halloween treat. And be sure to see “Beetlejuice Beetlejuice” only in theaters September 6.
- Level: Intermediate
- Total: 1 hr
- Active: 45 min
- Yield: 12 servings
-
- Nutritional Analysis
- Per Serving
- Serving Size
- 1 of 12 servings
- Calories
- 377
- Total Fat
- 18 g
- Saturated Fat
- 9 g
- Carbohydrates
- 58 g
- Dietary Fiber
- 3 g
- Sugar
- 45 g
- Protein
- 3 g
- Cholesterol
- 2 mg
- Sodium
- 83 mg
Ingredients
NEW: You can now switch to Cook Mode to keep your screen awake.
Directions
Special equipment:
toothpicks; 4 disposable piping bags; a silicone tombstone candy mold; a small offset spatula- Preheat the oven to 250 degrees F. Line a baking sheet 11-by-17 inches or larger with a silicone baking mat or parchment paper and set aside.
- For the Beetlejuice character faces: Line a separate baking sheet with parchment paper. Place the lime green melted candy in a small piping bag with a small hole snipped in the end. Pipe four mounds each about the size of a quarter of the green candy, well-spaced, on the parchment paper. Immediately use a toothpick to pull three sides of the candy into spiked points, resembling hair. Place a whole white candy wafer on top of the candy for the face.
- Place the black melted candy in another piping bag with a tiny hole snipped in the end. Pipe two triangular shapes on each white candy wafer to mimic furrowed eyes.
- For the Lydia Deetz faces: Pipe four mounds each about the size of a dime of the black candy, well-spaced, on the parchment paper. Immediately use a toothpick to pull the candy into spiked points. Pipe a small dot of the black candy just below the dime-sized mounds and place a white candy wafer on top. Pipe 4 to 6 black lines on the white candy wafer to create Lydia’s spiky bangs. Pipe two black eyeballs just below the bangs.
- Transfer the baking sheet with the faces to the refrigerator to chill until set, about 15 minutes.
- For the tombstones: Place the grey melted candy in a piping bag with a small hole snipped in the end. Pipe the candy into a silicone tombstone candy mold and gently rap the mold on a work surface to level the candy and to remove any trapped air bubbles. Transfer to the freezer to chill until set, about 7 minutes. Turn the candy out of the mold gently onto a parchment-lined baking sheet.
- Place the red melted candy in a piping bag with a very tiny hole snipped in the end. Pipe a red arrow pointing down through the center of each tombstone candy; refrigerate until set, about 5 minutes.
- For the candy bark base: Place vertical lines of the lime green, white and purple candy tablets, touching each other, on the prepared 11-by-17-inch baking sheet. Bake until the tablets are melted and glossy, 3 to 5 minutes, or until they begin to lose their tablet shape. Remove from the oven and lightly tap the pan on a work surface to even the candy.
- Immediately drag a small offset spatula through the candy in zigzag fashion to create a marbleized pattern. Gently tap the pan on a work surface to even the candy again, if needed.
- Immediately scatter bug, bat and bone candy sprinkles. Arrange striped candy stick pieces on the candy bark base. Let cool 2 minutes. Add the character faces and the tombstones to the bark. Scatter on the purple and green assorted sprinkles. Refrigerate the candy on the pan for 15 minutes, or until completely set and rigid.
- Remove the candy from the refrigerator and gently peel the bark away from the silicone mat or parchment. Break the candy into pieces. Store the candy in an airtight container at room temperature or package pieces in cellophane bags and tie with black ribbon for a party favor or Halloween treat.
Cook’s Note
If you can’t find candy tablets, simply use 6 ounces of each lime green, white and purple candy melting wafers. Line them up on the baking pan side-by-side to form a rectangle that’s about 9-by-13 inches.