.jpg.rend.hgtvcom.126.196.suffix/1789013089131.jpeg)













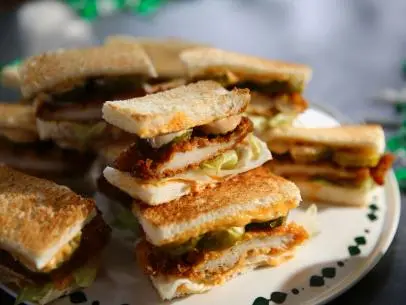
Crispy Spicy Chicken Sandwiches
- Level: Advanced
- Total: 3 hr 10 min (includes pickling time)
- Active: 1 hr
- Yield: 6 servings
- Level: Advanced
- Total: 3 hr 10 min (includes pickling time)
- Active: 1 hr
- Yield: 6 servings
Ingredients
Dill Pickles:
Garlic Parmesan Sauce:
Secret Sauce:
Crispy Spicy Chicken Sandwiches:
Directions
Special equipment:
a deep-fry thermometer or deep-fryer- For the dill pickles: Place the cucumber slices in a colander and sprinkle with the salt. Toss to coat them evenly. Let them sit for 20 to 30 minutes to draw out excess moisture, which will help them stay crisp after pickling.
- In a medium bowl, combine the vinegars, sugar and citric acid. Stir until the sugar has dissolved completely.
- Drain the cucumbers well, pressing gently to remove as much water as possible. Pack the drained cucumber slices into a clean jar or container. Add the fresh dill and red pepper flakes, if using, between the cucumber layers for extra flavor and spice. Pour the brine over the cucumbers in the jar, making sure the cucumbers are fully submerged. If necessary, use a small spoon or weight to keep the cucumbers from floating above the brine. Seal the jar or cover the container and place it in the refrigerator. Let the cucumbers pickle for at least 2 to 4 hours, but ideally, let them sit overnight for the best flavor. The cucumbers will absorb the brine, becoming tangy, sweet and slightly spicy.
- For the garlic parmesan sauce: In a blender, add the Parmesan, garlic, ice water and thyme and blend until a smooth mixture is formed. Pour in a large mixing bowl, then add the mayonnaise, lemon juice, Dijon mustard, crushed red pepper flakes, rosemary, Fresno, shallot and parsley. Stir with a whisk until everything is well combined, then add salt and black pepper to taste.
- For the secret sauce: Combine the mayonnaise, gochujang, relish, Worcestershire sauce, fish sauce and Dijon mustard. Use a whisk or spoon to mix the ingredients until smooth and evenly combined. The gochujang will provide a spicy kick, while the relish adds a touch of sweetness and tang and the fish sauce gives an umami depth. Taste the sauce and adjust the seasoning if needed. If you'd like it spicier, add more gochujang. For a little extra tang, add more relish or Dijon mustard. For saltiness, adjust with a touch more Worcestershire or fish sauce. For the best flavor, cover the sauce and refrigerate for at least 30 minutes before serving. This allows the flavors to meld together nicely.
- For the crispy spicy chicken sandwiches: Combine the paprika, garlic powder, onion powder, salt and cayenne in a small bowl; reserve 1 teaspoon for dredging. Pat the chicken thighs dry with paper towels to remove any excess moisture. This will help the coating stick better. Rub the spice mixture evenly over the chicken thighs, coating each piece well. Let them sit for 10 to 20 minutes to allow the spices to absorb into the chicken.
- Mix the bread flour and the reserved teaspoon of seasoning in a large bowl. In a medium bowl, add the cold club soda.
- Heat about 2 inches of oil in a large skillet or deep-fryer over medium-high heat to 350 degrees F (175 degrees C).
- Dredge each seasoned chicken thigh into the flour, then into the club soda and then back to the flour, making sure it's fully coated. Gently lower the battered chicken into the hot oil, one piece at a time. Avoid overcrowding the skillet, as this can cause the chicken to cook unevenly. Fry the chicken until golden brown and crispy and the internal temperature reaches 165 degrees F, 6 to 8 minutes per side.
- Remove the chicken from the oil to a plate lined with paper towels to drain any excess oil.
- While the chicken is frying, lightly toast the sandwich buns in a dry pan or oven to give them a warm, crispy texture. You can spread a little butter on the cut sides of the buns for extra flavor before toasting.
- Spread a layer of secret sauce on the bottom half of each toasted bun. Add the arugula, tomato and pickles. Toss a crispy chicken thigh in the garlic parmesan sauce, then place it on top of the vegetables and top with the other half of the bun. Repeat to make more sandwiches.
Cook’s Note
You can adjust the amount of lemon juice or Dijon mustard in the garlic Parmesan sauce to suit your taste. Garnish with extra chopped parsley and a sprinkle of grated Parmesan just before serving for an added visual and flavor boost.