













How To Roast a Juicy, Flavorful Turkey for Thanksgiving
We'll help you choose, prep and perfectly oven-roast a showstopping bird.


Matt Armendariz, 2014, Television Food Network, G.P. All Rights Reserved
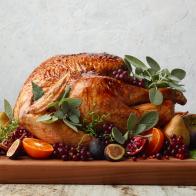
The big day approaches, but it doesn’t need to be intimidating. There are breast-side-down devotees, deep-fry fanatics and cooks who wouldn’t dream of roasting a turkey any way but their own. For a straightforward approach, coat the bird with butter, season it and roast it breast side up at 325°F until a thermometer confirms it’s done, then let it rest before carving. Start with a fully thawed turkey, and give yourself enough time for both cooking and resting. Whether you’re hosting for the first time or simplifying your usual routine, these steps will help you bring a golden bird to the table.
How To Choose a Turkey
A 10- to 12-pound turkey is essentially a big chicken, so don’t let its starring role at Thanksgiving intimidate you. Start by calculating how many pounds of turkey you need per person. A good rule of thumb is about 1½ pounds of uncooked, whole turkey per guest which allows for the bones and leaves room for leftovers.
For a larger crowd, consider roasting two smaller birds instead of one enormous turkey. Smaller turkeys generally cook faster and can be easier to roast evenly, provided your oven has enough room for air to circulate around both pans. You’ll also have four drumsticks to distribute, which may settle a few family negotiations.
Fresh and frozen turkeys can both make an excellent dinner. A fresh bird saves thawing time, while a properly thawed frozen turkey can roast beautifully. Check the label before buying to determine what you’re working with. Self-basting or enhanced turkeys contain an added solution, often including salt, and kosher turkeys have already been salted. These birds generally don’t need another brine. Buying a turkey can be tricky so make sure to pick one that suits your recipe and schedule.
How To Roast a Turkey, Step by Step

Renee Comet
Step 1: Thaw (and Brine) the Turkey
Make room on the bottom shelf of your refrigerator several days before cooking. Keep the frozen turkey in its original wrapping, place it in a rimmed pan to catch leaks and allow approximately 24 hours of thawing for every 4 to 5 pounds. Keep the refrigerator at 40°F or below, and consult our turkey thawing guide to work backward from dinner.
Brining is optional, but it gives salt time to season the meat before roasting. For this method, thaw the turkey in the refrigerator first, then allow 12 to 24 hours for a wet brine or 24 to 48 hours for a dry brine. Include that brining time within the one to two days you can refrigerate a fully thawed turkey before cooking.
Follow a tested recipe for the salt quantity, and keep the bird refrigerated throughout. Choose a method for brining, but skip the additional brine if the turkey is kosher, self-basting or already treated with a salt solution.
Step 2: Prep the Turkey for the Oven
Preheat the oven to 325°F and arrange a rack low enough that the turkey will sit near the center of the oven. Set a roasting rack inside a roasting pan so it will lift the bird above the drippings and allows hot air to circulate underneath. Gather any important tools now so you’re not rushing to grab the at the moment of need.
Take the turkey out of the refrigerator when you’re ready to prepare it, no more than an hour before roasting. There’s no need to bring the whole bird to room temperature. Remove the packaging, check both cavities for the neck and giblets, and refrigerate those pieces if you’re saving them for gravy or stock.
Pat the turkey thoroughly dry with paper towels, including inside the cavity, and remove any remaining pinfeathers with clean kitchen tweezers. Don’t rinse it: splashing water can spread bacteria around the sink and counter. Wash your hands and clean any surfaces that touched raw poultry. Keep total counter time below two hours, or one hour if the temperature exceeds 90°F.

Matt Armendariz, 2014, Television Food Network, G.P. All Rights Reserved
Step 3: Butter and Season the Turkey
Brush melted butter over the skin, reaching underneath the wings and around the legs. Season the outside and cavity with salt and pepper. If you brined the turkey or bought one that was already salted, use unsalted butter and omit additional salt unless your recipe directs otherwise.
For more flavor, stir lemon zest, a little lemon juice and chopped herbs into the melted butter. Thyme, sage and rosemary all work well with turkey.
You can also gently slide your fingers beneath the breast skin to loosen it without tearing, then spread softened herb butter directly over the meat. That puts the herbs and butter where you’ll taste them in each slice, rather than leaving all the flavor on the skin.

Matt Armendariz, 2014, Television Food Network, G.P. All Rights Reserved
Step 4: Add Aromatics or Stuffing
Place a few pieces of onion, lemon and fresh herbs loosely in the cavity, leaving room for heat to circulate. These aromatics add fragrance without turning the turkey into a tightly packed package.
If you prefer bread stuffing inside the bird, add it immediately before roasting and keep it loose, allowing approximately ¾ cup per pound of turkey. Never stuff the turkey ahead of time. If stuffing the bird, make sure to do it safely and check that the center of the stuffing reaches 165°F before taking the bird out of the oven.
Baking stuffing in a separate dish is the safer, simpler choice. A stuffed turkey takes longer to cook, and the breast can dry out while you wait for the stuffing to reach a safe temperature.
Step 5: Truss the Turkey (Optional)
Trussing gives the turkey a compact shape for presentation, but it isn’t essential. Leaving the legs untied exposes more of the thigh area to the oven’s heat and can help it cook more evenly. Either way, tuck the wing tips behind the shoulders to keep them from scorching.
For a fully trussed bird, position the turkey breast side up with the legs facing you. Find the midpoint of a long piece of cotton kitchen twine and loop it around the neck stump at the opposite end. Bring the two ends down along either side of the breast and tie them snugly just below the breast, drawing the sides inward.
Wrap each end around a drumstick, bring the drumsticks together so they cross, then wind the twine around them and tie securely. Trim the excess. For a quicker approach, simply tie the drumstick ends together.

Matt
Step 6: Roast, Rest and Carve
Place the turkey breast side up on the rack and roast at 325°F. As a rough planning estimate, allow about 15 minutes per pound for a medium or large unstuffed bird, but smaller turkeys can take longer per pound. Use our chart for how long to cook a turkey by weight to set your schedule, and allow extra time for a stuffed bird.
Begin checking the internal temperature about an hour before the earliest expected finish time. Insert an instant-read thermometer into the thickest part of the breast, the innermost thigh and the innermost wing without touching bone. All three locations must reach at least 165°F. If the turkey is stuffed, the center of the stuffing must also reach 165°F. Know how to tell when your turkey is done and where to check; the color of the juices alone won’t tell you.
If the skin still needs color as the turkey approaches doneness, increase the oven to 425°F for the final stretch. Start checking after 10 to 15 minutes rather than automatically adding another 30 to 45 minutes. Remove the turkey once it reaches temperature, even if your original schedule allowed more time.
Loosely tent the cooked bird with foil and rest it for at least 20 minutes. For a stuffed turkey, leave the stuffing in place during that rest, then transfer it to a serving bowl before carving. Use the pause to make gravy from the drippings, then start carving.
Turkey Roasting Timeline
Several days ahead: Start thawing. Allow about 24 hours for every 4 to 5 pounds of turkey, working backward from roasting day and adding time for brining if you plan to do it. Thaw in the refrigerator, as recommended by the USDA. Keep the wrapped bird on a rimmed pan on the bottom shelf to catch leaks.
1–2 days ahead: Brine, if desired. Once the turkey has thawed, allow 12 to 24 hours for a wet brine or 24 to 48 hours for a dry brine. Keep it refrigerated throughout, and include brining within the one-to-two-day storage window after thawing.
Up to 1 hour before roasting: Prep and season. Remove the neck and giblets, pat the turkey dry, then butter and season it. Add aromatics or stuffing and truss if desired.
Several hours before dinner: Start roasting. Roast at 325°F, using our turkey cooking chart to estimate the time for your bird’s weight. Allow extra time for a stuffed turkey, plus at least 20 minutes for resting and time to carve.
About 1 hour before the expected finish: Begin checking the temperature. The thickest part of the breast, innermost thigh, and innermost wing must each reach 165°F. If the bird is stuffed, check that the center of the stuffing reaches 165°F, too.
At least 20 minutes before carving: Let it rest. Loosely tent the cooked turkey with foil while you make gravy from the drippings. Then carve, arrange on a platter and serve.

Renee Comet
Turkey Roasting Problems and Fixes
The Skin Is Browning Too Fast
Cover the darkening areas loosely with foil and continue roasting until the meat reaches temperature. You can shield just the breast or cover more of the bird as needed. Skip the high-heat finish if the skin already has plenty of color; remove the foil near the end only if you want more browning.
The Breast Is Done Before the Thighs
Loosely shield the breast with foil to slow further browning while the thighs finish cooking. Foil won’t stop the breast from cooking, so keep checking the temperature and avoid leaving the turkey in longer than necessary. Rotating the roasting pan halfway through cooking can help compensate for oven hot spots, and leaving the legs untrussed gives heat better access to the thighs.
The Skin Isn’t Crisp
Surface moisture makes crisp skin harder to achieve. Start by drying the turkey thoroughly and roasting it on a rack. Frequent basting with watery juices can also keep the surface damp. Basting is optional, but if you enjoy the ritual, stick to liquid fat like olive oil or butter to crisp the skin.
If the meat still needs cooking, a brief finish at 425°F can improve the color and texture. Watch closely, and don’t overcook a finished turkey just to darken the skin.
It’s Cooking Faster or Slower Than Expected
The turkey’s size, starting temperature, stuffing, and your oven’s actual temperature all affect the schedule. An oven thermometer can help identify an oven that runs hot or cool, while an instant-read thermometer tells you what’s happening inside the bird.
If the turkey finishes a little early, let it rest loosely tented while you finish the sides. For a longer delay, keep it hot at 140°F or above rather than leaving it on the counter. If it’s running late, continue cooking until every required spot reaches 165°F. The side dishes can wait a few minutes.
Related Links:
The Food Network Kitchen team develops recipes, tests products, preps for Food Network shows, produces videos and social content, hosts events and much more. "Food Network Kitchen" is the marker of this team's inspiring, helpful and trustworthy content on FoodNetwork.com.


