How to Make a Haunted Gingerbread House for Halloween
Gingerbread season starts early with this scary (but, really, adorable) Halloween party display.

Related To:
Photo By: Heather Baird SprinkleBakes.com
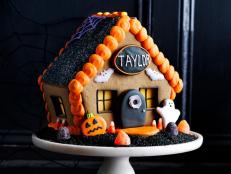
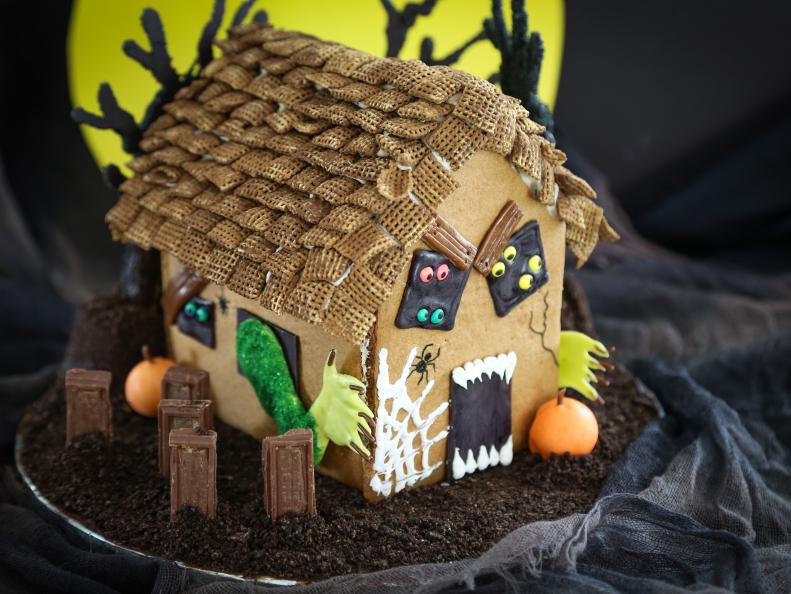
What a Boo-tiful House!
If you're a one-gingerbread-house-per-year kind of person, dare we suggest you step outside tradition and sneak in an extra one this year? Hansel-and-Gretel-inspired homes are super-festive at Christmas, but Halloween has a similar motif baked right into the holiday: haunted houses! The sky's the limit when it comes to decorating these candy creations, but here's how to make our version, a part scary, part silly house-turned-monster.
Get the Recipe: Haunted Gingerbread House
Make the Gingerbread Dough
A sturdy gingerbread house starts with thick dough made with brown sugar and molasses (get the recipe here). You'll know the dough is the correct consistency when you can easily handle it without it sticking to your fingers. Divide the dough in half and roll each piece flat to 1/4-inch thickness between two sheets of parchment. Transfer the rolled dough onto baking sheets and chill in the refrigerator until firm (about 30 minutes). This will ensure the gingerbread has a smooth, even surface after it's baked.
Cut Out Walls and a Roof
Using these templates, cut out the house's four walls and two roof pieces using a flat-edged knife (and don't discard the templates quite yet). Lift the chilled pieces with your hands and transfer them to parchment-lined baking sheets. Well-chilled dough will transfer easily without tearing. Bake at 350 degrees F for 15 minutes.
Trim the Edges
After the cookies are baked and while they're still hot, lay the paper templates on top of each piece and recut the shapes. This makes the house fit together perfectly when you assemble it.
Build the House
Fill a piping bag with melted white candy wafers and pipe it onto the edge of the cookies to assemble the house. A few cans from your pantry can help prop the pieces upright as you build. Let stand until set, about 15 minutes.
Set the Scene
Cover a cake board or a serving platter (you'll need one that's 12 inches or larger) with chocolate frosting. Add crushed cookie crumbs to create a dirt landscape.
Finish Construction
When the walls of the house are set and sturdy, gently lift the house and place it in the center of the cookie-covered cake board. Attach the roof and use extra melted candy to fill in any visible gaps at the corners and edges of the house. Let stand until set.
Layer On a Rickety Roof
Toss cereal squares with cocoa powder to create a bunch of dusty, jaunty roof tiles. Pipe more melted candy onto the roof, starting with a line on the bottom edge, and top it with corn cereal. Pipe another line of melted candy just above the first row of cereal and add another row, slightly overlapping the first. It's OK to use broken cereal pieces — they add to the character of the haunted house! Continue until the entire roof is covered with cereal tiles. Finish by piping melted candy on the front and back top edges of the house and line with a final batch of cereal squares. Let stand until the candy is set, about 15 minutes.
Make Windows and Doors
Print out the template for the house's windows and doors, and place it on a flat work surface under a large sheet of parchment or waxed paper. Pipe over the template's boxes with black melted candy wafers. Use a toothpick to push the candy into small corners and fill in gaps. Make as many windows as you wish for your haunted house by moving the template under a new sheet of parchment paper and piping more boxes.
Give 'Em Eyes
Place colorful candy buttons in each of the windows before the melted candy is set. Use a black food color marker to draw on "eyeballs." Let everything stand until firm.
And Give the Door Fangs
Peel the firm candy boxes with eyes off the parchment and use a little melted candy to attach them to the top of the front of the house. Position each window tilted inward slightly. Attach the larger candy rectangle below the two windows to create the door. Use the white melted candy to pipe dots on the top and bottom edges of the door. Use a toothpick to pull the melted candy into points to create fangs.
Pipe Some Green
With green melted candy, pipe a 4-inch L shape onto parchment paper.
Turn It Into an Arm
Use a toothpick to smooth the melted candy into the shape of an arm with fingers. Pour green sanding sugar over the top portion of the arm, leaving the hand uncovered. Place a chocolate sprinkle on each finger to create long claws. Let set until firm, then peel it off the parchment and shake the excess sugar off. Repeat this process with a backward L shape so that you have two monster arms.
Attach the Monster Arms
Using melted candy, attach a window to each side of the house and hold until set, about 2 minutes. Then attach a monster arm on top of each window and hold those until set too. Further decorate the sides and back of the house with as many more windows as you like.
Make Chocolate Look Like Wooden Boards
Knead two chocolate chews together and roll flat with a rolling pin (if the chews are too firm to flatten, heat them in the microwave for 5 seconds). Cut into small board shapes (about 1/4-inch x 1-inch) using a knife. Use the end of a toothpick to drag some striations through the pieces.
Attach the Boards
Use a toothpick to poke two small holes in each end, creating nail holes on the boards. Attach the pieces over the windows (don't they look like the scary house's eyebrows?) using melted candy.
Start the Trees
Line a baking sheet with parchment paper. For each tree, pipe a line of black melted candy and place a rolled wafer cookie on top of each line. This will anchor the wafers and keep them from rolling around on the baking sheet.
Make 'Em Scary
Pipe more black candy to completely cover the wafers and draw tree branches. Cover with black sanding sugar and let stand until firm, about 15 minutes.
Plant the Trees
Place a round snack cake upside down next to the house. Press the candy tree into the snack cake so it stands sturdily. Cover the cake with leftover cookie crumbs so it seamlessly blends into the scene.
Make a Shaky Ladder
Use pretzel sticks to make a rickety ladder no one would ever want to climb up! Place two whole pretzel sticks parallel to each other, then attach broken pretzel "rungs" between them using melted candy. Let stand until set, then lean the ladder precariously against the house (preferably up to a window with haunted eyes peering out!). We also used some more melted white candy to pipe a spiderweb onto the house.
Make Gumball Pumpkins
Carefully poke a small hole into each gumball using a metal skewer or knife, and thread them onto toothpicks. Dip the gumballs into melted orange candy wafers and place them on parchment paper. Remove the toothpick. Slice slivers of chocolate chews to fashion small pumpkin stems. Place them standing upright on top of the pumpkins. Let set, about 15 minutes.
Add a Graveyard
Turn the pieces of break-apart chocolate bars into tombstones. Pipe a small dot of leftover chocolate frosting onto the crumb-covered cake board, then press upright chocolate pieces into the frosting.
Finish with Some Little Scary Touches
Using a black food color marker, draw on some final flourishes, like spiders, webs, cracks and vines.