


How to Make a Yule Log: A Step-by-Step Guide
Plus the simplest, cutest Yule log cake recipe.

Jessie Sheehan
By Jessie Sheehan for Food Network Kitchen
Jessie Sheehan is a baker and cookbook author.
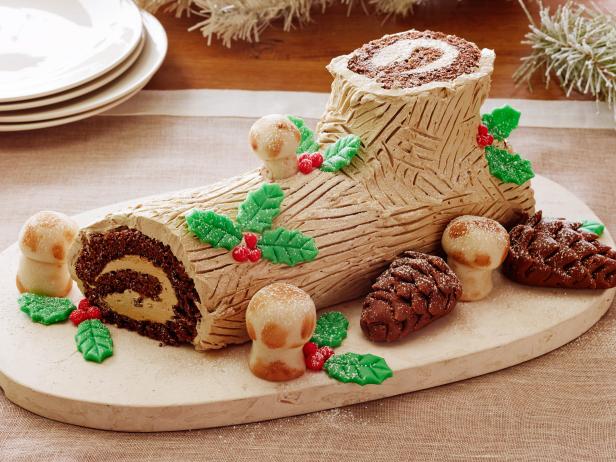
A festive Christmas dessert, yule log cakes go by many names: Christmas logs, buche de noel and more. Most yule log recipes involve a rolled sponge cake, which makes for an elegant presentation. Here, our step-by-step guide to making a yule log.
What Is a Yule Log?
A yule log is a piece of wood that people from some European cultures burn in their hearths around Christmastime. The tradition is thought to have pagan connections; whatever its origins, it’s the inspiration for the yule log cake. Also known as a Buche De Noel, a yule log cake is typically made from flexible sponge cake that’s smeared with buttercream icing, rolled up into a log-shaped roulade and decorated with forest emblems like meringue mushrooms, buttercream leaves and sugar cranberry “berries.”
How to Make a Yule Log, Step-by-Step
Step 1: Bake the Cake
A yule log is typically made with sponge cake, which has the flexibility that rolling up the log requires. Our sponge cake recipe is a little simpler than others, as we do not ask you to separate your eggs (you’re welcome) which one typically does when making a sponge. But our cake is still very flexible, we promise, and you can make it in a regular old standard-sized baking sheet; so, you can skip trying to track down a jelly roll pan, which is often required. Once in the oven, you’ll prep your counter ASAP in anticipation of flipping your still-warm cake out onto it.
Step 2: Prepare Your counter for Your Cake

Jessie Sheehan
While your cake bakes, place a dish towel on the counter, with the long side facing you, and sift cocoa powder all over it. This will ensure the cake does not stick to the towel. As soon as you remove the cake from the oven, run a butter knife around its edges to make sure it will release easily from the pan and dust the top of it with cocoa powder, again, to avoid any sticking. Place the long edge of the pan very close to the edge of the towel (this proximity ensures that when the cake flips out of the pan, it does not have very far to fall) and with a quick flick of your wrist, turn the cake over and onto the towel. Peel off the parchment paper.
Step 3: Roll the Warm Cake Up with a Towel

Jessie Sheehan
After you peel off the parchment, dust cocoa powder over the cake again – yes: there is a lot of cocoa-dusting happening, but we promise there is a method to our madness and that the result of all this dusting will be a crack-free cake (you’re welcome). Begin to roll up the cake along with the towel (imagine putting two pieces of paper on top of each other and rolling them up together). The towel will keep the cake from sticking to itself and will absorb some moisture, too, as the cake cools. This initial rolling, pre-filling, will give your cake its rolled-up muscle memory, so that when you do fill the cake with cream and re-roll it, it easily curls up around the whipped cream, like it was born to do so.
Step 4: Bring the Rolled Cake to Room Temperature

Jessie Sheehan
Once the cake is completely rolled up in the towel, transfer it to a cooling rack and let it come to room temperature. This can take from 30 to 45 minutes depending on the temperature in your kitchen. While the cake comes to room temp, make the whipped cream filling.
Step 5: Carefully Unroll the Cake

Jessie Sheehan
Once your cake is room temperature (you can tell just by touching it) carefully unroll it, still on the cooling rack. It will be lying on the towel and its ends might curl up a bit (that’s its muscle memory at work!).
Step 6: Spread the Cream on the Cake

Jessie Sheehan
As soon as you unroll the cake, evenly spread it with the cream, leaving a small border at the edges.
Step 7: Reroll the Cake

Jessie Sheehan
Once the cream is spread over the cake, immediately and tightly re-roll the cake – without the towel. Once rolled, carefully nudge the cake so it is seam-side down. Still on the towel-lined cooling rack, place the cake in the refrigerator to set up, about an hour. While the cake sets, make the ganache.
Step 8: Cut the Cake

Jessie Sheehan
Once the cake has set in the refrigerator, using two large spatulas, lift the cake off of the towel/cooling rack and place it on a cutting board. Trim the two ends of the cake with a serrated knife just to create perfectly flat ends, then cut off about a four-inch piece of the cake on a diagonal. For the cleanest cuts, dip the knife into very hot water in between each one, wiping the knife with a towel to dry it each time.
Step 9: Create the Branch

Jessie Sheehan
Transfer the two pieces of cake to a serving platter. Place the diagonal edge of the shorter piece on the side of the longer piece, so that it looks as if it is a branch shooting off. Do not worry if there is a gap where the two pieces touch, you will cover the gap with ganache “bark.”
Step 10: Cover the Branch In Bark

Jessie Sheehan
Spread the room temperature ganache all over the cake, leaving the ends exposed, or not.
Step 11: Give the Bark Texture

Jessie Sheehan
Grab a dinner fork and drag its tines all over the ganache creating bark-like texture.
Step 12: Decorate the Yule Log

Jessie Sheehan
Decoratively place some meringue mushrooms and sugared cranberries and rosemary in the spot where the two “branches” meet. Dust the entire cake with confectioners’ sugar, if you so desire, or don’t. We tend to think less is more when yule log decorating, but you do you. Let the decorated cake set in the refrigerator for about an hour before serving.
Yule Log Recipes
Whether you prefer a traditional yule log, a black sesame spin or a clever trick featuring store-bought cake, these yule log recipes have you covered.
Matt Armendariz, 2014, Television Food Network, G.P. All Rights Reserved
This classic yule log recipe is made with chocolate sponge cake, fluffy coffee-spiked buttercream frosting and almond marzipan for a sophisticated, nutty flavor.

This twist on the traditional buche de Noel features black sesame buttercream and a citrus-scented, almond-orange sponge cake.

Matt Armendariz
This easy riff on a traditional yule log calls for store-bought Yodels, so all you have to do is build your logs and frost them—no baking required.

Creamy mascarpone icing, tart cherry jam and an impossibly fluffy, almond-flavored cake come together in this elegant iteration.

Teri Lyn Fisher
This show-stopping holiday cake requires zero baking and is packed with luscious chocolate and coffee flavor.
Related Links:


.jpg.rend.hgtvcom.231.174.suffix/1681323015319.jpeg "535587181")


