

Recipe courtesy of Food Network Kitchen
Recipe courtesy of Food Network Kitchen
Watch how to make this recipe.
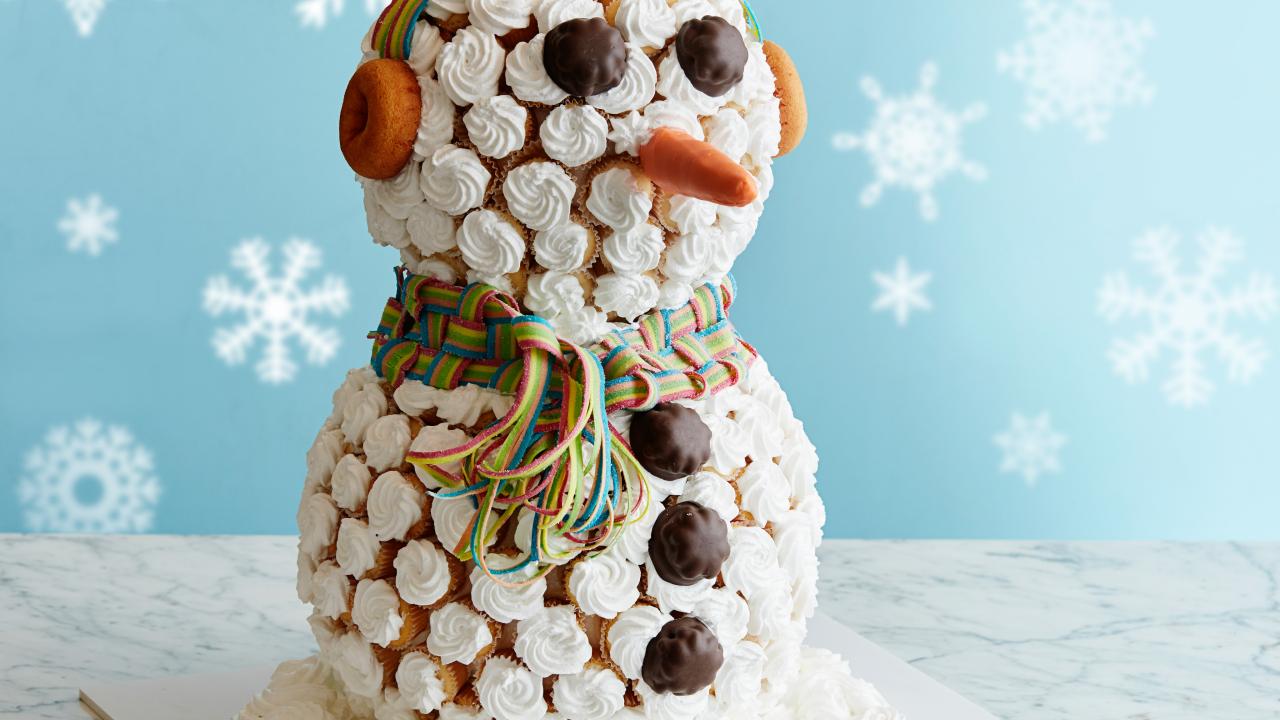
Gigantic Standing Snowman
Getting reviews...
- Level: Intermediate
- Total: 4 hr
- Active: 4 hr
- Yield: 50 to 60 servings
-
- Nutritional Analysis
- Per Serving
- Serving Size
- 1 of 56 servings
- Calories
- 185
- Total Fat
- 4 g
- Saturated Fat
- 1 g
- Carbohydrates
- 35 g
- Dietary Fiber
- 0 g
- Sugar
- 26 g
- Protein
- 2 g
- Cholesterol
- 0 mg
- Sodium
- 229 mg
This impressive centerpiece is perfect for feeding a crowd at your ugly sweater party this holiday season. Coated with a meringue frosting, these bite-size cupcakes are as light as snow and easy to pull off and enjoy during the festivities.
- Level: Intermediate
- Total: 4 hr
- Active: 4 hr
- Yield: 50 to 60 servings
-
- Nutritional Analysis
- Per Serving
- Serving Size
- 1 of 56 servings
- Calories
- 185
- Total Fat
- 4 g
- Saturated Fat
- 1 g
- Carbohydrates
- 35 g
- Dietary Fiber
- 0 g
- Sugar
- 26 g
- Protein
- 2 g
- Cholesterol
- 0 mg
- Sodium
- 229 mg
Ingredients
Snowman:
Frosting:
Directions
Special equipment:
mini muffin tins; about 240 mini white cupcake liners, a large base (about 15 by 20 inches) for building the snowman, such as a foam poster board; a large pastry bag; a medium star tip; up to 300 toothpicks; a 10-inch Styrofoam sphere; a 7-inch Styrofoam sphere; about six 12-inch wooden skewers- For the snowman: Preheat the oven to 350 degrees F. Line mini muffin tins with white mini cupcake liners.
- Prepare the cake batter according to the package directions for using egg whites. Fill each cupcake liner halfway with batter. Bake until a toothpick inserted into the center comes out clean, 10 to 12 minutes. Transfer to a cooling rack to cool completely, about 30 minutes. Repeat with the remaining cake batter (you should have about 240 cupcakes total).
- Microwave the white candy melting wafers in a medium microwave-safe bowl in 30-second intervals, stirring in between each, until melted, about 1 minute. Pour 2 tablespoons of the melted candy onto the center of a large serving platter or serving board (such as a 15-by-20-inch foam poster board). Place a 10-inch Styrofoam sphere on top of the candy and let set until hardened, about 10 minutes. This will be the bottom round of the snowman.
- Trim 2 inches off the flat end of three 12-inch wooden skewers, making sure that the skewers are even in length. Mark the center of the sphere and poke the 3 skewers, bundled together, into the center flat-end first, leaving about half the length of the skewers sticking out of the top. Align a 7-inch Styrofoam sphere on top and in the center of the 10-inch sphere and press down so the skewers are inserted into the smaller sphere, securing the snowman head to the bottom. Leave a 1-inch gap between the 2 spheres.
- Set aside 5 cupcakes for making the nose later. Coat the bottom of 16 cupcakes with the melted candy (reheating as necessary) and wedge them around the base of the bottom sphere so they are in contact with the board, creating a ring of cupcakes to keep the base from moving.
- Poke a toothpick through the top center of each of the remaining cupcakes until the toothpick pokes out of the other side. Coat the bottom of one cupcake with some of the melted candy. Starting at the bottom of the snowman, hold the top of the toothpick and poke the cupcake into the side of the sphere, offset between the row of cupcakes below, so that the toothpick is no longer showing and the coated bottom is pressed against the sphere. Working in batches so that the melted candy does not harden (and reheating as necessary), repeat with the remaining cupcakes until the bottom and head of the snowman are completely covered with cupcakes.
- To make the carrot nose: Crumble the reserved 5 cupcakes into as fine a crumb as possible in a medium bowl. Add the vanilla frosting to the bowl and mix until well combined and the mixture can be formed into a stiff ball. Mold into a 4-inch carrot shape. Cut a 12-inch wooden skewer in half; discard the half without the point. Insert the skewer half lengthwise through the center of the carrot with the pointed end sticking out of the flat side of the carrot. Freeze until solid, about 30 minutes.
- Microwave the orange candy melting wafers in a medium microwave-safe bowl in 30-second intervals, stirring in between each, until melted, 1 to 2 minutes. Dip the frozen carrot into the orange candy until completely coated. Transfer to a parchment-lined dish until hardened, about 15 minutes.
- Attach the carrot nose to the center of the face with the pointed end of the skewer, pressing in until the skewer is no longer visible and the carrot is straight.
- For the frosting: Bring a few inches of water to a boil in a saucepan that can hold a heatproof stand mixer bowl above the water without the bottom of the bowl touching. Add the sugar, lemon juice, salt and egg whites to the mixer bowl and whisk together by hand. Set the bowl above the boiling water and whisk until the mixture is warm to the touch and the sugar is completely dissolved. Transfer to the stand mixer fitted with the whisk attachment and beat at medium-high speed until the mixture is cool and holds stiff peaks, 10 to 15 minutes.
- Transfer a quarter of the frosting to a large pastry bag fitted with a medium star tip. Pipe rosettes onto each cupcake starting in the center and swirling outwards until the entire cupcake is covered with frosting, refilling the pastry bag with frosting as needed.
- To make the eyes and buttons: Cut 3 toothpicks in half and discard one of the halves. Stick the pointed end of each remaining toothpick half into the back of a chocolate-covered marshmallow cookie, making sure it doesn't poke through the front. On the head where the eyes would be, attach 2 marshmallow cookies to 2 cupcakes with the toothpicks. Attach 3 marshmallow cookies to 3 cupcakes down the front of the snowman where the buttons would be.
- To make the ear muffs: Cut two 12-inch wooden skewers in half; discard the ends without the point. Insert a skewer point-side first into each side of the snowman head even with the eyes. Trim any excess skewer to leave 1 inch exposed. Attach a doughnut to each side of the head by pressing the doughnut into the skewer until it is flush with the head and pressing against the frosted cupcakes. Lay the two 9-inch sour candy strands next to each other across the top of the head to attach the ear muffs. Trim any excess if needed.
- To make the woven scarf: Stack four 3-foot-long sour candy strands on top of each other and position vertically in front of you. Measure 4 inches down from the top of the strands and insert a toothpick through all 4 pieces to attach them at the top. Separate the strands below the toothpick so they are no longer stacked on top of each other. Interlace the far-right strand first under the strand next to it, then over the strand next to that and finally under the last strand (on the left) to create the first weave, tightening as you go to create a snug pattern. Continue the pattern by bringing the same strand back over the strand closest to it, then under the next strand and finally over the last strand on the far right.
- Repeat this pattern--weaving side to side and back again--until the strand has been completely woven through. Using a toothpick, attach another 3-foot strand where the original one left off and continue until the new strand is woven through. Cut the remaining unwoven strands at the bottom. Use toothpicks to secure the scarf. Repeat this process, starting with four new 3-foot sour candy strands and weaving in a fifth, to create 2 woven scarf halves equal in length.
- Fray the unwoven section at the top of the scarf halves by pulling the different colors apart. Attach one of the scarf halves to the back of the snowman, securing it with toothpicks. Wrap the scarf carefully around to the front of the snowman so the frayed end drapes near the buttons. Secure the other scarf half, overlapping in the back if needed, and wrap around to the front of the body so the ends of the scarves overlap.
- Keep chilled until serving. Serve within a day.