


- Level: Intermediate
- Total: 5 hr (includes cooling time)
- Active: 55 min
- Yield: makes 1 large kransekake
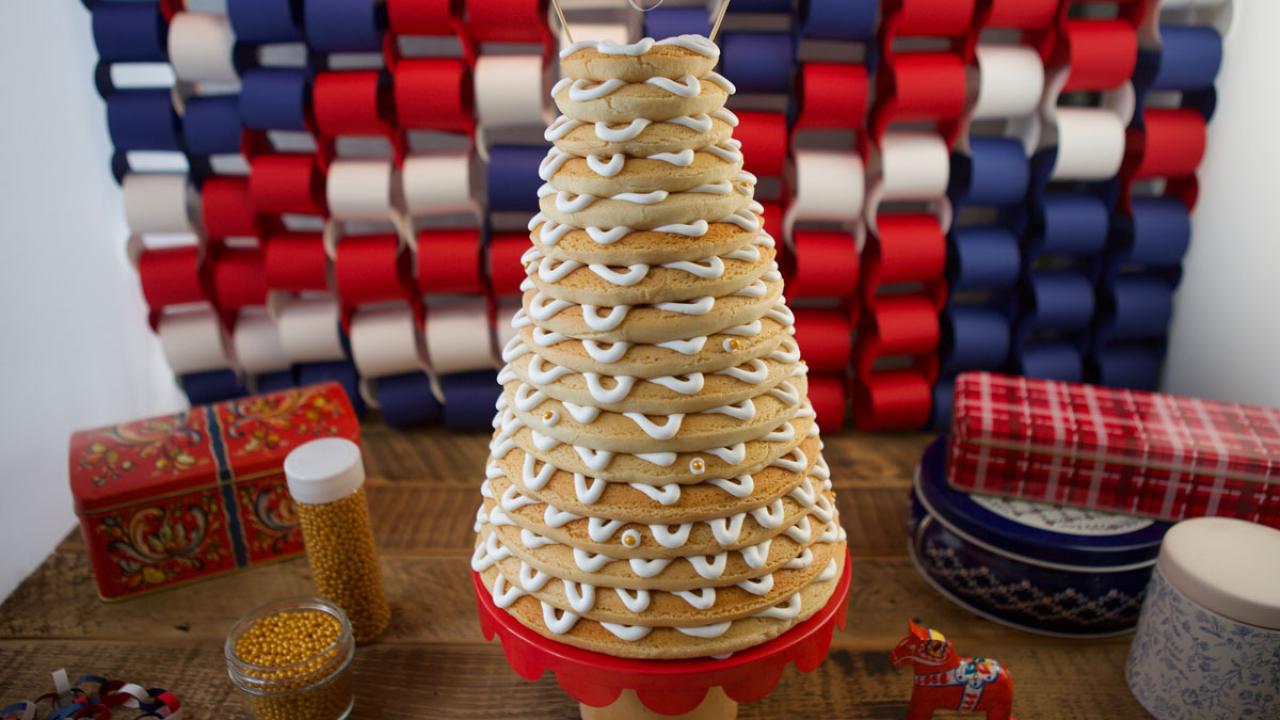
This wreath cake is called a kransekake. It's a Norwegian and Danish cake that you have at big celebrations like weddings, Christmas and Syttende Mai (Norwegian Constitution Day). I made my first one for Chrismukkah last year and the reaction was insane—people loved it and it looked so impressive but [whispers] it's actually easy to make.
- Level: Intermediate
- Total: 5 hr (includes cooling time)
- Active: 55 min
- Yield: makes 1 large kransekake
Ingredients
Directions

Special equipment:
kransekake molds; paper chains, flags, any other fun decor!- Whisk together the almond meal, powdered sugar and salt in a large bowl. Add the egg whites, almond extract and orange blossom water or rosewater, if using, and stir with a spatula to combine. At first it will seem like there is not enough liquid to hold everything together, but just keep on mixing and it will eventually form a dough. Pat the dough into 2 discs, then wrap in plastic wrap and refrigerate for 2 hours or up to overnight.
- Preheat the oven to 400 degrees F and position two racks in the center of the oven. Use your hands to grease the kransekake molds liberally with butter or coconut oil, then set aside. (I prefer to set the molds on large baking sheets so that they're easier to move around.)
- Working with one dough disc at a time, chop off a piece of dough and roll it into a rope that's a generous 1/2-inch thick (or, if you're pulling your kitchen ruler out, just go with 5/8-inch thick), dusting with additional almond flour if the dough is sticky. Coil the rope into the molds, then pinch off any excess dough and pinch the ends to seal them together. Continue the process, re-rolling scraps as needed, until all of the molds are filled. Don't worry about overworking the dough!
- Bake until golden; begin checking for doneness at 9 minutes. You'll likely need to bake these layers in batches, which is totally fine; just keep any dough that you're not working with covered and in the refrigerator.
- Let the rings cool in the pans, then carefully pop them out (a small offset spatula or butter knife will help) and transfer to a baking sheet or wire rack.
- Stack the rings up using dots of the royal icing as "glue" (I do dots at 12 o'clock, 3 o'clock, 6 o'clock and 9 o'clock). Decorate with sprinkles. Let the icing dry, 30 minutes to 1 hour, then decorate with paper chains, flags or other decor as desired. This is good for at least a few days uncovered at room temperature, so feel free to make it in advance!
Looking for Something Else?


Related Pages
- Sprinkles Cake Recipe
- Chocolate Tahini Cake with Tahini Frosting Recipe
- Mexican Chocolate Pinata Cake Recipe
- Blueberry Doll Cake Recipe
- Terrazzo Jelly Cake Recipe
- Norwegian Cream Cake (Blotkake) Recipe
- Chocolate Hazelnut Celebration Cake Recipe
- Honey Whiskey Cake Recipe
- Mixed Berry Crumb Cake Recipe