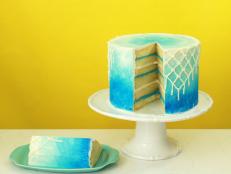
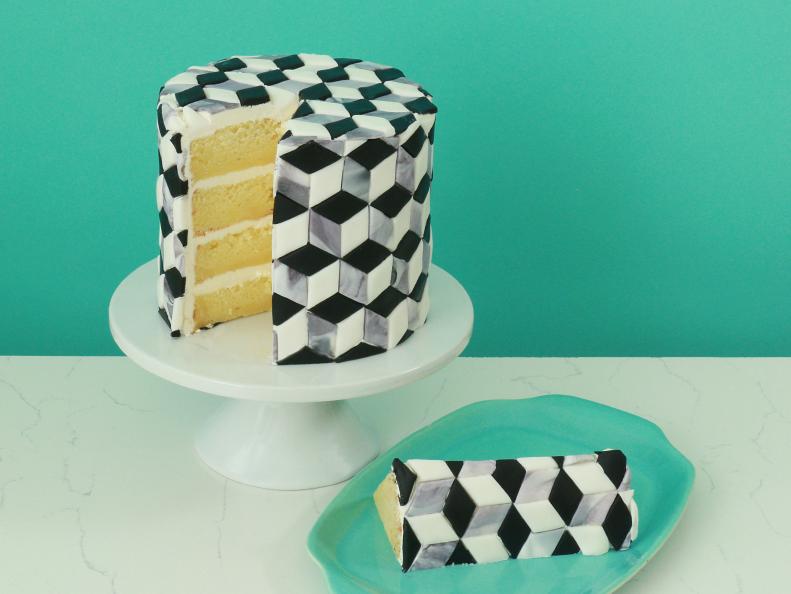
How to Make a Geometric Tile Cake

Give your cake some modern flair with an eye-catching geometric design.

Geometric Tile Cake

Sharp lines and optical illusions help make this black-and-white tile cake just as striking as one in rainbow colors. Follow these easy steps to assemble your own!

Watch the Video: Geometric Tile Cake

What You'll Need

Food:

 ● 4 x 6-inch cake rounds, cooled (choose any recipe you like)
 ● Vanilla Buttercream frosting (use the large batch recipe included or 4 store-bought cans)
  ○ 6 cups (12 sticks) unsalted butter, softened
  ○ 2 pounds (1 bag) confectioners' sugar
  ○ 2 tablespoons heavy cream
  ○ 1 tablespoon vanilla extract
  ○ 1/2 teaspoon table salt
 ● Fondant: black + white

Tools:

 ● Parchment paper
 ● Offset spatula
 ● Plastic piping bag (and a rubber band to close)
 ● Optional: Silicone fondant mat
 ● Fondant rolling pin
 ● Geometric multi-cutter diamond cutter
 ● Frosting smoother
 ● Optional: Serrated frosting scraper
 ● Scissors

Baking and Prep

Preheat the oven to 350 degrees F. Line four 6-inch cake pans with parchment paper and coat with cooking spray. Prepare your choice of cake mix as directed; divide the batter between the pans and bake 25 to 30 minutes. Allow the cakes to completely cool before you begin decorating.

While the cakes are baking, make one large batch of buttercream frosting. Beat the butter for a few minutes on medium speed, preferably using a stand mixer with the paddle attachment. On slow speed, gradually add the confectioners' sugar 1 to 2 cups at a time, allowing each batch of sugar to incorporate with the butter before adding the next. Increase the speed to medium and add the vanilla, cream and salt. Beat for an additional 3 minutes.

Fill a large piping bag with the vanilla buttercream. Use a rubber band to close the bag.

Frost the Cake

Working on a cake plate or board, stack the cake rounds, adding a layer of frosting in between each cake layer.

Frost the exterior of the cake with white frosting, smooth with a spatula or other flat edge frosting tool.

Decorating: Step 1

Onto a silicone fondant mat or a sheet of parchment paper, roll out a fist-sized ball of white fondant 1/8-inch thick.

Decorating: Step 2

Use a diamond shaped multi-cutter (or a single diamond cookie cutter) to cut out the diamond shapes. Repeat with the black fondant, and then with a marbleized fondant.

Decorating: Step 3

To marble the fondant, add some small black pieces of fondant to a white fist-sized ball of fondant, lightly mix the fondant together with your hands before rolling it out.

Decorating: Step 4

Keep the pieces covered until you’re ready to add them to the cake.

Tip: If using 1 1/2 x 3/4-inch shaped diamonds and a 6-inch round cake, you’ll need roughly 100 pieces of each color.

Optional: Line Frosting with Serrated Tool

Run a serrated frosting scraper or any other serrated tool along the side of the cake to create a guide. This linear guide will assist in keeping the design level around the cake.

Assembly: Step 1

Starting at the bottom of the cake, add one of each color of the fondant pieces together to form a hexagon shape onto the cake.

Assembly: Step 2

Repeat until the pattern is all the way around the cake. For any of the partial spaces along the top or bottom of the cake, cut the pieces in half with scissors before adding on.

Assembly: Step 3

Continue with the pattern on top. Trim along the edge with scissors to remove any hanging pieces.

Refrigerate Until It's Time to Serve

Allow the cake to chill for at least 30 minutes before serving.

More from:

Food Goals