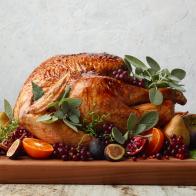














How To Brine a Turkey Two Ways
Brine a turkey two ways: dry brine for crisp skin (24–72 hours) or wet brine for juicy meat (12–24 hours), plus salt ratios, timing and which turkeys to skip.

Shaiith/Getty Images
To brine a turkey, you season it with salt in advance — either rubbed on as a dry brine for 24 to 72 hours or dissolved in water as a wet brine for 12 to 24 hours — so the meat stays juicier and seasoned all the way through.
First things first, you can’t brine a frozen turkey — it must be fully thawed first — so make sure you know how long to thaw a turkey, and allot enough time. Next, consider that dry brining is the easier method for most home cooks: it needs no bucket of salt water, takes less fridge space and gives crisper skin.
With minimal planning and some extra space and time, you'll need just a few pantry ingredients (along with a foolproof turkey recipe) to achieve turkey success this season.
In This Article
What Is a Turkey Brine?
A turkey brine is salt — either dissolved in water with sugar and aromatics (wet brine) or rubbed directly on the bird (dry brine) — that seasons the meat before roasting.
A traditional water-based brine is a mixture of water, salt, sugar and aromatics — like herbs, spices and citrus peel — that infuses turkey with moisture, seasoning and flavor. After boiling to dissolve and infuse, the brine must be cooled completely — below 40°F — before the turkey goes in.
There's also a dry brine which is when salt (plus seasonings) are rubbed directly on the bird to give it flavor.
For more info on brining and its many uses, head over to our story What Is Brining?.
How Brining Makes Turkey Juicier
Brining helps turkey stay juicy because salt changes the structure of the muscle proteins so they squeeze out less moisture as the meat cooks. The salt loosens muscle proteins so they hold more moisture during cooking and seasons the meat deeply.
Brining isn’t required, but it’s the most reliable way to keep lean turkey breast from drying out. Think of it as optional: a well-cooked unbrined turkey can be great too, just make sure you’re on top of how long to cook a turkey.
How Long to Brine a Turkey?
Wet brine a whole turkey for 12 to 24 hours and dry brine it for 24 to 72 hours and always in the refrigerator. More time brining isn't necessarily better: leaving a turkey in a wet brine for more than a day can make the meat spongy, so set a timer. And smaller cuts like a turkey breast need less time.
Wet Brine vs. Dry Brine: Which is Better?
Dry brining is better for most home cooks because it gives crisper skin and needs less space; wet brining works faster and seasons evenly but takes a large container and lots of fridge room.
Dry Brine
Time: 24 to 72 hours
Space needed: A roasting pan on a fridge shelf
Skin: Very crisp
Meat: Juicy, concentrated turkey flavor
Mess/effort: Low
Try this recipe: Dry-Brined Turkey With Classic Herb Butter
Wet Brine
Time: 12 to 24 hours
Space needed: A stockpot, brining bag or cooler large enough to submerge the turkey
Skin: Less crisp unless air-dried after brining
Meat: Very juicy, can taste slightly watered down
Mess/effort: Higher (gallons of brine to make, cool and discard)
Try this recipe: The Best Turkey Brine
Verdict: A dry brine is better if you're looking for a low-effort method that gives a juicy flavor whereas a dry brine requires more mess and can taste slightly watered down. The decision really depends based on your time commitment and flavor preference.

Best Brined Turkey Recipes 32 Photos
Make brining a breeze by following these foolproof turkey recipes from Food Network chefs.
Turkeys You Shouldn't Brine
Don’t brine a kosher, pre-brined or self-basting turkey — it has already been salted, and brining it again will make the meat too salty. Additionally, bear in mind that you don’t need to brine pre-brined turkeys, self-basting or “enhanced” turkeys since they are already injected with a salt solution) are already salted. Check the label for words like “brined,” “basted,” “enhanced” or “contains up to X% solution and consult our turkey buying guide. If a turkey label says ‘contains up to’ a percentage of solution, it has already been brined — skip the salt and go straight to roasting. Additionally, frozen turkeys must be fully thawed before brining.
How to Dry Brine a Turkey in 5 Steps
To dry brine a turkey, pat it dry, rub it all over with kosher salt and baking powder, and refrigerate it uncovered for 24 to 72 hours.

Marge Perry
Step 1: Dry the Turkey
Remove the neck and giblets and thoroughly pat the turkey dry with paper towels. (The less moisture there is on the skin, the more crisp it will be.)

Marge Perry
Step 2: Make Your Seasoning Blend
Make your seasoning blend, which should include 1/2 - 3/4 tsp kosher salt per pound of turkey. This varies by brand as Diamond Crystal is lighter by volume than Morton so you'll want to keep that in mind. For example, a 14-lb turkey would need approximately seven teaspoons of salt. Additionally, a little baking powder in a dry brine raises the skin’s pH, which helps it brown and crisp in the oven.

Marge Perry
Step 3: Season the Entire Bird
Season the entire bird, including the cavity. Be sure to pat seasoning on the bottom, underneath the wings and under the drumsticks. Tuck in the wings and truss the bird, if desired. Optionally, you can also loosen skin and season under it.

Marge Perry
Step 4: Refrigerate the Bird
Set the turkey on a rack or roasting pan uncovered in a fridge for 24 to 72 hours.

Marge Perry
Step 5: Butter the Bird
After refrigerating the turkey, no rinsing is needed. Before roasting, brush the entire surface of the turkey with melted butter.

How to Wet Brine a Turkey in 4 Steps
To wet brine a turkey, submerge it in cold salt water in the refrigerator for 12 to 24 hours, then pat it dry and let the skin air-dry before roasting.

Marge Perry
Step 1: Make the Brine
Make the brining mixture, which should include 1 tablespoon of kosher salt per quart of liquid (which equals ¼ cup per gallon). Make sure the salt (and sugar, if using) are fully dissolved. Never put a turkey into warm brine — cool the brine to 40°F or below first, or the bird will sit in the bacterial danger zone.”

Marge Perry
Step 2: Submerge the Turkey and Refrigerate
Add the turkey and be sure it is submerged. Refrigerate 12 to 24 hours.
Add the brine to a pot or container large enough to hold the liquid and the turkey — about 1 gallon per 10 pounds of turkey. A large stock pot in a mostly empty fridge works, as does a brining bag, which takes up less space.
Some enthusiasts dunk their turkeys in insulated coolers and let them sit outside in the cold—it's important that the internal temperature in the cooler is 40°F or below for food-safety reasons (it will sit in a bacteria danger zone) so you'll want to check with a thermometer and replenish with ice to speed the cooling process.

Marge Perry
Step 3: Dry the Turkey and Let It Sit Uncovered
Remove the turkey from the brine (discard the brine and never reuse it). Pat the turkey dry and allow it to stand at room temperature within the 2-hour limit. Don’t rinse the turkey — pat it dry as the USDA advises against rinsing raw poultry.
Alternatively, you may place the bird on a roasting pan, uncovered, in the refrigerator for up to 24 hours after brining to increase the crisping of the skin when it roasts.

Marge Perry
Step 4: Butter the Bird
Rub the surface of the turkey with softened butter.
Should You Rinse or Season a Brined Turkey?
A brined turkey doesn’t need more salt or a rinse — just pat it dry, rub it with butter and season with pepper or herbs if you like.
This is especially true if you follow balanced brine recipe like our best turkey brine or dry-brined turkey with classic herb butter. Bear in mind, if you plan to make gravy with the pan drippings, adding additional salt could make the gravy end up too salty. Feel free to rub your bird down with butter and proceed with roasting (pepper, herbs and butter are fine) as you would normally. You'll want to taste the drippings before salting the gravy and brush up on how to make gravy.
Turkey Brining FAQ
Can you stuff a brined turkey?
Yes, but it's safest to cook the stuffing separately in a baking dish. If you choose to stuff the turkey, prepare the stuffing just before filling the cavity and use a food thermometer to ensure the center of the stuffing reaches 165 F.
Do you need to adjust cooking time for a brined turkey?
Not necessarily, but brined turkey may cook a little faster because it retains more moisture. Start checking the internal temperature early and use a meat thermometer to ensure the thickest parts of the breast and innermost thigh reach 165 F.
What happens if a turkey isn't completely submerged in brine?
Parts of the turkey that aren't submerged may not absorb salt as evenly as the rest of the bird. Use a container that fits the turkey snugly, and weigh it down with a clean plate if needed to keep it submerged.
Can you brine turkey parts instead of a whole turkey?
Absolutely. Turkey breasts, thighs and drumsticks can all be brined individually. Because smaller pieces have more surface area relative to their size, they generally need less time than a whole bird.
At the end of the day, the decision to brine your turkey is completely up to you. If you decide to do it, then dry brine for 24 to 72 hours for crisp skin, wet brine for 12 to 24 hours if you have the space — and skip brining entirely if your turkey is already kosher or pre-brined.
Related Links:
The Food Network Kitchen team develops recipes, tests products, preps for Food Network shows, produces videos and social content, hosts events and much more. "Food Network Kitchen" is the marker of this team's inspiring, helpful and trustworthy content on FoodNetwork.com.


