.jpg.rend.hgtvcom.126.196.suffix/1789013089131.jpeg)














Pavlova
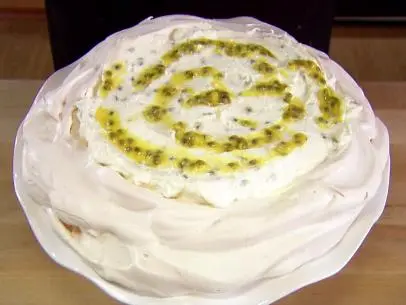
With its crisp meringue shell, soft marshmallowy center, and eye-catching fruity toppings, this dessert is a stunner for any occasion.


- Nutritional Analysis
- Per Serving
- Calories
- 284
- Total Fat
- 11 grams
- Saturated Fat
- 7 grams
- Cholesterol
- 41 milligrams
- Sodium
- 113 milligrams
- Carbohydrates
- 44 grams
- Dietary Fiber
- 2 grams
- Sugar
- 40 grams
- Protein
- 3 grams
Article by: Krissy Downey
There's something so satisfying about this elegant and naturally gluten-free dessert; it's crunchy, creamy and sweet. We opted for confectioners' sugar in the meringue, making the pavlova extra crisp on the outside and marshmallow-like on the inside. Crowned with a halo of whipped cream and fresh berries, this dessert is truly heaven-sent.
What Is Pavlova?
Pavlova is a meringue-based dessert that is crispy on the outside and soft on the inside. It is usually topped with whipped cream and fresh fruit, adding a fresh contrast to the sweet cake-like dessert. It is particularly popular in Australia and New Zealand, but popularity has risen in the United States over the last several years. Pavlova is as delicious as it is beautiful, making it an excellent choice for any festive occasion.
Pavlova Ingredients
Egg Whites – Egg whites are the base ingredient for pavlova, meaning it is naturally gluten free.
Cream of Tartar – Cream of tartar acts as a stabilizer for the egg whites, helping them whip up to their full volume and hold their shape. It is usually available at most grocery stores.
Confectioners’ Sugar – While many pavlova recipes use granulated sugar, our recipe uses powdered or confectioners’ sugar, making it extra crisp on the outside and marshmallow-like on the inside.
Whipped Cream – Homemade, billowy whipped cream is the traditional topping for pavlova.
Fruit Curd or Jam – Storebought jam or lemon curd works wonderfully with this dessert. We use raspberry jam here, but feel free to change things up based on your preferences.
Fresh Fruit – Fresh fruit, typically a variety of berries, is what makes pavlova both beautiful and refreshing.
How to Make Pavlova Like a Pro
Draw a guide on the parchment paper. We avoid any guesswork by drawing a 9-inch circle on the parchment paper the pavlova will bake on. This way, we can just follow our guide when shaping the pavlova instead of stressing over free handing the perfect circle.
Make sure you beat the egg whites until stiff peaks form. The egg whites are ready when they hold their shape firmly and do not droop or collapse when you lift out the whisk or beaters. To test, lift the whisk straight up out of the egg white and sugar mixture. The peak should stand upright with a slight curve at the tip but remain in place without falling back into the bowl.
Let it cool completely before decorating. If you start to decorate the pavlova while it is still hot or even warm, the moisture from the toppings can cause the meringue to crack leading to a soggy or deflated pavlova.
Use a variety of colorful fruit. The fresh, colorful fruit is what gives pavlova its show-stopping appearance. Use a variety of fruit in different colors, like raspberries, blackberries, blueberries, strawberries, figs and red currants. The toppings are what makes pavlova unique, so get creative with different combinations and varieties.
What Is the Difference Between Meringue and Pavlova?
Meringue and pavlova are extremely similar egg white-based desserts, but they are texturally different. Meringue is baked until it is completely dry and crisp throughout, and pavlova is crisp on the outside but marshmallowy on the inside due to the addition of a stabilizer.
How Do You Know When Pavlova is Done?
You’ll look for a few key signs to determine if pavlova is done. First, it will have a crisp exterior which will feel dry and firm to the touch. Second, you may notice some slight cracks. The cracks are normal and indicate the meringue is drying out properly. Next, it will have a hollow sound when you gently tap the crust, and, finally, the pavlova should hold its shape without collapsing or spreading.
Can I Make Pavlova In Advance?
Yes, you can. We recommend making all the components up to one day in advance and assembling just before serving. Don’t add the topping in advance; it’ll make the pavlova soggy.
Pavlova
- Level: Intermediate
- Total: 3 hr 25 min
- Active: 55 min
- Yield: 8 servings
-
- Nutritional Analysis
- Per Serving
- Calories
- 284
- Total Fat
- 11 grams
- Saturated Fat
- 7 grams
- Cholesterol
- 41 milligrams
- Sodium
- 113 milligrams
- Carbohydrates
- 44 grams
- Dietary Fiber
- 2 grams
- Sugar
- 40 grams
- Protein
- 3 grams
- Level: Intermediate
- Total: 3 hr 25 min
- Active: 55 min
- Yield: 8 servings
-
- Nutritional Analysis
- Per Serving
- Calories
- 284
- Total Fat
- 11 grams
- Saturated Fat
- 7 grams
- Cholesterol
- 41 milligrams
- Sodium
- 113 milligrams
- Carbohydrates
- 44 grams
- Dietary Fiber
- 2 grams
- Sugar
- 40 grams
- Protein
- 3 grams
Ingredients
Directions
- Position a rack in the lower third of the oven and preheat to 225 degrees F. Line a baking sheet with parchment paper. Draw a 9-inch circle on the paper, then flip it over so the drawing is on the underside.
- For the meringue, combine the egg whites, cream of tartar and salt in the very clean bowl of a stand mixer fitted with the whisk attachment. Whisk on medium speed until foamy, about 1 minute. Increase the speed to medium-high and beat until thick and opaque, about 1 minute more. Gradually add the confectioners' sugar, 1/4 cup at a time, and beat until stiff shiny peaks form, about 5 minutes more.
- Spread the meringue on the prepared baking sheet, making sure to stay within the drawn 9-inch circle. Create some shallow dips and swoops (this will hold the whipped cream and berries). Bake until the meringue is dry and crisp on the outside, about 2 hours. Turn off the heat and let the pavlova sit in the warm oven to dry out more, about 1 hour. Transfer to a wire rack to cool completely. (The meringue can be made up to several hours in advance.)
- Meanwhile, make the whipped cream by whisking together the heavy cream and vanilla in a large bowl with an electric mixer until stiff peaks form, about 3 minutes. Cover and refrigerate until ready to serve.
- Toss the berries and raspberry jam in a medium bowl until evenly coated and glossy. Cover and refrigerate for at least 15 minutes and up to 1 hour.
- To serve, dollop the whipped cream on top of the meringue and spread into an even layer. Pile the macerated berries on top (drizzle any berry juice on top as well). Slice into wedges and serve immediately.
Cook’s Note
Make sure your eggs are at room temperature; this will ensure that the right volume is achieved when whipping the whites.