


Recipe courtesy of
Winnie Lee
for
Food Network Kitchen
Recipe courtesy of
Winnie Lee
for
Food Network Kitchen
Watch how to make this recipe.
Watercolor Snowflake Cookies
Getting reviews...
- Level: Intermediate
- Total: 10 hr (includes cooling and drying time)
- Active: 1 hr 30 min
- Yield: about 30 cookies
These buttery snowflake-shaped cookies are decorated with vanilla royal icing and painted with a watercolor effect that’s both artistic and elegant. Shades of blue wash over the surface of the cookies, and accents of shimmering edible silver leaf add sparkle and dimension. The key to painting on top of royal icing is diluting gel food coloring with a little bit of vodka because the moisture evaporates quickly and leaves the beautiful color behind. With their rich flavor and glossy finish, these cookies are as delicious as they are beautiful — a showstopper treat for any winter celebration.
- Level: Intermediate
- Total: 10 hr (includes cooling and drying time)
- Active: 1 hr 30 min
- Yield: about 30 cookies
Ingredients
Dough:
Vanilla Royal Icing:
Decorating:
NEW: You can now switch to Cook Mode to keep your screen awake.
Directions
Special equipment:
a 3- to 4-inch snowflake cookie cutter; 2 piping bags fitted with fine plain tips; 2 food-safe paint brushes; clean tweezers- For the dough: Cream the softened butter and sugar in the bowl of a stand mixer fitted with the paddle attachment until light and fluffy, 2 to 3 minutes. Beat in the egg and vanilla paste until fully incorporated.
- In a separate bowl, whisk together the flour, baking powder and salt. With the mixer on low, gradually add the dry ingredients to the wet ingredients, mixing until combined. The dough will be soft but not sticky.
- Preheat the oven to 350 degrees F and line 3 baking sheets with parchment paper. Cut the dough in half. Roll out the dough on a lightly floured surface to about 1/4 inch thick. Use a 3- to 4-inch snowflake cookie cutter to cut out cookies. Place the cookies on the prepared baking sheets, spacing them about 1 inch apart. Repeat with the remaining dough. (If the dough gets too soft to work with, after rolling it out you can transfer it to the refrigerator to chill for 20 minutes.)
- Bake the cookies until the edges are lightly golden, about 10 minutes. Let the cookies cool on the baking sheets for a few minutes before transferring them to a wire rack to cool completely.
- For the vanilla royal icing: Whisk the confectioners' sugar and meringue powder together in a large bowl. Beat in 5 tablespoons water with an electric mixer fitted with the paddle attachment on medium-high speed. Beat until soft, glossy peaks form, adding 1 tablespoon more water if needed. Beat in the vanilla. You’ll need two consistencies of icing: A thicker icing for outlining the cookies and a thinner, runnier icing for filling (flooding) the outline. Transfer one-fourth of the icing to a piping bag fitted with a small round tip and set aside for outlining. Slowly beat more water into the icing remaining in the bowl until it is spreadable and just flows. Transfer this to another piping bag fitted with a small round tip for flooding the cookies.
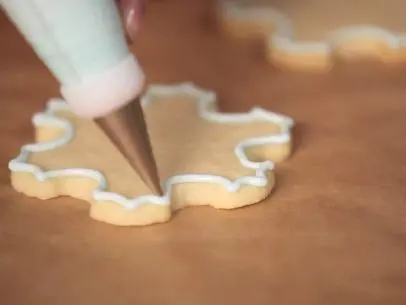
- Use the thicker icing to outline the snowflake shape of the cookies. Once the border outlines are done, fill in (flood) the centers of the cookies with the thinner icing piped inside the border; it should be thin enough to just cover the surface. Use a toothpick to help the icing reach the edges and to remove any air bubbles. Reserve a small amount of the thinner icing in the piping bag for decorating the cookies; place the bag in a resealable plastic bag and set aside. Allow the cookies to dry completely at room temperature. This can take 6 to 8 hours or overnight, depending on the humidity.
- For decorating: Place vodka in a small bowl. Dip a clean, food-safe paintbrush into the vodka and generously brush the iced surface of a dried cookie with vodka. Working quickly before it dries out, dip another food-safe paintbrush into a small amount of blue gel food coloring, then dab and dilute it on a plate by dipping the paintbrush into the vodka. Mix until you reach a light, translucent blue shade. Lightly brush the diluted color onto the cookie in broad strokes or dabs, focusing on different areas to create a gradient or ombré effect. You can layer darker shades on top of lighter ones to add depth. Blend the edges of the colors by brushing lightly with a clean brush dipped in vodka. The colors will flow into each other, creating a soft watercolor look.
- After the watercolor effect has dried slightly, about 5 minutes, dip a brush into vodka and then into a dab of the reserved royal icing. Use it to make white highlights on the cookie. These highlights should slightly bleed into the blue areas, mimicking the look of snow or light reflecting. Decorate the remaining cookies.
- Carefully apply small pieces of edible silver leaf to the cookies using clean tweezers. Focus on areas where you want to add sparkle or extra dimension. Gently press the silver leaf onto the icing with the back of a clean, dry brush or your finger to ensure it adheres well. Allow the cookies to dry completely, letting the paint set and the silver leaf adhere, 1 to 2 hours. Store in an airtight container for up to 3 days.
Cook’s Note
When measuring flour, we spoon it into a dry measuring cup and level off excess. (Scooping directly from the bag compacts the flour, resulting in dry baked goods.) Please note that the iced topping and decoration are made with clear vanilla extract (1 1/2 teaspoons) and vodka (about 1 tablespoon), which both contain alcohol that may not evaporate completely when dried.
Looking for Something Else?


Related Pages
- 19 Best Healthy Ground Beef Recipes
- Dinner Recipes: From Classics to Weeknight Meals
- 10 Protein Shake Recipes You’ll Crave
- Raspberry Snowflake Pull-Apart Bread Recipe
- Kransekake Recipe
- Leaf Sugar Cookies Recipe
- Shimmering Star Shortbread Recipe
- Barilla’s New Snowflake-Shaped Pasta Is Too Cute
- Barilla Is Bringing Back a Pasta That Will Make...