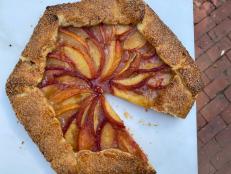
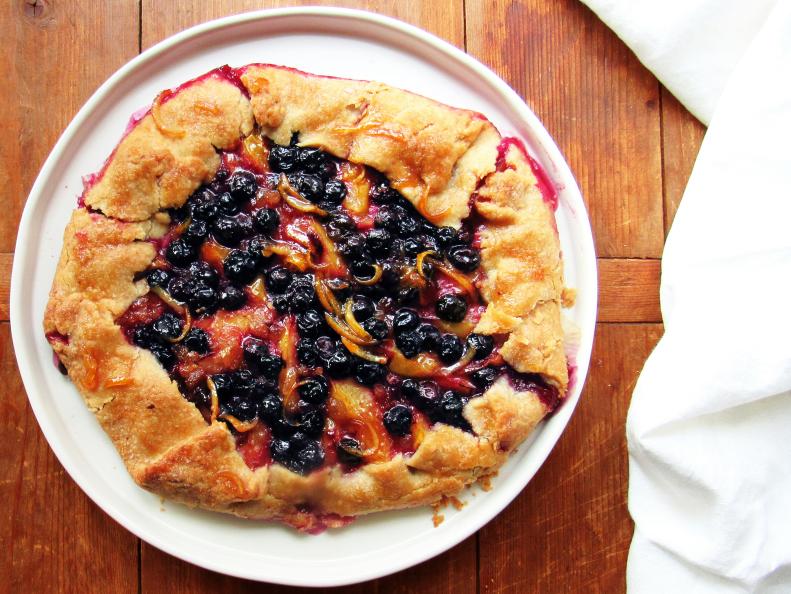
Relax, It's Just a Galette

Simple, rustic and adaptable, French galettes bring charm to any occasion — without the bother of temperamental pie crust.

Pie's Rugged Cousin

We understand why baking a pie or a tart unnerves some people; the crust alone seems daunting. But with chilled ingredients, a light touch, some patience, and a simple and seasonal filling, it's as easy as ... well, a galette. Galettes (also known by their Italian name, "crostatas") are flat, freeform tarts baked on a baking sheet instead of in a pie or tart pan. The pastry is folded up around the filling so that it holds itself together, resulting in a rustic, uneven crust. The filling can be sweet or savory — such as fruit tossed with a bit of sugar, or sliced vegetables paired with any number of herbs or cheeses. They're fun and easy enough for kids to help with, and, most importantly, they are forgiving, since the rugged edges are part of their charm. See why there is nothing to fear with this simple pastry, which lends itself to all sorts of possibilities.


Photography by Laura Agra

Combine the Dry Ingredients

If you have a food processor, just a few pulses will bring together the dry ingredients for the crust (usually flour, sugar, salt, and possibly another add-in, like cornmeal, ground nuts or other seasonings). Otherwise, you can stir the dry ingredients together in a bowl.

Cut In the Butter

This step incorporates the butter (almost always cold) into the dry ingredients, but it leaves the butter in little tiny bits throughout the mixture, rather than fully blended or creamed in. These little bits of butter will melt as the pastry bakes, creating tiny flaky pockets.

Just a Few Pulses

Again, with a food processor, it's a matter of a few pulses, but if you’re working by hand you can use a pastry cutter (available inexpensively online or at any well-stocked cooking store), two knives or even your fingers to distribute the butter into the dry ingredients. Shortening, lard or another fat may be used instead of butter.

Add the Liquid

The liquid may be in the form of ice water, dairy, an egg, even vodka (an ingredient some cooks love to use to add tenderness to a crust). You want the liquid to be cold, and you want to add just barely enough to allow the mixture to hold together in a ball. Pulse in the liquid, or use a fork to quickly stir it in, and handle the dough as little as possible.

Form the Dough Into a Disk and Chill It

Quickly and gently gather the dough into a ball and then pat it into a disk on a generous piece of plastic wrap. Wrap it well, then refrigerate it, usually for about an hour, to firm it up so it rolls out easily and has less chance of sticking to the counter. You can often make the pastry dough ahead of time and chill it, wrapped, for up to several days, though you will want to let it warm up very slightly before rolling, or it will be too hard to roll out.

Roll the Dough

Transferring rolled-out pastry dough from a counter to a baking sheet is not easy stuff for most of us, so a little hack is to roll out the dough on the parchment paper itself. Make sure your work surface is clean and dry, place the parchment on the counter, and sprinkle it with flour to prevent the dough from sticking to the surface you are rolling it out on. Sprinkle the top of the dough with flour, to prevent it from sticking to the rolling pin, and roll out the dough from the center to the edges until you have a round or oval shape, 1/4 to 1/3 inch thick. Do not worry if your shape is not perfectly even.

Trim the Edges

Transfer the pastry on the parchment paper to a rimmed baking sheet. You will likely have ragged edges — you may choose to trim those a bit with a knife to make it look a little neater, but don’t lose too much of the crust.

Toss the Fruit with the Sugar and Spices

The fruit (or whatever filling you are using) may be tossed with some seasonings or other supporting ingredients, such as crystallized ginger or dried fruit. If your fruit is juicy, you may also wish to add in a bit of flour, cornstarch or tapioca, which will help absorb the juices as the galette cooks and prevent the crust from becoming soggy on the bottom. Another option is to sprinkle the rolled pastry, before filling it, with a mixture of flour and a bit of sugar, or a bit of beaten egg or egg whites.

Fill the Galette

Usually the fruit is arranged in the center of the pastry, leaving a border of about 2 inches, so that the edges of the pastry can be folded up to encase the filling.

Fold Over the Edges

Gently lift the edges of the pastry over the filling. You will have overlap in parts of the crust, and when you are finished you will still see a large area of open fruit filling in the middle of the galette, which is both beautiful and allows steam to escape.

Add More Butter

Often small pieces of butter are dotted over the top of the fruit for extra flavor and richness. You may also wish to sprinkle the outer crust with sugar, or brush it with an egg wash or melted butter, which do things like add texture, color and shine.

Brush with Preserves and Cool

Another quick little flavor move is to brush the cooked tart with some sort of melted preserves, which add another layer of flavor, color and shine. Transfer the galette on the parchment paper to a wire rack, and cool completely. Allowing it to cool on a wire rack helps firm up the bottom of the galette. You may see some juice spill out from the sides, especially if you are using berries — this is fine (and a little dramatic!) and the reason we love parchment paper.

Plate and Serve

When you are ready to serve, loosen the galette from the parchment paper with a large spatula, and slide it gently onto a serving platter.

Get the Recipe: Plum and Crystallized Ginger Galette

More from: