Chocolate Cream Pie with Whipped Peanut Butter Cream
- Level: Intermediate
- Total: 3 hr 40 min
- Active: 1 hr 5 min
- Yield: one 9-inch pie
-
- Nutritional Analysis
- Per Serving
- Serving Size
- 1 of 20 servings
- Calories
- 292
- Total Fat
- 20 g
- Saturated Fat
- 10 g
- Carbohydrates
- 24 g
- Dietary Fiber
- 1 g
- Sugar
- 14 g
- Protein
- 6 g
- Cholesterol
- 117 mg
- Sodium
- 36 mg
Ingredients
CHOCOLATE CREAM FILLING:
WHIPPED PEANUT BUTTER CREAM:
SINGLE CRUST:
Directions
- Make the filling: In a medium saucepan, heat the milk, cream, and chocolate over medium-low heat, stirring constantly, until the chocolate has fully melted. Turn the heat up to medium and bring the mixture to a gentle simmer.
- Meanwhile, whisk the sugar, cornstarch, and espresso powder together in a medium heatproof bowl. Whisk in the egg yolks until well combined.
- When the chocolate mixture has come to a simmer, pour about half of it into the egg yolk mixture in a slow, steady stream, whisking constantly. Then pour the egg yolk mixture into the saucepan and cook the pudding over low heat, whisking constantly, until it gets very thick and comes to a first boil (a single large bubble comes up to the surface in the center of the pudding), 3 to 4 minutes. Remove the pan from the heat. Stir in the butter and vanilla until well combined with a silicone spatula.
- Strain the warm pudding into the cooled piecrust and cover with plastic wrap pressed directly against the surface of the pudding. Let cool at room temperature until the filling is completely set, 35 to 45 minutes.
- Make the peanut butter cream: In the bowl of a stand mixer fitted with the whisk attachment (or in a large bowl, using a hand mixer), whip the peanut butter and sugar on medium-high speed until light and fluffy, 2 to 3 minutes. Add the cream and continue whipping until the mixture reaches medium peaks. Add the vanilla and mix to combine.
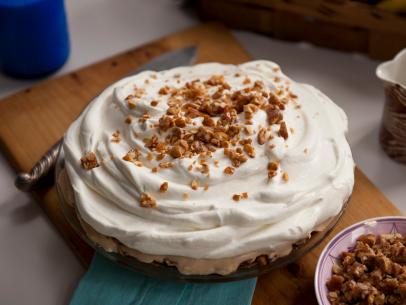
- Finish the pie: Dollop the peanut butter cream on top of the cooled pie and swirl it around with an offset spatula (easier), or transfer it to a pastry bag and pipe it on (fancier—see Pro Tip). Refrigerate until ready to serve.
SINGLE CRUST:
- To mix the dough by hand: In a large bowl, whisk together the flour and salt. Add the butter cubes, tossing them through the flour until each piece is well coated. Cut the butter into the flour by pressing the pieces between your palms or your fingers, flattening the cubes into big shards and continuing to toss them through the flour, recoating the shingled pieces.
- For a flaky crust, continue cutting the butter into the flour just until the pieces of butter are about the size of walnut halves. Or, for a mealy crust, continue to work the mixture together until the pieces of butter are about the size of peas. To mix the dough in a food processor: See Pro Tip.
- Make a well in the center of the flour mixture. Add 3 tablespoons ice water for a single crust or 6 tablespoons for a double crust and mix to incorporate. Then add more ice water 1 tablespoon at a time and continue mixing just until the dough comes together. As it begins to come together, you can knead it a few times to make sure it's fully combined. It's important not to add too much water to the dough, which should never be sticky— it should hold together easily in a ball but still feel almost dry to the touch.
- Form the dough into an even disk if making a single crust; or divide in half and shape into 2 equal disks if making a double crust. Wrap tightly in plastic wrap and chill for at least 30 minutes or up to overnight.
- For a single-crust pie: Lightly flour the work surface. Roll out the dough to a circle 1/4-inch thick: Start in the center of the disk of dough and push away from you using even pressure. Return to the center and repeat, this time moving toward you. Continue, rotating the dough occasionally and reflouring as needed to prevent the dough from sticking. This produces a more even result than just rolling back and forth, which can often yield thin edges and a thick center.
- To transfer the dough to the pie pan, roll the dough up onto the rolling pin, starting at the far edge of the round. With the pie pan in front of you, start at the edge closest to you and gently unfurl the dough into the pan. Press gently to make sure the crust settles all the way to the bottom, but be careful not to poke any holes in the dough. Trim away the excess dough, leaving a 1/2-inch overhang all around. Chill in the refrigerator for 15 to 30 minutes or freeze for 5 to 10 minutes.
- Tuck the excess dough under at the edges, pressing lightly to help seal the dough to the outer rim of the pie pan. Crimp the edges of the piecrust as desired. Return the dough to the refrigerator for 20 to 30 minutes or to the freezer for 5 to 10 minutes.
- Mix the egg with about 1 tablespoon water and whisk. Brush the crimped edges of the dough with a thin layer of the egg wash. The crust is now ready to be blind-baked.
- Peanut Butter Pie Dough: Cut a piece of parchment about 5 inches square. Spread 68 g (1/4 cup creamy peanut butter) in a 1/2-inch-thick layer on the paper and freeze until fairly firm, about 1 hour. Cut into cubes and use in place of 57 g (2 oz) (4 tablespoons) of the butter.
- To Blind Bake A Single Pie: Preheat the oven to 425 degrees F (218 degrees C), preferably with a baking stone on the bottom rack. Cut a square of parchment paper slightly larger than the pie pan.
- Prick the chilled dough all over with a fork. Place the parchment over the crust and fill with pie weights or dried beans.
- Bake the crust on the stone or bottom rack just until the edges barely begin to turn golden, 15 to 20 minutes.
- Take the pan out of the oven and remove the parchment and weights.
- Return the pie pan to the oven and bake for another 12 to 17 minutes, until the dough is evenly golden brown. Cool the crust completely before filling it.
Cook’s Note
Perfect pudding relies on proper cooking. Adding a small amount of the warm liquid to the eggs (while whisking vigorously and constantly) gradually warms up the egg mixture, bringing it closer to the temperature of the rest of the warm liquid, a process called tempering. If the eggs are added directly to the warm milk mixture, they are more likely to scramble, resulting in a grainy, chunky pudding. For a fancier finish, I like to use a flat side of a basket-weave tip to pipe on the whip in concentric circles, working toward the center of the pie. But plenty of other techniques would fly here—think big fat rosettes or even random-sized dots all over! The filled pie can be refrigerated, loosely covered with plastic wrap, for up to 3 days, but it's best to add the peanut butter whip the day that you serve the pie. Manipulated properly, four simple ingredients—flour, fat, salt, and water—make a dough that's crisp and tender. The key takeaways: Keep everything cold; don't be afraid to leave the butter in large pieces; and don't overmix. And, come baking time, don't be afraid of the high temperature, which turns this dough into all it can be through the magic of moisture evaporation and steam! I prefer mixing my dough by hand, but it can be made in the food processor. Start by cutting the butter into 3/4-inch cubes instead of 1/2-inch. Toss the butter in the flour to coat before adding both to the food processor, then pulse in 3-second bursts until the pieces of butter are the desired size, depending on whether you want a flaky (walnut size) or mealy (pea size) crust. I find 10 to 15 pulses usually do the trick. Even when using the food processor, it's best to add the water by hand to prevent overmixing. The tightly wrapped disk(s) of dough can be refrigerated for up to 3 days. Wrapped in plastic and then in aluminum foil, the dough can be frozen for up to 3 months. Thaw overnight in the refrigerator.
