Next Up

How to Make an Ugly Christmas Sweater Pie

By: Helen Nugent

Learn how to "knit" dough, and you'll never want to decorate pie another away.

1 / 13

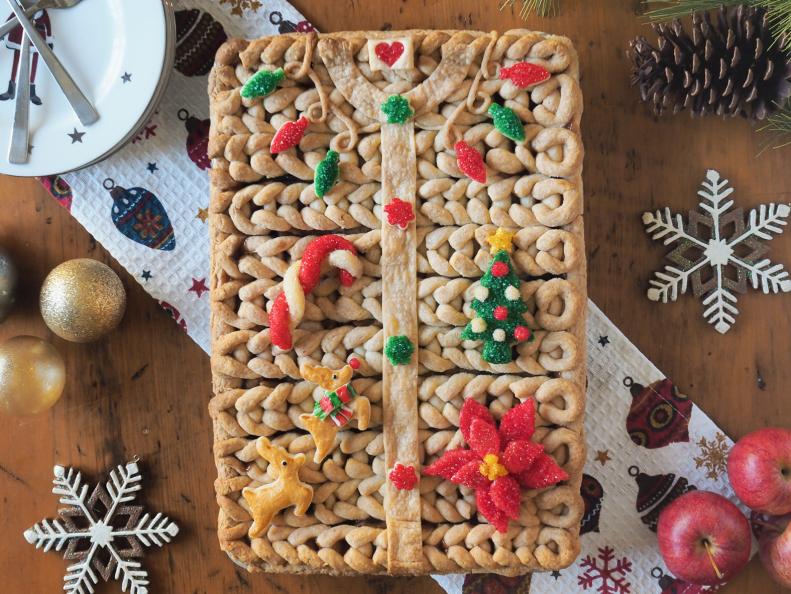
The Kitschier the Better

A traditional "ugly" Christmas sweater might not look so becoming when you actually wear it — but when it inspires a pie, the trend turns downright adorable. And the "knitted" detailing on the pie crust makes this the coziest dessert around — it's a technique you'll be excited to master (especially if you've never quite gotten the hang of those knitting needles). Here's how to whip up your own.

get the recipe

More photos after this Ad

2 / 13

Roll Out the Bottom Layer of Crust

To make a pie that looks like a cheery sweater nicely folded in a box, you'll need a rectangular pan — ours is 10-by-15-by-1-inch. Roll out pie dough (find out how to make it in the full recipe instructions) into a 14-by-19-inch rectangle. Gently roll the dough up around your rolling pin and then unroll it over the baking pan. Fit the pastry into the pan and up the sides. Don't worry if it rips or tears — you can simply patch it back together with your fingers, and you won't see it in the end. Tuck the edges under the side of the pan and trim. Place in the refrigerator while you create your other decorations.

More photos after this Ad

3 / 13

Start the Knit Design

To create the purl stitch effect, roll 1-to 2-inch balls of dough into logs that are 4 inches long and about 1/4-inch wide. (Or feel free to experiement with the size of the pieces — you can "knit" your pie in a fine or chunky pattern, depending on the length and thickness of the dough stitches.)

More photos after this Ad

4 / 13

Get Knitting

Form one of the dough logs into a horseshoe shape. Then lay another log across the bottom of the horseshoe, leaving about 1/4 inch of the horseshoe ends visible. Tuck the two ends of the horseshoe up and over the straight piece, keeping the ends turned in slightly. Then, curve the straight piece downward into the next horseshoe shape. (Watch the recipe video to see this in action.) Continue to build your column of purl stitches until you have 10-inch long columns that will fit across (and completely cover) your pie — flip the columns over before you place them on the pie for a neater look. Once you have assembled all your purl stitch columns, place them in the fridge for 15 minutes.

More photos after this Ad

Next Up

We Recommend