


Everything You Need to Know to Survive in Your Dorm Kitchen
From food safety basics to cooking fundamentals, here’s what every college kid should know before putting an egg to a pan.

Maskot/Getty Images
Whether you’re sending your kid off to university, or if you, personally, are the one about to take the plunge, the transition into college life can be daunting. On the one hand, suddenly you’re afforded a newfound sense of freedom. But, as it goes, with the privilege of independence comes the responsibility of feeding yourself.
The thought of having to manage three meals a day every day for the rest of your life can be panic inducing, but remember, you’re now in control of all the delicious things you consume! Grazing on some small, nourishing plates throughout the day is an option if you can’t find yourself committing to a breakfast, lunch and dinner schedule or if school becomes overwhelming. Don’t worry too much about the exact time or frequency of your meals. Following the routines that keep you well fed throughout a dynamic schedule semester to semester should be the priority.
Now, a huge part of eating is obviously cooking, so if you want to dive into the forays of the kitchen, there are some basic things you need to know to ensure success. It hasn’t been too long since I was in my own dorm kitchen, so here I’ll break down some of that essential knowledge everyone should have before heading off to college.

Sergey Pakulin / EyeEm/Getty Images
Metal Does Not Belong in the Microwave
We’re going to get this one out of the way first because it’s probably the simplest mistake that most people will have the means to make. Many traditional college dorms don’t allow students to bring in small appliances with heating elements, like hot plates, Instant Pots or electric griddles because they’re fire hazards (even decorations like lava lamps are on the no-no list). However, it’s pretty standard to allow a mini-fridge, microwave and coffee maker into student housing to store and reheat food, and provide a necessary kick of caffeine (or just some hot water).
A lot of things can go in the microwave – a lot of things even belong in there, like a splatter shield to minimize bubbling liquids from bursting all over the insides of your microwave – but one of the things (among many) that you should probably never consider putting into your microwave is metal, unless it’s built into a microwavable meal’s packaging or is a cookware set that’s designed to make food in it.
Aside from these exceptions, microwaves are not huge fans of a stray fork or bit of aluminum foil. These small kitchen appliances work by sending microwaves, a form of electromagnetic radiation (think radio waves), throughout its interior chamber. The waves bounce around and get absorbed by the water molecules in your food which creates heat. However, when you have metal with sharp edges, like a fork or jagged piece of aluminum foil the molecules in the metals deflect some of the microwaves, rather than absorbing all of them. Not only will this reaction superheat the metal, but the waves can also bounce between these craggy edges and can send sparks flying, literally. If you’re not careful, you might inadvertently cause some minor damage in your brand-new microwave, or worse: be the minor explosion and subsequent smoke alarm that gets your entire hall evacuated!
Store Fruits and Vegetables Properly for a Long Shelf Life
You want to know the amazing thing about most fruits and vegetables? You don’t really have to cook a lot of them to wind up with a mind-bogglingly delicious result. You can simply toss them together in a variety of combinations in their raw state for a never-ending array of tasty and imaginative salads. The downside? Fruits and veggies have a very finite shelf life, so you have to make sure you’re storing them properly to get the most out of them.
Many fruits and vegetables can just be put in the fridge, though sometimes it’s nice to let some fruit like apples and peaches ripen in a wire basket on the counter. Produce that should never go in your fridge unless you want some unpleasant changes in texture, include lemons, limes, bananas, tomatoes and potatoes — though, you won’t be eating those raw (but feel free to pop them in your microwave for a baked potato). Also, onions and garlic are going to prefer a cool, well-ventilated area to hang out, rather than the fridge. For a more in depth guide on how to store almost any fruit or veggie you can think of check out this A to Z guide.

Maryna Terletska
Eggs Are Your Perfect and Versatile Best Friend
Eggs are a perfect food. They provide moisture and structure to cakes and cookies, they’re essential to many batters and coatings for delicious fried foods, and they’re delicious on their own. Nowadays, there are plenty of gadgets to make eggs in the microwave quickly, so every student can feed themselves a delicious plate of eggs, whether they have a kitchen or not.
For those of you who are lucky enough to have a kitchen, eggs have so many different uses, so you’ll never run out of options for feeding yourself. Frying an egg is a hassle-free preparation, and its presence on top of any rice bowl will liven up your dinner. Not to mention that runny yolk will be a perfect moment to show off on TikTok. Scrambled eggs make a great breakfast whenever you need something quick before class, and they’re so easy to make. If you’re cooking your eggs on the stove top, you’ll want to get yourself a good, non-toxic, nonstick pan (that you should never use metal in for fear of scratching the pan’s smooth, slick surface).
Making scrambled eggs in the microwave is fast and simple too. All you’ll need is a fork, a mug and some eggs. Using the fork, whisk two eggs with two tablespoons of water or milk plus salt and pepper in a mug until it’s completely blended with no streaks of the white. Then, throw it in the microwave for 30 seconds. Take it out, then quickly stir it with your fork. Pop it back in the microwave for 30 seconds and repeat. After this step, microwave your eggs in 20 second intervals until your scramble is as runny or set as you prefer! You can top your eggs with butter, cheese, chives or anything else you like at this point for an easy breakfast.
But aside from being great scrambled and fried, you can also boil your eggs for delicious results. Boiling eggs in the shell can yield wonderful hard-boiled eggs that can be transformed into deviled eggs or a delicious egg salad, but they’re also a great snack for on-the-go. The only annoying part about a boiled egg is the peeling process can be headache inducing if you don’t have the right technique. Poached eggs feel super fancy, but they’re actually really easy to make, and will save you from the peeling process. A perfectly poached egg will elevate the simplest slice of toast or add some extra protein and a bursting unctuous yolk to a brothy bowl of beans.
Remember to Preheat Your Oven (and Your Pans if You Want an A+)
If you’re lucky enough to move into a dorm with a kitchen, then the options for feeding yourself have immediately expanded. No longer are you beholden to the dining hall’s daily offering or whatever’s available on a delivery app, because you’ll be able to do some actual cooking with your oven and stove.
Before any culinary artistry can occur, you’re going to need to preheat your oven. Usually any recipe or packaged food will tell you the exact temperature your oven should be set to, with one of the most common heat settings being 350 degrees F. It should take about 15 minutes for your oven to reach this temperature, and you can check the oven’s built-in thermometer (or get one) to ensure accuracy, but once you’ve hit that desired heat setting you’re good to go.
Preheating the oven allows food to cook more consistently, while also ensuring you can accurately follow a recipe and keep food safe. Say a recipe has a 25-minute cook time at 350 degrees F. If you put your food in the oven without preheating, it will take at least 15 minutes to actually hit 350, and once you do, your food will only have cooked at the proper temperature for 10 minutes – less than half of the suggested cooking time, which will likely leave you with disappointing results.
Furthermore, preheating minimizes the amount of time food remains in the “danger zone.” This temperature range, between 40 and 140 degrees F, is where dangerous microbes are ripe for multiplying in your non-shelf stable consumables. Food should not stay in the “danger zone” for more than two hours. A proper preheat means you can throw your food from the fridge or freezer into the oven with minimal amounts of time lingering at unsafe temperatures.
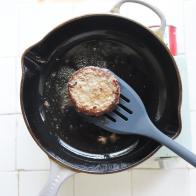
If you really want to take your cooking to the next level, pre-heating your pans on the stove is the next step. While there are no food safety concerns to worry about like when dealing with a preheated oven, having an already-hot pan is a game changer when it comes to creating intense flavor.
Cooking is a series of chemical reactions that transform and concentrate flavors. One of the most important is the Maillard reaction, or the magic that occurs when raw food comes into contact with a hot pan, and all that browned goodness forms, whether you’re searing some meat or roasting some veggies. However, if you haven’t let your pan get properly hot, what you meant to sear will actually start steaming.
When you drop a cut of meat into a hot pan, the water on the surface evaporates almost instantly and allows it to get crisp and browned. If you lack the patience, however, that piece of meat will trap all of the water between it and your pan, and will end up steaming on the underside, turning most meats a pale grayish brown color that doesn’t quite have the same appeal as its golden-hued counterpart.
Preheating your pan doesn’t take long, and you can usually tell it’s ready by pouring a few drops of neutral oil, like canola or vegetable, into the pan. The oil should quickly glide across the pan and have a soft shimmer. If you see a few wisps of smoke, that means your oil is at its “smoke point” which is a perfect temperature for searing – however, if there are billowing clouds filling the kitchen and you see the oil scorch into your pan, it overheated and should be removed from the heat source to cool down to a less dangerously hot temperature.

Capelle.r/Getty Images
A Watched Pot is How You’ll Know When Water’s Boiling
Waiting for water to boil can be truly excruciating, but it’s one of the building blocks to so many comfort dishes, from pasta to mashed potatoes. Because there’s an endless number of combinations of pot-size, water level and even heat-source, it’s hard to say just how long it will take to boil a pot of water. The best way to know if your water is at a steady boil is to check for the visual cues.
A small saucepan with four cups of liquid usually takes around 10 minutes to come to a boil, so generally, you won’t have to think about your pot of water for at least a few minutes. When you’ve returned to the kitchen, if the water looks the same, it’s not boiling. A few bubbles could be quickly rising to the surface in a steady stream in a few concentrated areas. Many people might consider this boiling water, but it’s likely just under the golden 212 degrees F required for a true, rolling boil.
You’ll know your water is boiling when multiple large bubbles rise to the surface and pop in succession of one another. The surface of your liquid should never be still and should be constantly agitated with bubbles – you may even be able to hear a rumble coming from the pot. Once the water has reached this stage, I’d recommend seasoning your water with salt to taste. Salted water takes longer to boil, because the impurities raise the liquid’s boiling temperature, so doing this step after you have a robust boil will cut some time (It also makes the salt easier to dissolve).
After the water’s been properly seasoned, wait another minute or two before dropping anything in the bubbling cauldron. Oftentimes, when you add some food to water that’s boiling, it will drop the temperature of the liquid and bring it down closer to a simmer. If your water hasn’t been boiling for that long, it can take a little while to bring it back up to the proper temperature, thus skewing your cooking times.
One word of caution: sometimes when you’re boiling other liquids, you have to be careful they don’t bubble over the sides of the pot and spill out onto your stovetop. You can use a wooden spoon lying horizontally over the diameter of the pot to break the surface tension created by these foams that will prevent a boil over. Alternatively, you can get a special lid that’s designed to prevent such catastrophes.
Pro tip: You can speed up the boiling process, at least a little bit, by putting a lid on whatever vessel you’re cooking with!
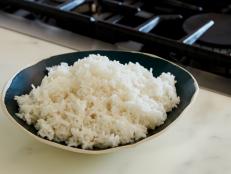
Rice Cookers Are the Countertop Appliance You Need
Dorms can sometimes be a little weird about what they will and won’t let you bring. Usually the items with independent heating elements are on the no-go list, though sometimes university housing with kitchens will let students have small appliances in the designated cooking areas, and every school has a different policy. If you’re so lucky as to have the greenlight to bring a rice cooker to campus, then you’ll definitely want to get your hands on one.
Rice is a staple grain across many cultures around the globe, and a rice cooker will get you a perfect pot in no time (stovetop rice does not compare). You can doctor up cooked rice with all kinds of sauces, condiments and raw veggies for quick and easy rice bowls in your dorm room.
But, as useful as rice is, the rice cooker may be even more versatile. Aside from producing perfectly cooked rice, you can cook other kinds of grains in the small appliance as well as beans, and even a giant pancake! No matter what you choose to cook in it, I know a rice cooker will have the functionality you need to keep yourself stuffed.

Olga PS/Getty Images
How to Handle Your Leftovers (and When to Throw Them Away)
Handling your leftovers properly is one of the most important steps in making sure the food you prepare doesn’t make you sick when you’re ready to enjoy it again. One time, a Belgian college student ate pasta he left out at room temperature for five days and sadly passed away shortly after. In order to avoid a repeat of that situation, I’ll remind you of the “danger zone.” Bacteria in food loves to quickly multiply in temperatures between 40 and 140 degrees F, so you only have about 2 hours after you’re done cooking to safely cool your food down and throw it in your fridge.
If you have a larger cut of meat, cut it into smaller pieces or thinly slice so it will cool down faster. Afterwards, you’ll want to tightly wrap it in plastic wrap, throw it in a plastic bag, or use another kind of reusable storage bag, and into the fridge it goes. However, you’ll more than likely have a big pot of soup or lots of extra pasta to be putting away. In that case, divide whatever it is you have into smaller portions so they can cool rapidly in the fridge – small, reusable storage containers are perfect for this job (make sure to get ones that are microwave safe to save yourself time doing dishes). Dividing your food up into manageable servings makes them quick and easy to heat up and enjoy later.
Heating back up leftovers is pretty simple, but there are a few things you should watch out for. The general rule of thumb is for your leftovers to reach a temperature of 165 degrees Fahrenheit throughout, which you can check with a food thermometer. You can reheat all your leftovers in the microwave, just make sure that you cover them so they retain their moisture. If you want the best flavor, you should try warming leftovers on the stove or in the oven! Soups are the easiest to reheat because the process isn’t that different from cooking it in the first place. Dump your leftover soup into a small saucepan, cover it and then bring it to a sustained, rolling boil. Voila! You’ve safely reheated your soup for consumption.
It’s important to remember that leftovers don’t last forever. The Mayo Clinic recommends tossing your food after four days in the fridge, though some foods like fish are more delicate and should probably really only last two days at most. If you don’t think you’ll be able to make this 4 day deadline, don’t fret, freezing is definitely an option. If you’ve already wrapped them up airtight, you’re good to pop them in the freezer and they’ll be perfectly edible for three to four months. They’ll be edible indefinitely, but as time goes on they’ll lose a lot of moisture and flavor. When you’re ready to enjoy them again, you’re safe to reheat them from frozen, but if you’re going to defrost them make sure to do so in the fridge to avoid the “danger zone.”
Related Content:


