


How to Glaze a Ham: Your Complete Guide
Learn how to glaze a ham with this simple, step-by-step guide. Go beyond how-to information and learn when a glazed ham should be served, as well as variations on glazing techniques.

Levi Brown
There's nothing quite like the sweet yet savory taste of glazed ham. The smoky, salty flavor of the meat pairs delightfully well with the sweetness of the glaze, making this one of the most-popular dishes for holiday dinners, as well as for regular family get-togethers and gatherings with friends — birthday parties, family reunions, housewarming celebrations and big-game bashes alike.
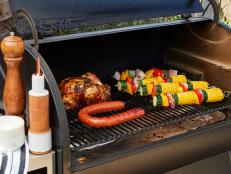
In beautiful weather, you can even attempt to do a grilled glazed ham, one of our favorite unexpected dishes that's sure to wow your guests.
Learning how to glaze a ham is surprisingly simple and can yield some delicious results.
Assemble your ingredients
First, you'll need some basic ingredients:
- Ham
- Pineapple slices (20-ounce can, or 1 pineapple sliced, but reserve 1/4 cup of juice)
- 20 whole cloves
- 1 jar maraschino cherries
- Light brown sugar (3/4 cup packed)
- 2 tablespoons yellow mustard
Note that there are optional ingredients that you can add or substitute as you like, but we recommend getting the basic recipe down first. Some alternative ingredients include:
- Dark brown sugar rather than light brown sugar
- Jam or fruit preserves
- Honey
- Vinegar
- Cinnamon
- Ginger
- Maple syrup
- Oranges
Cook the ham
In almost all cases, you will actually be heating an already cooked ham. If your ham says something like "Ready to eat" or "Ready to serve" on the label, then it is already cooked. In this case, you'll want to preheat your oven to 325 or 350 degrees F, then follow the directions on the package for how long to heat the ham before serving. The glaze should not be applied until the final hour to 30 minutes, in order to avoid burning the sugars.
What you're going to do with the glaze ingredients is just combine most of them into a paste, and then apply it to the ham. After that, the heat in your oven will take care of everything. The sugars will slowly melt and turn into a glossy, sweet coating (glaze). However, cooking your ham at too high a temperature or for too long will lead to a charred glaze, and no one likes it burnt.
Make your glaze and apply it
Roughly 30 minutes before your ham is done cooking, remove it from the oven. Apply the pineapple slices to the ham — feel free to get creative with your design. It doesn't really matter how you put them on, so long as you don't overlap them. Use the whole cloves to hold the pineapple slices in place (think pushpins). If you're going the classic route, you'll want to put one cherry in the center of each pineapple ring, using a clove to secure it. (If your cloves aren't working well, you can use toothpicks just as easily.)
Now you'll want to bring together all the ingredients for the glaze. Combine them in a separate mixing bowl, including the pineapple juice. You want the consistency to be pretty thick but spreadable. Spoon the glaze over the entire ham, or apply it with a basting brush. Larger hams may need repeated applications of glaze. Use honey or maple syrup to create a glossier ham by brushing it on over the glaze as a final step.
Put the ham back in the oven and finish baking. When it's ready, you should be left with a delicious, glazed ham that will delight your guests.
Related Stories:


