


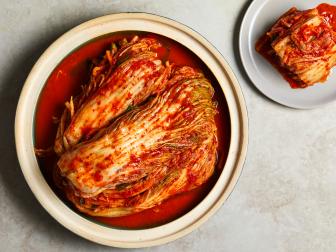
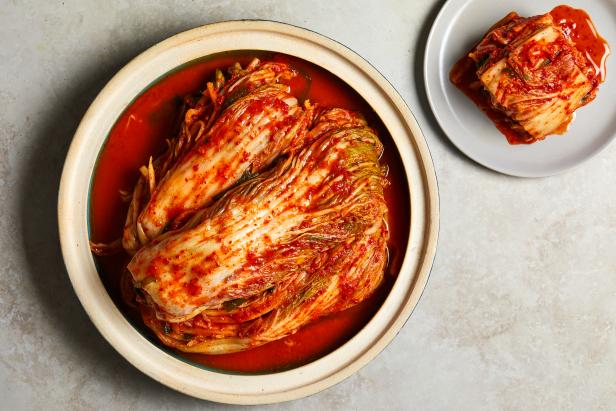
An Essential Guide to Making Napa Cabbage Kimchi
Our expert introduces the nuances of the ingredients and walks us through her technique for making kimchi with jeongseong.


LUCY SCHAEFFER PHOTOGRAPHY / FOOD STYLING: JACKIE JI YOON PARK
This kimchi recipe is very personal, as all kimchi is. When I developed this recipe, I tried to mimic my grandmother’s technique. She uses very simple and humble ingredients, which is how kimchi is meant to be made. Kimchi has been around as a food preservation method for thousands of years, but even just decades ago, the vegetables many Koreans had access to year-round were limited, and it was not common to own a refrigerator, since it was expensive. Fridges were pretty unavailable throughout my grandmother’s life and partially my mom’s life. With such limited resources, kimchi had to be made with few ingredients and preserved throughout the year, by fermenting in clay earthenware pots called onggi that get partially buried in the cold earth of late autumn and winter.
The women in my family discuss how each step in kimchi-making (and as a matter of fact, all foods) should be made with purpose, care and intention. There is a Korean word called 정성 (jeongseong) which translates to "one’s sincere heart," and in Korea, there is a saying that goes something like "flavor comes from jeongseong." If something is made with jeongseong, it means you’re taking care of the components of the dish, and taking the time to season and mix everything with clear devotion. If you search the internet, there are so many easier, faster kimchi recipes, but nothing beats kimchi made with jeongseong. My recipe might be a little longer, but it creates a flavorful, effervescent, salty, spicy kimchi.
That said, this recipe (find the full ingredient list and instructions here) can also act as a guideline — a blank canvas on which you can add and subtract ingredients and steps to your liking. Just keep in mind that the flavor will change as you do so, and you should have a little experience in how foods ferment. If you’re new to kimchi, I’d start with this recipe and research a bit more before getting too creative. For instance, adding oysters would amp-up the freshness, but I’d recommend eating it within 2 to 3 weeks; oysters can break down within the kimchi if kept too long. Or you could add minari, and the kimchi would become herbaceous, but the minari could also overpower the rest of the ingredients. You could also try adding carrots for color.
Here’s how to make my recipe:
The Ingredients

LUCY SCHAEFFER PHOTOGRAPHY / FOOD STYLING: JACKIE JI YOON PARK
The basic ingredients for kimchi always include gochugaru, garlic, ginger, fish sauce, rice glue, salt and sugar. When making just about anything, you should always start with good quality ingredients. Same goes for kimchi. (And in this case, good quality does not mean expensive.) Here’s how to know what to look for when buying the ingredients and how to prep them (get the full list of ingredients in my recipe).
Napa Cabbage

LUCY SCHAEFFER PHOTOGRAPHY / FOOD STYLING: JACKIE JI YOON PARK
Always look for compact, crisp, firm cabbage with little to no brown spots on the ribs. The outer leaves should be green and the inner leaves should be yellow throughout; if the leaves are just white, the cabbage is likely to be bland. Check the root end of the cabbage; it should be firm to the touch. If it is soft as you press on it, the cabbage could be old. Avoid buying small napa cabbages that are thin, brittle or have a lot of holes or wilted leaves. Go for medium-sized heads (3 to 5 pounds); anything bigger is usually quite bland.

LUCY SCHAEFFER PHOTOGRAPHY / FOOD STYLING: JACKIE JI YOON PARK

LUCY SCHAEFFER PHOTOGRAPHY / FOOD STYLING: JACKIE JI YOON PARK
Prep: Remove any outer leaves that are wilted and spotty, but remember to keep a few as they will encase the cabbage during fermentation. Shave off any brown areas near the root. Instead of cutting straight down to quarter the cabbage, make an incision from root end and split in quarters by hand to keep the leaves whole and natural-looking.

LUCY SCHAEFFER PHOTOGRAPHY / FOOD STYLING: JACKIE JI YOON PARK
Korean Radish
This ingredient is essential for adding freshness. Purchase one with prominent green color throughout the top half, which indicates firmness and sweetness. The skin should be smooth, with little to no bruises. If it feels too light, it might have lack of moisture.

LUCY SCHAEFFER PHOTOGRAPHY / FOOD STYLING: JACKIE JI YOON PARK
Prep: Wash and scrub thoroughly. Remove any bruises and cut into thin matchsticks. Don’t remove the peel; it has a lot of flavor.
Chinese or Korean Chives
Chives add a hint of spiciness that’s different from garlic. But if you add too many chives, it slows down the fermentation. So for summer kimchi, you’d add a lot to slow down the fermentation and during winter, you’d add less to speed it up. Chives should be vibrant green, fragrant and subtly spicy. Choose ones that are shorter and thinner; this indicates they were harvested at a younger age. If they’re too long and wide, they could be fibrous.
Prep: Discard any chives that are wilted and bruised. Cut off the thick, woodier ends about 1-2 inch from the roots. Wash thoroughly in a big bath of cold water, as there is a lot of sand in the chives’ roots.
Garlic and Ginger
You cannot do kimchi without garlic and ginger. They add spiciness and fragrance and help mellow out the fish sauce and salted shrimp. Use just a little bit of ginger; too much as it can add bitterness. If you intend on keeping and eating the kimchi for longer period, add less ginger.
Korean Coarse Sea Salt (Cheonilyeom)

LUCY SCHAEFFER PHOTOGRAPHY / FOOD STYLING: JACKIE JI YOON PARK
This unrefined salt improves and maintains the crispness of any kimchi. It’s salty and subtly sweet. It has more moisture content than other conventional salts, so it may stick to your hand slightly, and you can break it down between your fingers. If you have leftover salt and no longer need it for making kimchi, you can grind the salt in a spice grinder or blender and use it for cooking.
Glutinous Rice Flour
Making a rice glue is key to ensuring all the elements of the kimchi come together. Some people make kimchi without it, but I personally love using it as it helps prevent the kimchi from turning too sour. For summer kimchi, you’d add slightly less glue (or none) and in winter, more glue, since it also changes the rate at which the kimchi ferments. The subtle sweetness from the flour also complements the gochugaru well. Potato starch is a great substitute.
Gochugaru

LUCY SCHAEFFER PHOTOGRAPHY / FOOD STYLING: JACKIE JI YOON PARK
Always look for gochugaru that has a vibrant hue, smells fragrant and subtly sweet. Good quality gochugaru has specks of shine and luster. If the gochugaru is too spicy, it will mask the flavors of other ingredients. There are two kinds of gochugaru: coarse and fine. For kimchi-making, it’s important to get coarser gochugaru, as finer gochugaru is meant for making soups and side dishes. Look for packages that say "taekyung" or "taeyangcho" — this means the chiles have been dried in the sun. Darker gochugaru can create darker kimchi. For this recipe, you can definitely add less or more gochugaru, depending on your spice tolerance. Always store gochugaru in the refrigerator or freezer.

LUCY SCHAEFFER PHOTOGRAPHY / FOOD STYLING: JACKIE JI YOON PARK
Dasima/Kombu and Dasima Anchovies

LUCY SCHAEFFER PHOTOGRAPHY / FOOD STYLING: JACKIE JI YOON PARK
Dasima and dasima anchovies are a natural seasoning, as they are subtly salty and have umami; they round out the other spices and seasonings. Dasima should be thick and not brittle; good quality dasima is harder to break by hand. You can add more dasima broth (which also calls for dried shiitake mushrooms) to dilute the saltiness and spiciness when combining all the kimchi ingredients, but if you add too much liquid, the kimchi can become too watery.

LUCY SCHAEFFER PHOTOGRAPHY / FOOD STYLING: JACKIE JI YOON PARK
Prep: Bloom the dasima in water to allow it to release more flavor into the broth; it’s important not to skip this step. Bring the dasima up to a boil, but do not leave it in too long, as it will develop a sliminess and foam. For the dasima anchovies, split the bodies in half, and remove the head and guts, which are mostly black along the belly side. They can make the broth bitter if you leave them in.
Dried Shrimp
Like dasima anchovies, dried shrimp helps season and brighten the kimchi. There are many options for dried shrimp in Korean groceries and Asian markets, but I like the dried bori shrimp, which are smaller, sweeter, and less fleshy and fishy. You want to avoid layering with too much fishiness, as you already achieve that with the fish sauce and the fermented salted shrimp.
Fermented Salted Shrimp and Fish Sauce
These add depth to kimchi and speed up the fermentation. Salted shrimp should be bright pink, shiny and salty. Don’t use any that have started to disintegrate. You should be able to see individual shrimp heads and bodies in the jar. Salted shrimp brings out kimchi’s cooling taste.
A good quality fish sauce is relatively low in saltiness and is packed with umami and roundness. Always go for fish sauce that is not too dark — it should be slightly clear. The two most common varieties in Korean grocery stores are anchovy sauce and sand lance sauce.
Anchovy sauce (myeolchi) is made out of anchovies that have been simmered slowly and fermented. Sand lance sauce (kkanari) tends to be less fishy than the anchovy one, and it is better for kimchi that is going to be eaten right away or within a month or two.
You can certainly play around with a variety of fish sauces — taste and use whichever you like.


Apple
Instead of Korean pear, plum extract or even sugar, I use apple, but if you add too much sweetness, it accelerates the fermentation and creates in a watery, limp kimchi. Plum extract is made from green plums that have fermented in sugar or honey; it adds a mild sweetness and fruitiness to kimchi, but it is much more effective when making kimchi that is more water-based (like water napa kimchi or water radish kimchi), and meant to be consumed relatively quickly.
The Tools
Here’s what you need to gather before you begin.

LUCY SCHAEFFER PHOTOGRAPHY / FOOD STYLING: JACKIE JI YOON PARK
Set of Big Bowls
You need a big bowl for brining the cabbages and a second big bowl for salting them. And then you need another large bowl for mixing the vegetables, rice glue and paste, and coating and brushing the cabbages.
Rubber Gloves
Kimchi is traditionally made with bare hands. I personally love making kimchi without gloves, as it is such a tactile experience, but it’s really up to you! Just make sure to wash your hands thoroughly before and after. Avoid using your bare hands if you have any cuts (the gochugaru can burn). Plus your hands will turn red, and the smell of garlic, ginger and fish sauce will definitely linger even if you wash your hands thoroughly afterward! So if you prefer gloves, go for it.
Colander
To drain your cabbages after rinsing off the brine.
Food Processor or Blender
Traditionally in Korea, whole dried chiles, anchovies and/or shrimp are ground in a very large mortar and pestle, but a food processor or blender works fine.
Fermentation Container with an Inner Vacuum Lid or Weight
Weighing the kimchi down during fermentation is important as it releases juice and pressure builds up in the containers. Use a weight, clean stone, or plate to weigh down the kimchi. I love tradition and my dream is to store and ferment my kimchi in the traditional onggi but I live in a tiny apartment, so I recommend big wide-mouth mason jars or containers like this; it comes with an inner vacuum lid and really contains the smell of kimchi.


This is important: Make sure you thoroughly clean and dry the containers prior to loading them with kimchi!
How to Make Kimchi
Now it’s time to start making your kimchi! Here are some tips for getting it done right — find the full instructions in my recipe.
Brining

LUCY SCHAEFFER PHOTOGRAPHY / FOOD STYLING: JACKIE JI YOON PARK
Many people use various brine ratios for their kimchi, but here is the ratio I like: 1 napa cabbage, 1 cup salt, 5 cups of water. Salt is always divided into two: half is used for the brining solution and the other half is used for salting the leaves.

LUCY SCHAEFFER PHOTOGRAPHY / FOOD STYLING: JACKIE JI YOON PARK
Mix the brining solution in one large bowl, and grab a second bowl for seasoning each quarter of cabbage (any salt that collects in the bowl can be scraped back to the brining solution). After you dip each quarter in the brine, shake it dry and then salt leaf by leaf, sprinkling salt as you open and turn the leaves like you would turn pages of a book. You’ll need a 1/2 teaspoon to 1 teaspoon of salt per leaf. Make sure each leaf gets salted, and that most of the salt is closest to the root, rather than the leafy parts, as it takes more time for roots to get salted properly.
Don’t worry if you run out of salt — just continue salting with 1/2 teaspoon to 1 teaspoon per leaf. However, oversalting can deter the fermentation process, as the cabbages could get cured in salt before fermentation kicks in. So it is imperative not to use more than 1/2 cup of additional salt than what is called for in the recipe.

LUCY SCHAEFFER PHOTOGRAPHY / FOOD STYLING: JACKIE JI YOON PARK
After salting, dunk the cabbage into the brine cut side down. There will be a small volume of brining solution compared to the cabbage at first, so not all of the cabbage will be submerged. Therefore, it is very important to rotate and gently press down on the cabbage every 1 to 2 hours, to ensure each piece gets to sit in the brine at some point. The volume of the brining solution will increase as the cabbage loses moisture.

LUCY SCHAEFFER PHOTOGRAPHY / FOOD STYLING: JACKIE JI YOON PARK
If some quarters brine faster than others, it’s important to take them out sooner. The cabbage is ready when most of the leaves (not just the outer leaf) bend easily without breaking close to the root. If it snaps, it needs more time to sit in the brine. If it’s overly bendy, then you’ve gone too far; it might have lost all its sweetness and crunch. Over-brining can also slow down the fermentation process.
The amount of time this takes depends on the amount of salt in the brine, the weather or season, and the nature of the cabbage itself. During the hot summer, napa cabbage can be brined as quickly as 4-5 hours, but in fall it might need 8-9 hours, or in winter, 10 hours.

LUCY SCHAEFFER PHOTOGRAPHY / FOOD STYLING: JACKIE JI YOON PARK

LUCY SCHAEFFER PHOTOGRAPHY / FOOD STYLING: JACKIE JI YOON PARK
When the cabbage is finished brining, rinse it in running water and drain. Repeat this 3 times, or until the thick white part of the leaves (closer to the root) is no longer slippery. Taste the rinsed cabbage. It should be seasoned well. With root side up, grab the leaves and squeeze them very gently to get rid of excess water. Be careful not to rip any leaves. Then separate the leaves by shaking gently, and place the cabbage, root side up, in a colander to drain for another 1-2 hours. You’ll find that more than 1 cup of water will release; kimchi can be very watery if you skip this step.
The Dasima Broth, Rice Glue and Paste
While your cabbage is brining and draining, you can prepare the dasima broth, rice glue and paste — find the instructions for doing so in the full recipe.

LUCY SCHAEFFER PHOTOGRAPHY / FOOD STYLING: JACKIE JI YOON PARK
Here’s a quick overview: You’ll prepare the broth by adding the cleaned anchovies and dried shiitake to the liquid in which you’ve boiled the dasima. Boil, strain and cool completely. Two cups of this broth get combined and cooked with the rice flour and sugar to create the rice glue.

LUCY SCHAEFFER PHOTOGRAPHY / FOOD STYLING: JACKIE JI YOON PARK
To make the paste, put the fish sauce, dried bori shrimp, garlic, salted shrimp, quartered onion, ginger and apple in a blender and process until smooth. Transfer the blended mixture to your third large bowl and whisk in the gochugaru and glue until combined. Add the radish, chives and sliced onion and stir again until incorporated.
Coating, Brushing and Layering

LUCY SCHAEFFER PHOTOGRAPHY / FOOD STYLING: JACKIE JI YOON PARK
Working directly in the bowl with the paste, place a quarter wedge of cabbage down with the root end facing you. Starting with the outermost layer, gather the leaves and flip them open as though you’re turning the pages of a book. Use your other hand to brush roughly 1 tablespoon of kimchi paste one leaf at a time with fingertips, spreading the paste outwards from root to tip, and sliding most of the vegetables in the paste down toward the thick white part closest to the root. Make sure not to coat too heavily in the beginning, as there are many cabbage quarters to coat. When you’re done, each quarter should be thoroughly coated and there should be no white/yellow/green color visible.
Fermenting and Storage

LUCY SCHAEFFER PHOTOGRAPHY / FOOD STYLING: JACKIE JI YOON PARK
After coating all of the cabbage, place the leafy ends facing you, gently press down on all the leaves and curl them up. Then take two outermost leaves and wrap them around the entire quarter, to make a cute little purse (this wrapping isn’t absolutely necessary, but helps pack down any air pockets). Repeat this process with all the quarters.

LUCY SCHAEFFER PHOTOGRAPHY / FOOD STYLING: JACKIE JI YOON PARK

LUCY SCHAEFFER PHOTOGRAPHY / FOOD STYLING: JACKIE JI YOON PARK
Pack the cabbage in a clean, airtight container as tightly as possible, pressing down gently to squeeze out as much air as you can. Use a weight, stone or a plate to weigh down the cabbage, leaving an inch or more of space at the top of the container, as the cabbage will release liquid and build up pressure as it ferments. It is important to use containers that are sealed and air-tight, as the smell of kimchi is very potent.

LUCY SCHAEFFER PHOTOGRAPHY / FOOD STYLING: JACKIE JI YOON PARK
Allow the cabbage to ferment for 2 to 4 days at room temperature on a kitchen countertop, away from the sunlight or heat, opening the container every 1 to 2 days to release the pressure and press down to submerge the cabbage in its juices (this is especially important on day 1 and 2). How long it takes to ferment can depend on the season, temperature, humidity and your ingredients. The kimchi will release more liquid as it sits, and bubbles will start forming; it will become slightly effervescent. (Keep in mind that the kimchi juice ferments faster than the cabbage, so taste the cabbage, especially closer to the thick root parts, as it ferments.) The kimchi’s salt level, flavor and texture will change throughout the fermentation process; typically by day 3 or 4, I notice the flavor is much more round, deep and nuanced. When the kimchi has reached your desired level of pungency and taste, store in the refrigerator for up to 6 months.
LUCY SCHAEFFER PHOTOGRAPHY / FOOD STYLING: JACKIE JI YOON PARK
Each time you take some kimchi out from the container to eat, make sure to press down on the rest in the container, leaving the plate or weight on top, or cover with plastic wrap touching the surface of the kimchi. The kimchi needs to remain sitting covered in its juice for proper storage.
Even with refrigeration, the kimchi will continue to ferment, but at a slower rate. If fermented and stored correctly, kimchi can last between 3 to 6 months, but you might find you can keep it even up to a year or more. I’ve kept mine for a year in the fridge, but at that point, it definitely becomes more sour and even smells alcoholic. The texture changes as it sits for a long time — older kimchi is better off cooked into something rather than being served as-is. Overly sour and fermented kimchi, also known as mukenji, is best for making stews, kimchi pancakes/jeons, kimchi dumplings and kimchi fried rice.

LUCY SCHAEFFER PHOTOGRAPHY / FOOD STYLING: JACKIE JI YOON PARK


