


Recipe courtesy of
Jackie Ji Yoon Park
for
Food Network Kitchen
Recipe courtesy of
Jackie Ji Yoon Park
for
Food Network Kitchen
Watch how to make this recipe.
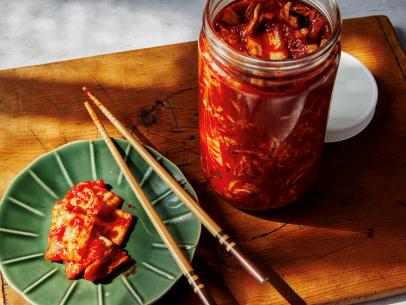
Baechu Kimchi
Getting reviews...
- Level: Advanced
- Total: 4 days 12 hr (includes brining, draining and fermenting time)
- Active: 2 hr
- Yield: about 25 cups
-
- Nutritional Analysis
- Per Serving
- Serving Size
- 1 of 8 servings
- Calories
- 192
- Total Fat
- 4 g
- Saturated Fat
- 1 g
- Carbohydrates
- 36 g
- Dietary Fiber
- 10 g
- Sugar
- 12 g
- Protein
- 12 g
- Cholesterol
- 10 mg
- Sodium
- 1807 mg
Napa cabbage kimchi is truly an iconic Korean food, yet there are so many different recipe variations. Almost every Korean will profess that their mother or grandmother's version is the best and I am no different. This recipe is my attempt to emulate my grandmother’s perfect kimchi, since she has kept the recipe a secret from me so far. It uses humble ingredients and a low-tech method, as kimchi was once buried in the ground to ferment before refrigeration. It is not quick and easy-- but my grandmother has said many times that kimchi is a labor of love and there should be no shortcuts. With a bit of planning and preparation, you can salt the cabbage and make the dasima anchovy broth and glue a day before, then leave the rest of the preparation for the next day. Either way, you will achieve a pungent, effervescent, spicy, sour kimchi that you are sure to agree is, well, the best.
- Level: Advanced
- Total: 4 days 12 hr (includes brining, draining and fermenting time)
- Active: 2 hr
- Yield: about 25 cups
-
- Nutritional Analysis
- Per Serving
- Serving Size
- 1 of 8 servings
- Calories
- 192
- Total Fat
- 4 g
- Saturated Fat
- 1 g
- Carbohydrates
- 36 g
- Dietary Fiber
- 10 g
- Sugar
- 12 g
- Protein
- 12 g
- Cholesterol
- 10 mg
- Sodium
- 1807 mg
Ingredients
Cabbage:
Dasima Anchovy Broth:
Rice Glue:
Paste:
Directions
- For the cabbage: Shave off any brown areas near the root of each cabbage and remove any outer leaves that are wilted or have holes, leaving a few for wrapping the cabbage in a bundle at the end of the coating process. Using a knife, make a 3-inch incision lengthwise from the root end of each cabbage and split open in half with your hands. Make another 3-inch incision from the root end of each half and split in half again into quarters.
- Make the brining solution: Combine 1 cup of the salt and 10 cups water in a large bowl and mix until most of the salt is melted. Dip each cabbage quarter in the brining solution and shake dry directly above the solution.
- After all of the cabbage is dipped and dried, use the remaining salt to distribute among the cabbage, working a quarter wedge at a time. Place the root end of each facing you, working over another large bowl. Gather the leaves with one hand and flip them open as though you’re turning the pages of a book; use your other hand to salt the leaves, 1/2 teaspoon to 1 teaspoon per leaf at a time, depending on the size of the leaf. Salt well on the thick white part, closer to the root, rather than the leafy ends. Make sure to use the entire 1 cup salt for this step. (If you run out of salt while salting, continue with more salt up to 1/2 cup; oversalting can deter the fermentation process, so do not go over 1/2 cup.)
- Once the cabbage is all salted, place back in the brining solution cut-side down. If there is any salt left behind in the large bowl (or any salt sticking to your hands), add it back to the brining solution. Rotate and gently press down on the cabbage every 1 to 2 hours to ensure each quarter is submerged in the brining solution at some point. In the beginning of the brining process, not all of the cabbage quarters will be sitting in the brining solution. Let sit at room temperature until the thickest white part of each becomes pliable and bends over in half without breaking, 6 to 8 hours. If the thick white part cracks loudly and there is a rip where you folded it over, then it needs more time.
- For the dasima anchovy broth: While the cabbage is brining, add the dasima and 4 cups cold water to a medium pot. Let sit until the dasima doubles in size and the water turns a slight green-yellow, about 30 minutes.
- Meanwhile, remove the heads of the dasima anchovies and split them in half along the spines to remove the guts. Set aside.
- Bring the dasima pot to a boil over medium-high heat; boil until the dasima starts to foam around the sides, 1 to 2 minutes. Discard the dasima, then add the cleaned anchovies and dried shiitake. Lower the heat to low and cook at a gentle boil (where you see 2 to 3 bubbles appearing on the surface at most), for 10 minutes. At this point, some broth will have evaporated and the remaining broth will be slightly darker. Turn off the heat and let sit for 5 more minutes. Strain through a mesh strainer. Reserve the pot for later use. Cool the broth completely in the refrigerator.
- When the cabbage is properly brined, drain it and discard the brining solution. Submerge the cabbage in a running bath of cold water and wash, massaging and rubbing the thick white part of each quarter between your fingers, one leaf at a time. Drain and repeat this 2 to 4 more times, until the thick white part closest to the root is no longer slippery. Tear off a piece of cabbage and taste. The cabbage should taste seasoned after a thorough wash. Hold each quarter wedge root-side up and with one hand, gently squeeze out the water from the leafy part. Be careful not to rip the leaves as you squeeze. Shake gently to separate the leaves and place back in a colander root-side up to drain for 1 to 2 hours.
- For the rice glue: Add the glutinous rice flour, sugar and 2 cups cold dasima anchovy broth to the reserved pot and whisk until combined. Place the pot over medium-high heat and cook, whisking constantly, until the mixture starts thickening and comes to a boil, 5 to 6 minutes. Switch to a silicone spatula, lower the heat to medium low and continue to cook, stirring, until the mixture is thick enough to coat the spatula, about 1 minute. (This mixture will thicken as it sits; you should have a total of 2 cups.) Remove from the heat and transfer to a heatproof container to cool immediately in the refrigerator.
- For the paste: Put the fish sauce, dried bori shrimp, garlic, salted shrimp, quartered onion, ginger and apple in a blender and process until smooth. Transfer the blended mixture to a large bowl and whisk in the gochugaru and glue until combined. Add the radish, chives and sliced onion and stir again until incorporated. (Keep in mind that this paste is supposed to be salty.)
- Place a quarter wedge of cabbge, root end facing you, in a big bowl. Gather the leaves with one hand and flip them open as though you’re turning the pages of a book; use your other hand to brush with roughly 1 tablespoon of the kimchi paste one leaf at a time, working from root to tip. Coat the entire leaf thoroughly with paste; slide most of the vegetables in the paste down by the thick white part closest to the root before moving on to the next leaf. Make sure not to coat too heavily in the beginning, as there are many cabbage quarters to coat. When finished coating, press down on all the leaves and curl up the leafy parts. Wrap the two largest, outermost leaves of each wedge around the entire wedge in a tight bundle. Repeat for the remaining wedges.
- Pack the cabbage in a clean, airtight container as tightly as possible, pressing down gently to squeeze out as much air as you can. Use a weight or a plate to weigh down the cabbage, leaving an inch or more of space on top, as the cabbage will release liquid and build up pressure as it ferments. Allow the cabbage to ferment for 2 to 4 days at room temperature on a kitchen countertop, away from the sunlight or heat, opening the container every 1 to 2 days to release built-up pressure and press down to submerge the cabbage in its juices. The kimchi will release more liquid as it sits, and bubbles will start forming; it will become slightly effervescent. (Keep in mind that the kimchi juice ferments faster than the cabbage, so taste the cabbage, especially closer to the thick root parts, as it ferments.) The kimchi will change in level of salt, flavor and texture throughout the fermentation process; when the kimchi has reached the desired level of pungency and taste, store in the refrigerator for up to 6 months.
- To serve, slice off the root and cut the kimchi horizontally in 1- to 2-inch pieces, keeping the leaves neatly stacked. Serve alongside rice and/or soup.
Cook’s Note
There are two kinds of gochugaru in Korean grocery stores. Make sure to buy a coarser version of gochugaru, as it is mainly used for kimchi making. Finer gochugaru is more widely used for soups, gochujang (Korean red chile paste) and side dishes. Add more gochugaru if you want more spice.